Overview of the Schedule Management Module
The Schedule Management Module in StaffViz simplifies employee scheduling, ensuring smooth workforce management. The module in StaffViz is divided into two major sections:
Shift Scheduling allows managers to create, assign, and manage work shifts, ensuring smooth workforce operations.
Break Scheduling helps define structured breaks within shifts, balancing employee well-being and productivity.
With features like filtering, sorting, and multiple viewing options, this module streamlines scheduling, making workforce management efficient and hassle-free.
This user guide will take you through StaffViz's scheduling functionalities.
Section 1: Shift Scheduling
Shift scheduling is important for work and managing employees when they need time off. This guide will show you how to use StaffViz's scheduling features. It will help you make your work easier and help your team get more done.
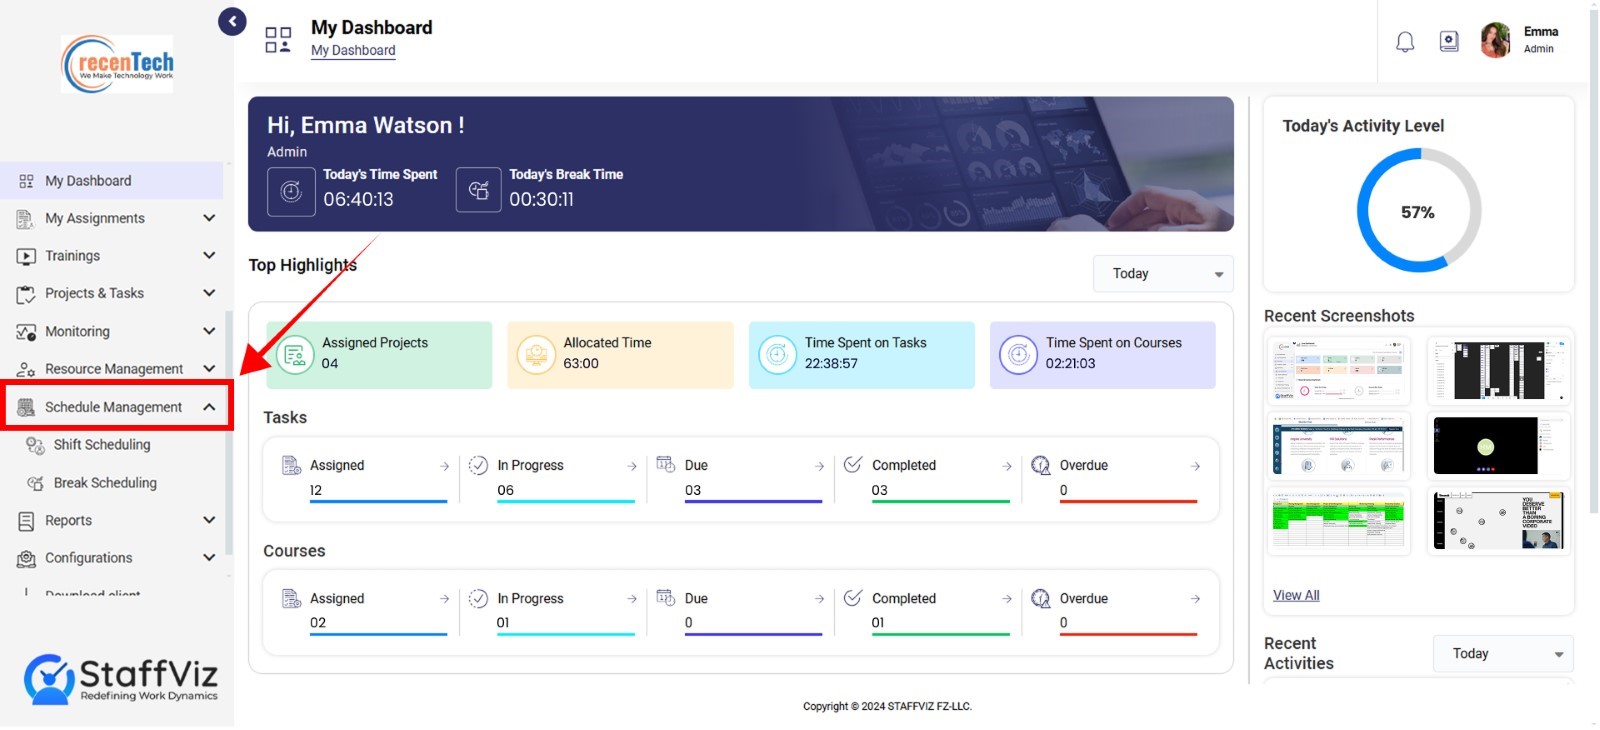
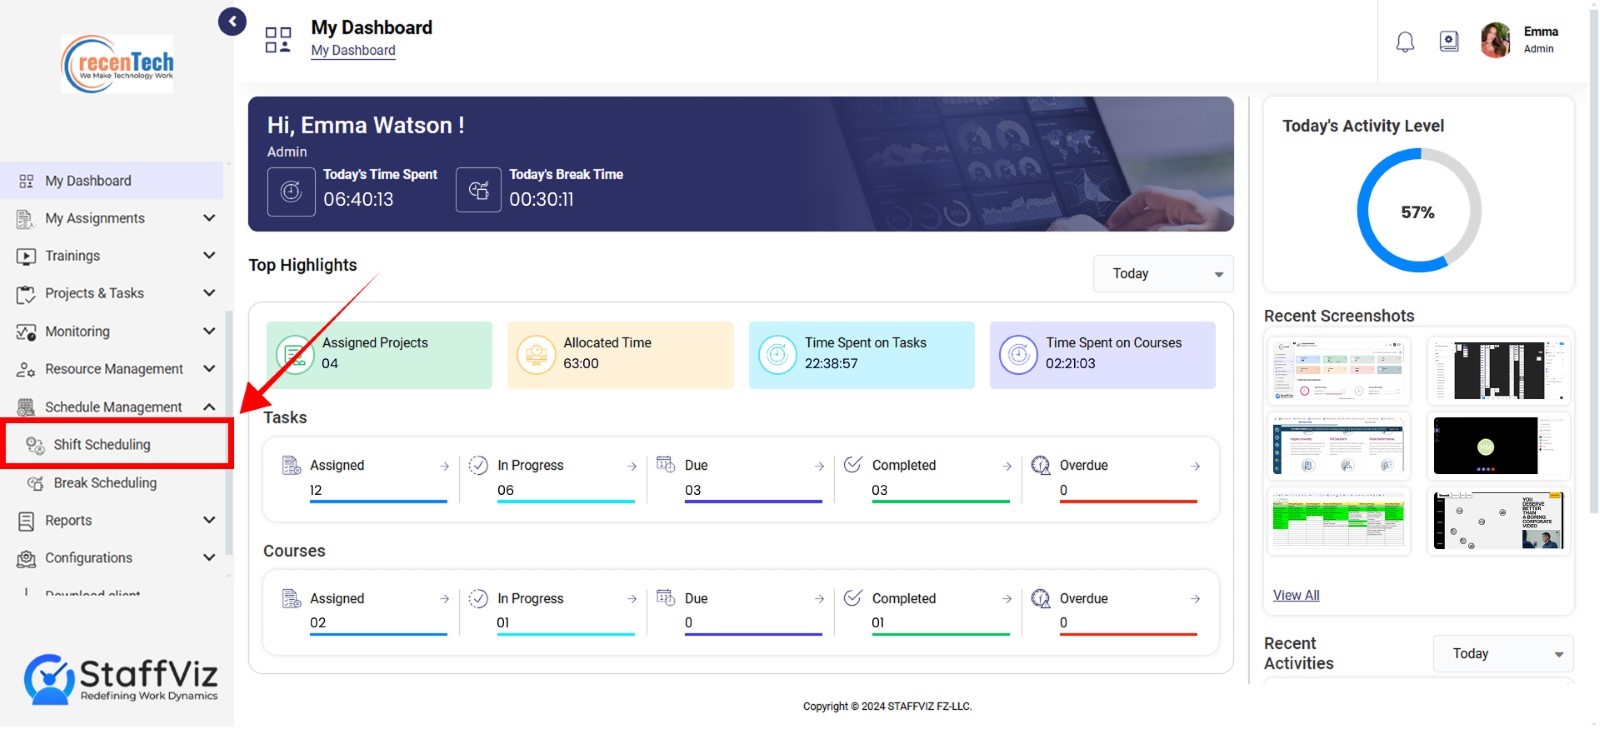
Step 1: Navigate to Shift Scheduling Section
Select Scheduling Management > Shift Scheduling from the main navigation menu.
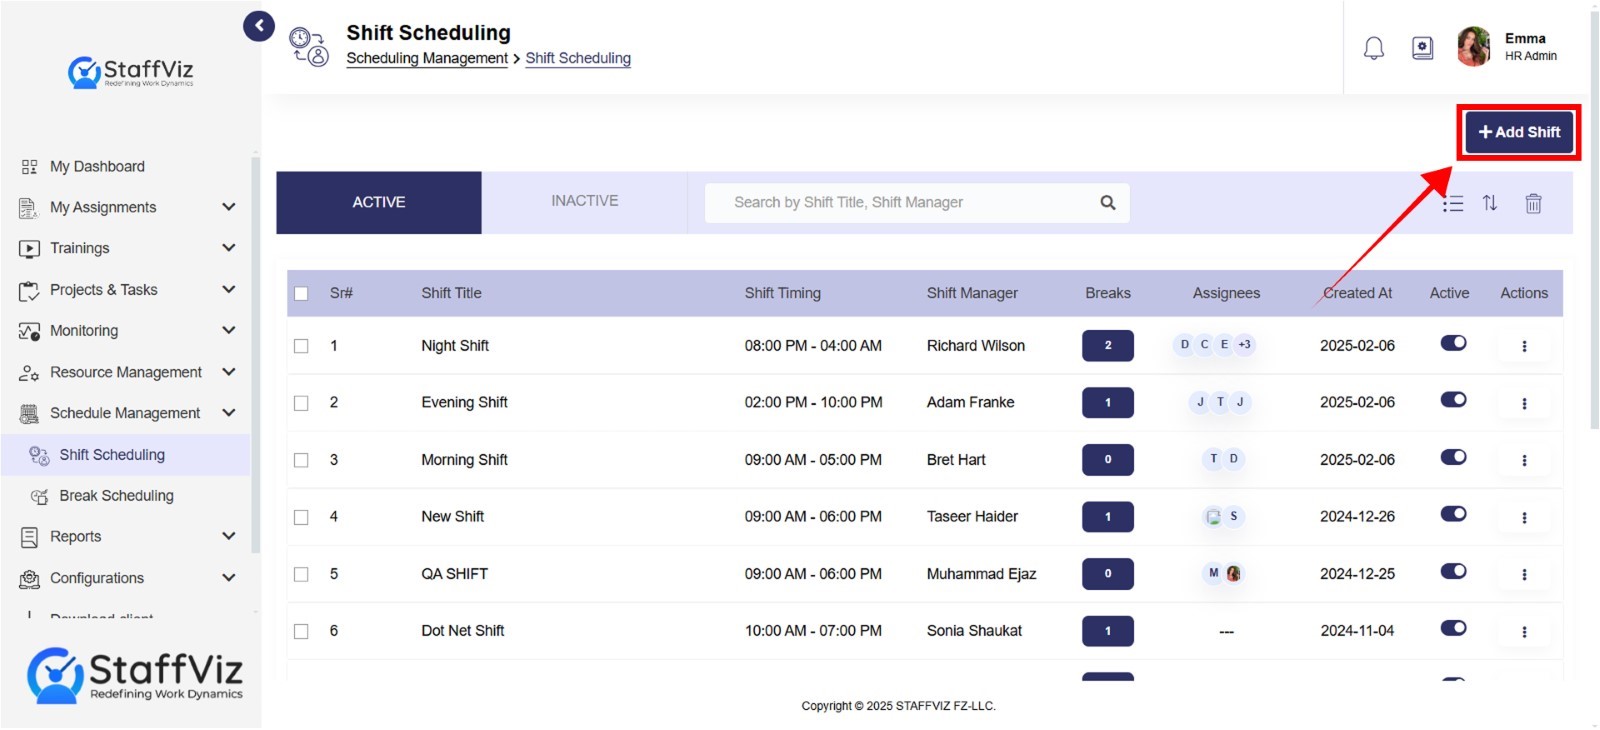
Step 2: Add Shift Button
Click Add Shift.
Section 1.1: Add a Shift
The add shift form covers the essential details for creating new shifts within StaffViz. The following are all the options discussed in detail.
Click the add shift button in the top right corner.
1.1.1: Add Shift Fields
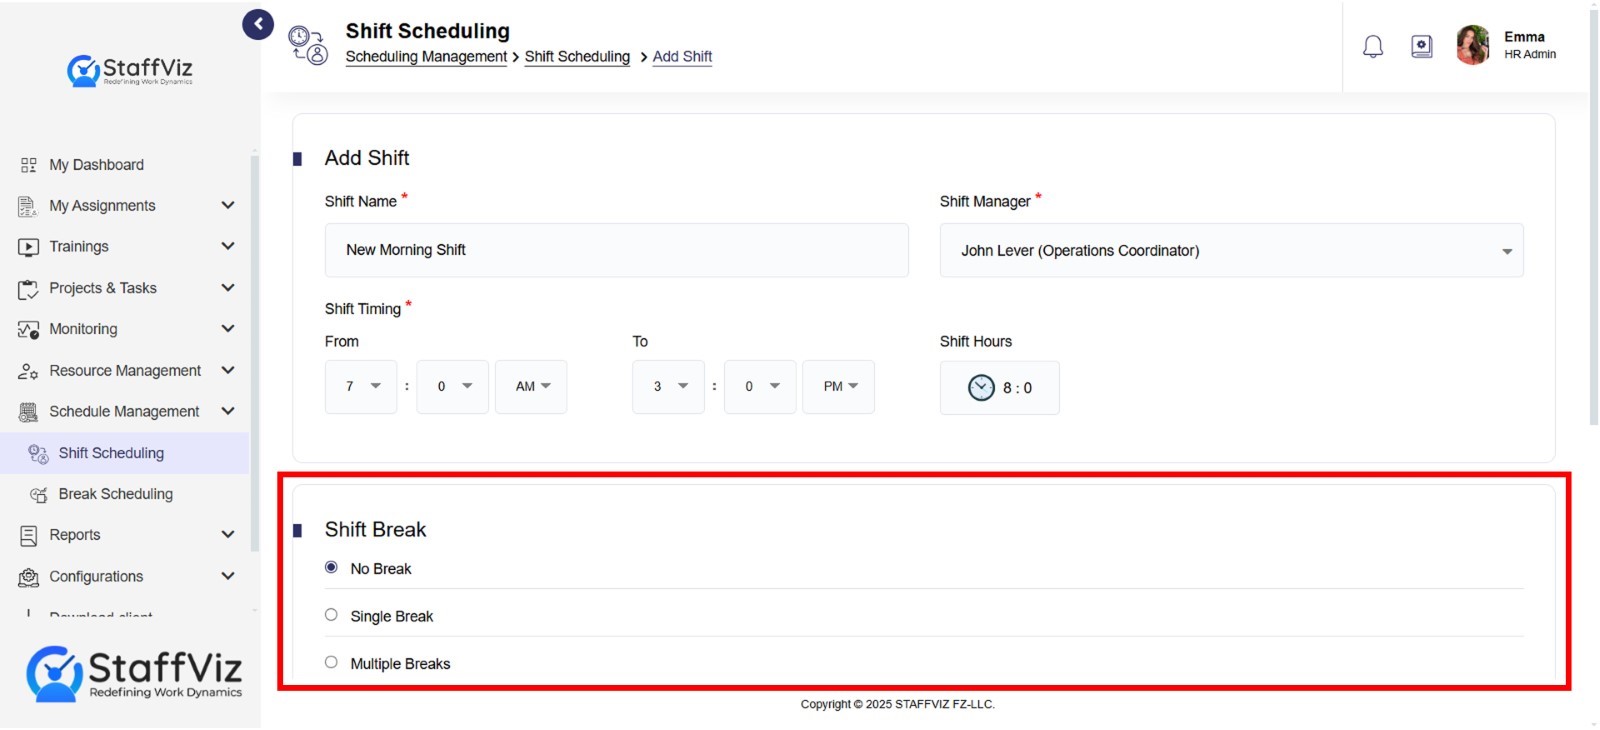
Shift Name (Required): This field allows you to assign a clear and descriptive name to the shift. For example, "Morning Shift" or "Night Shift."
Shift Manager (Required): Select the person who will be responsible for managing and overseeing this shift.
Shift Timing (To, From) (Required): Specify the start and end times of the shift using a clear time format (e.g., 09:00 AM, 05:00 PM).
Shift Hours: This field automatically calculates the total duration of the shift based on the "Shift Timing" (To, From) entries.
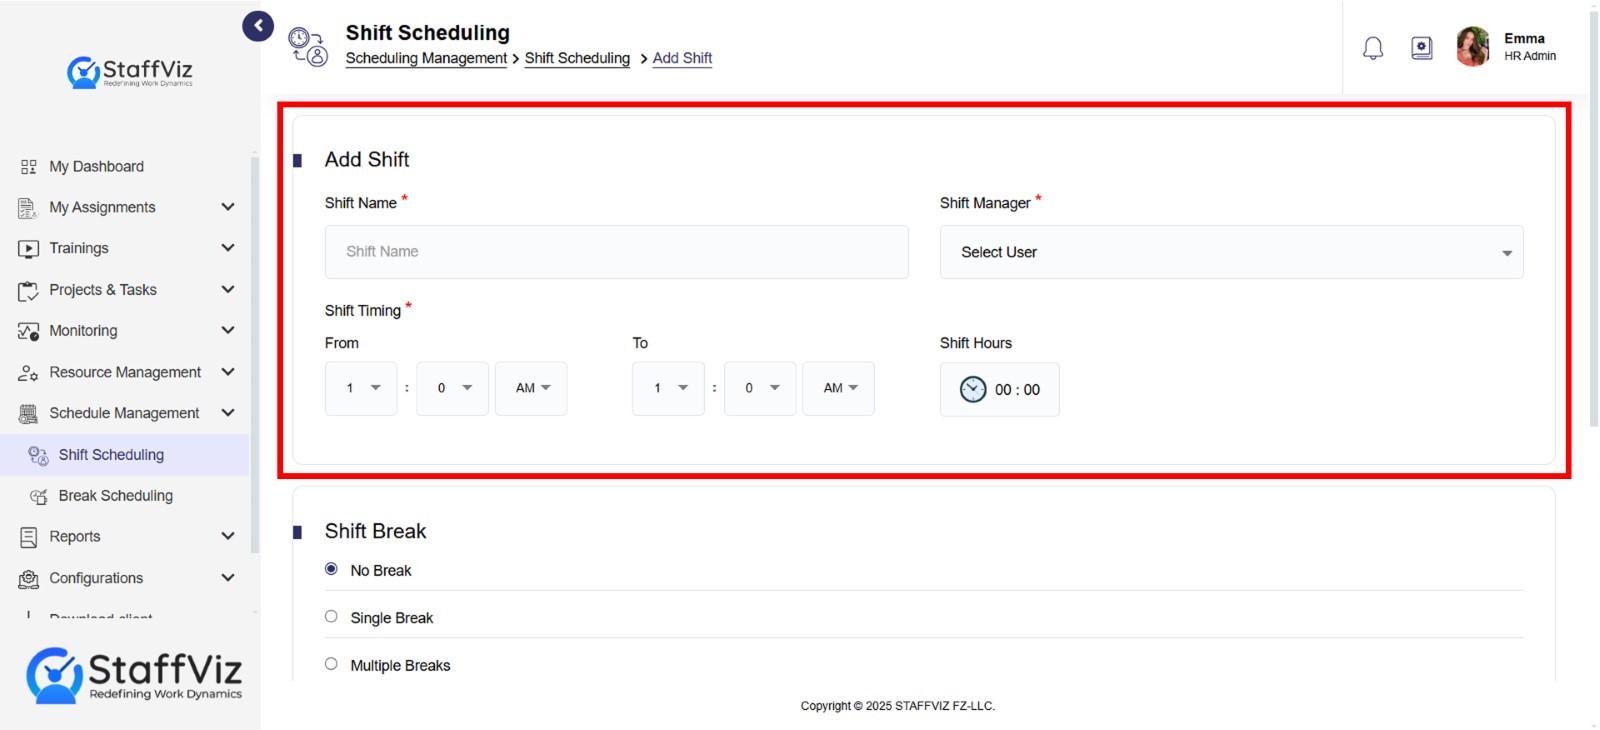
1.1.2: Shift Break
This section allows you to designate the break structure for the shift. You might have options like:
No Break: Employees will not have a scheduled break during this shift.
Single Break: Employees can take breaks at their convenience, provided they stay within the allocated break duration.
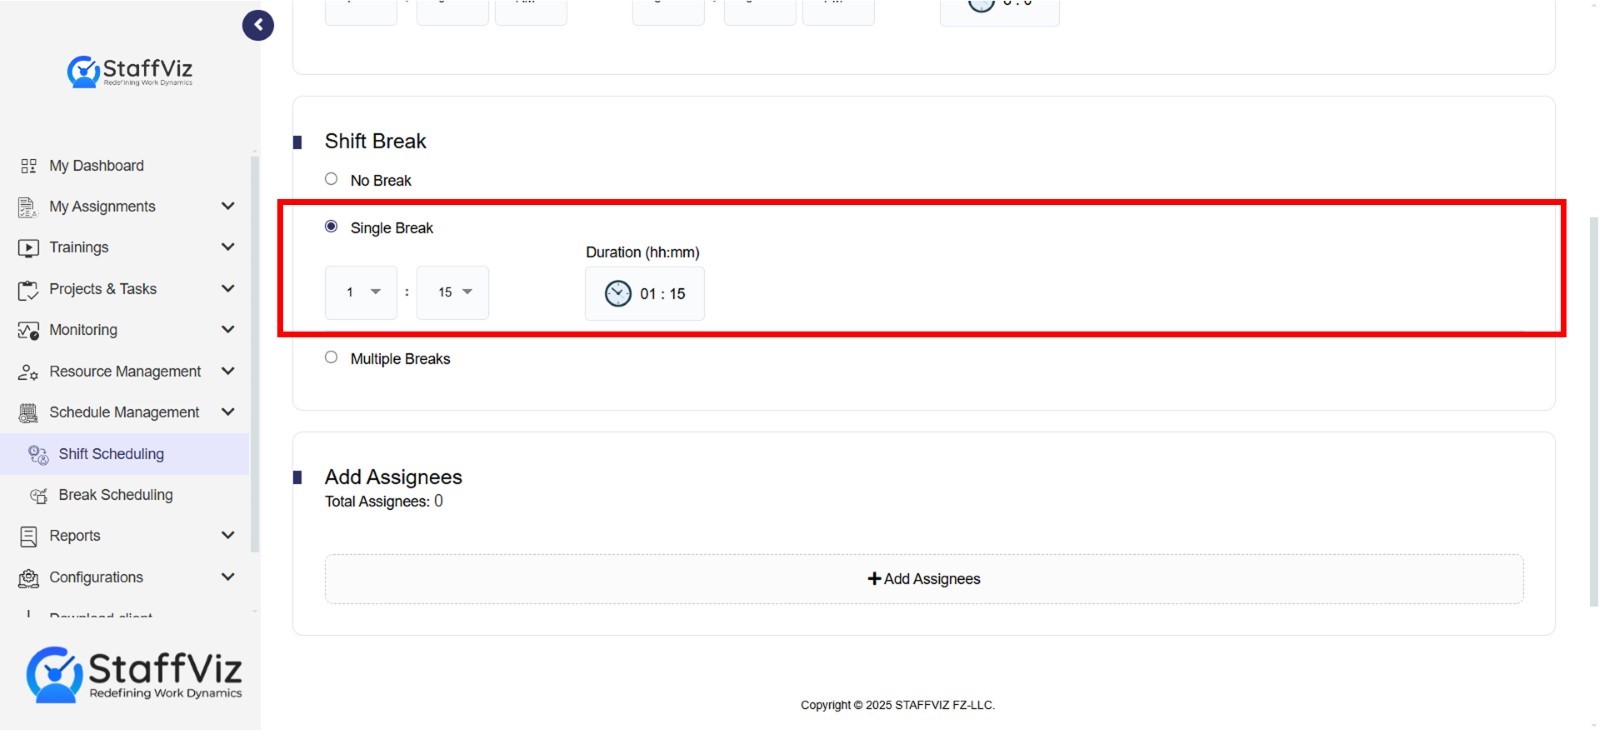
How to Setup a Single Break
Step 1: Navigation
Navigate to Shift Scheduling > Add Shift section.
Step 2: Select Single Break
Select the Sigle break options and setup the break duration using hours and minutes option.
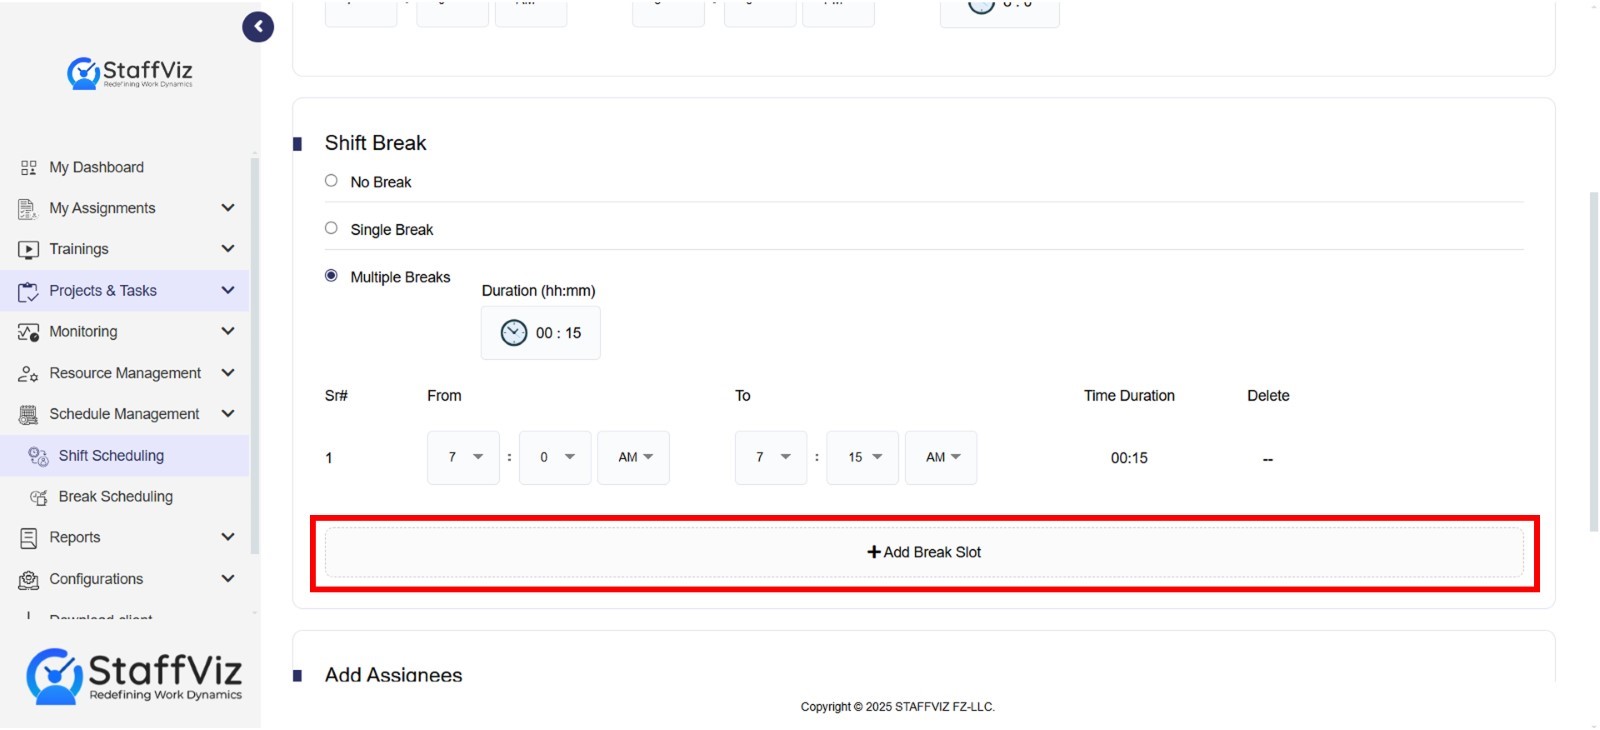
Multiple Breaks: Employees are assigned multiple fixed breaks with specific time slots. This means the break buttons only activate for specified time slots.
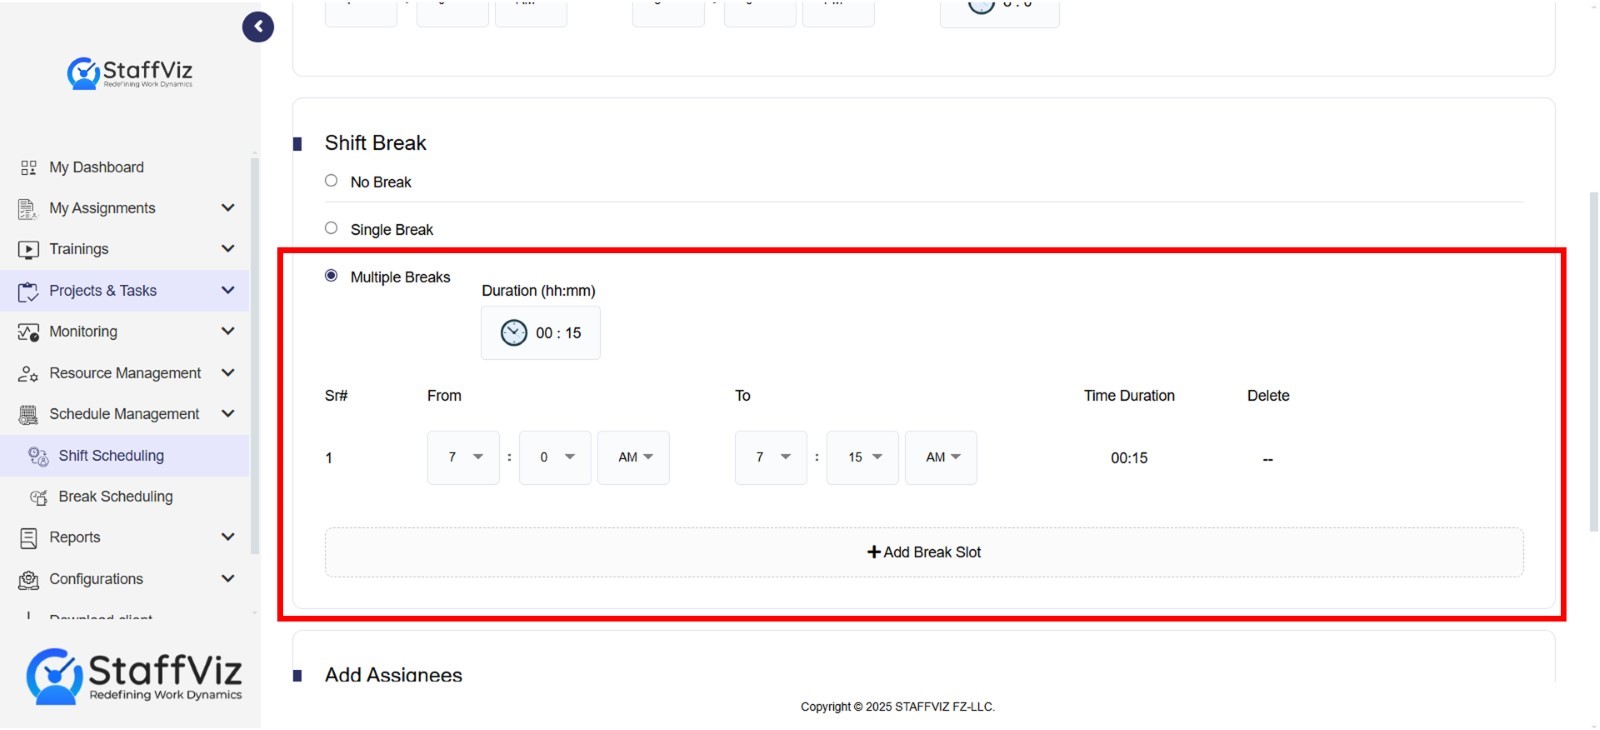
How to setup Multiple Breaks
Step 1: Navigation
Navigate to Shift Scheduling > Add Shift section.
Step 2: Select Multiple Breaks
Select multiple breaks in the shift break section.
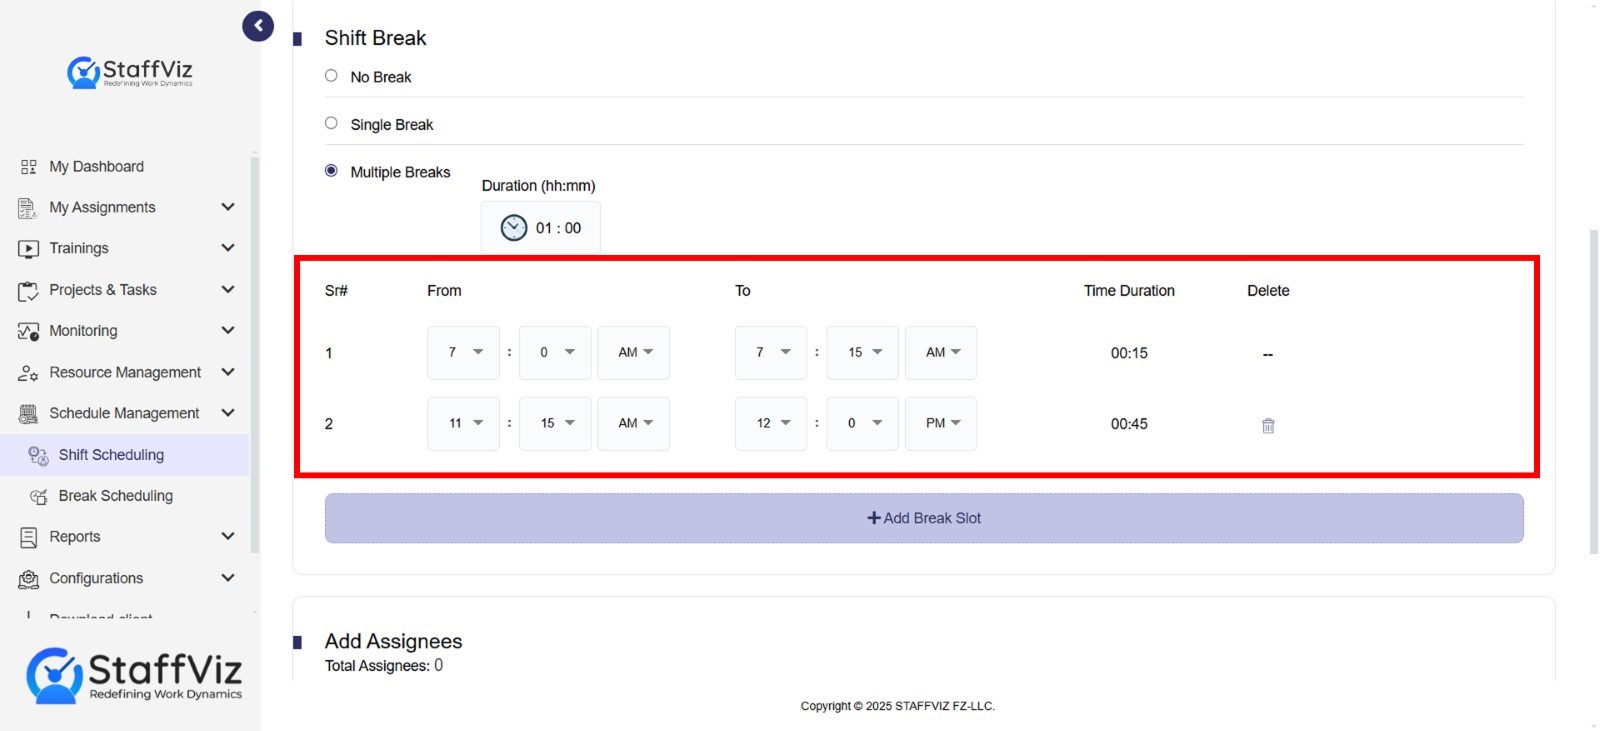
Step 3: Setup Specific Break Time
Unlike the Single break, Multiple breaks are fixed time breaks. So, you need to select the exact time using to and from options while keeping in mind that the break schedule must be within the shift hours. When you set up the to and from times the duration will be automatically calculated.
Step 4: Add Multiple Break Slots
To add multiple break slots, just click the Add Break Slot button and follow step 3 to set up the break schedule.
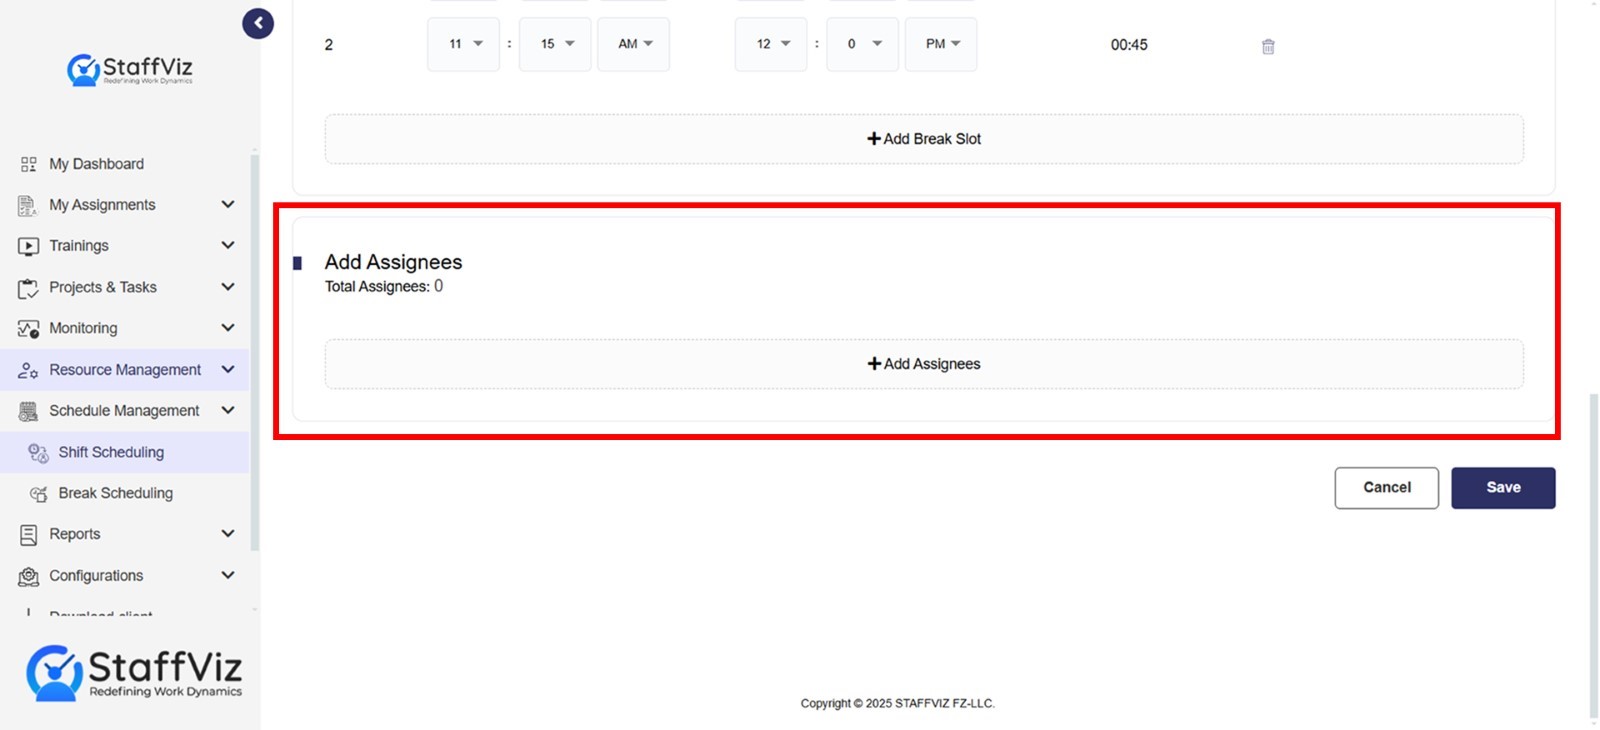
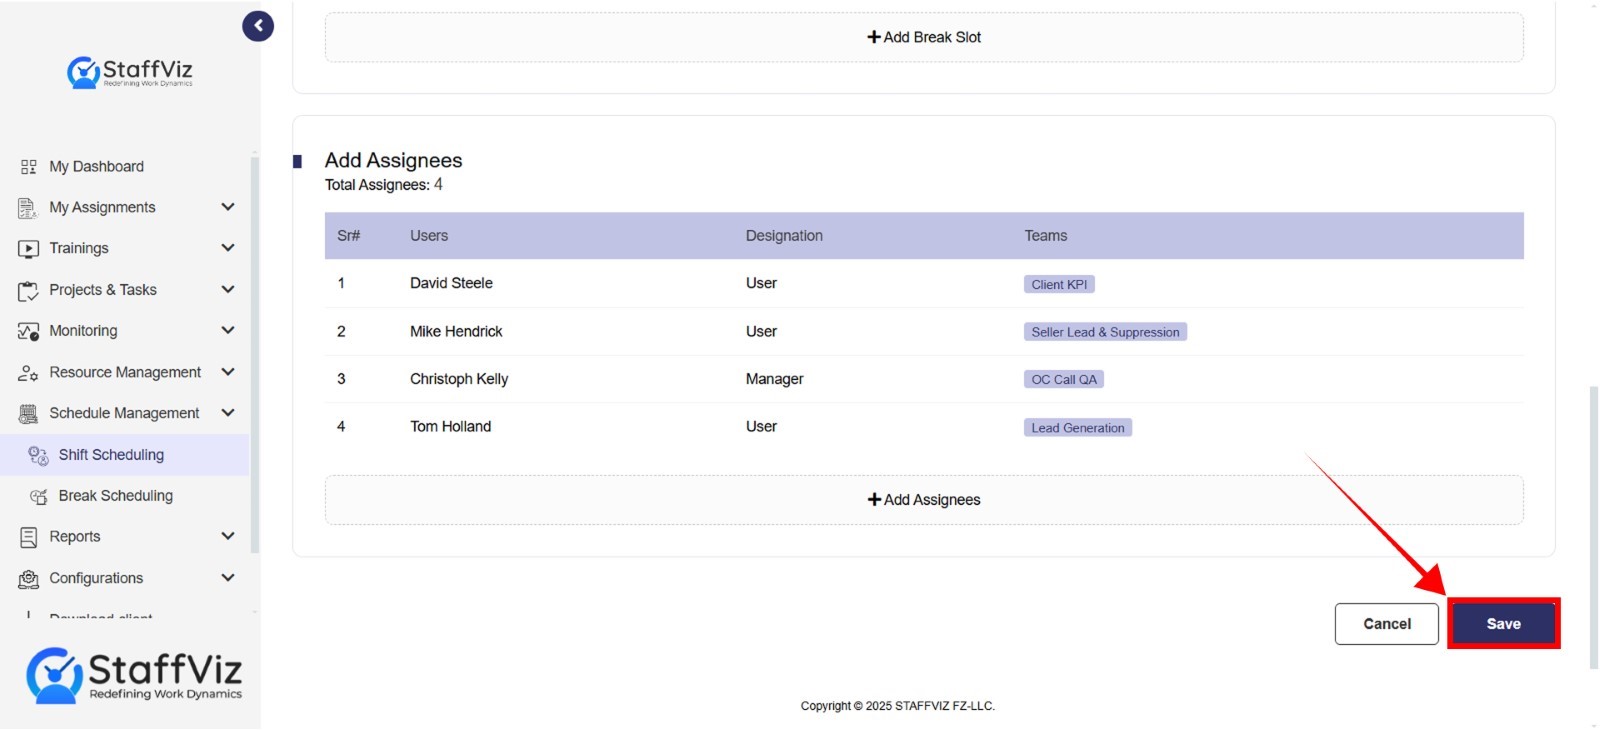
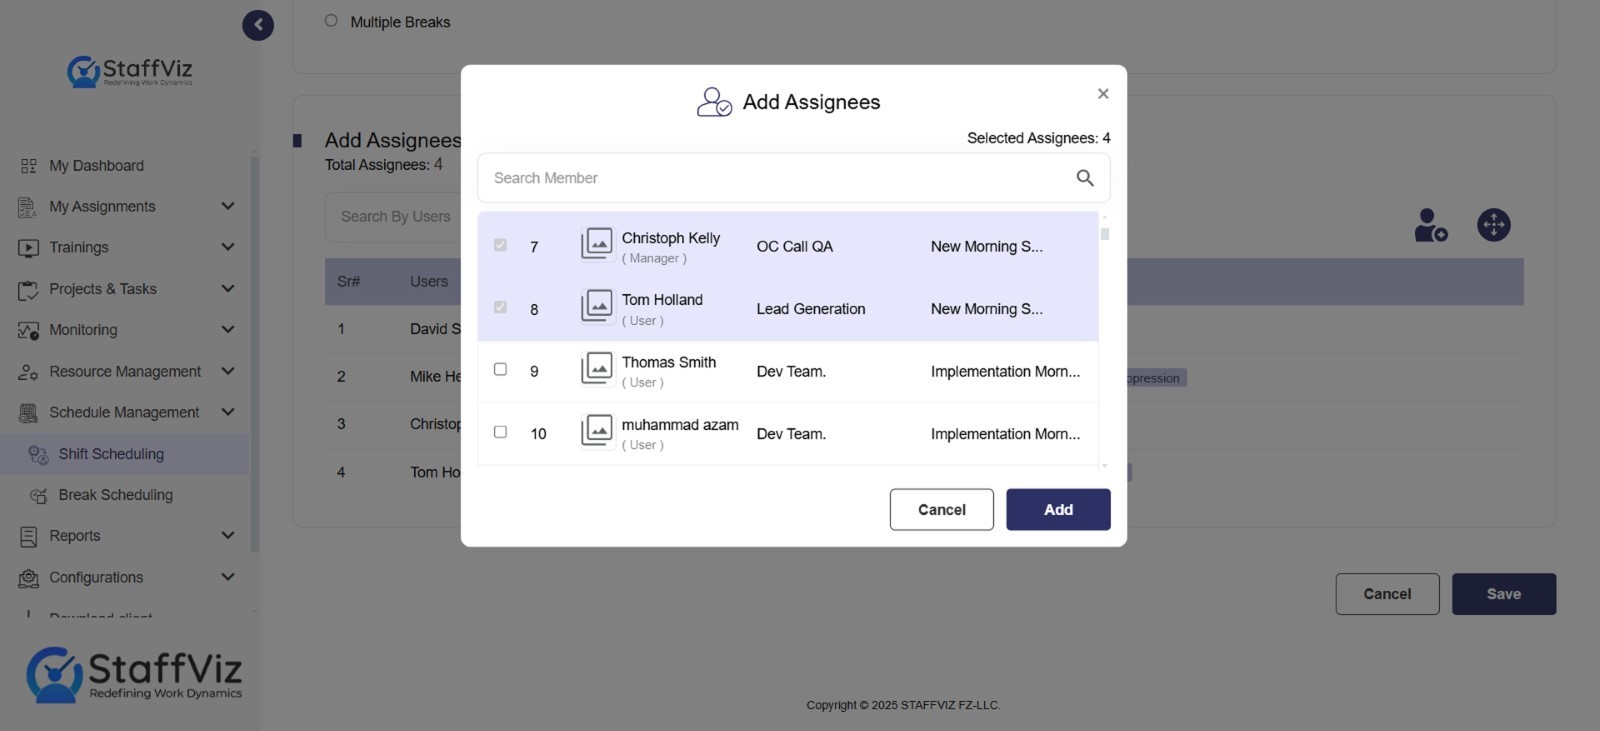
1.1.3: Add Assignee
This section allows you to search and select employees to be assigned to work in this shift.
Once you click Add Assignee button StaffViz offers different methods for adding assignees, such as
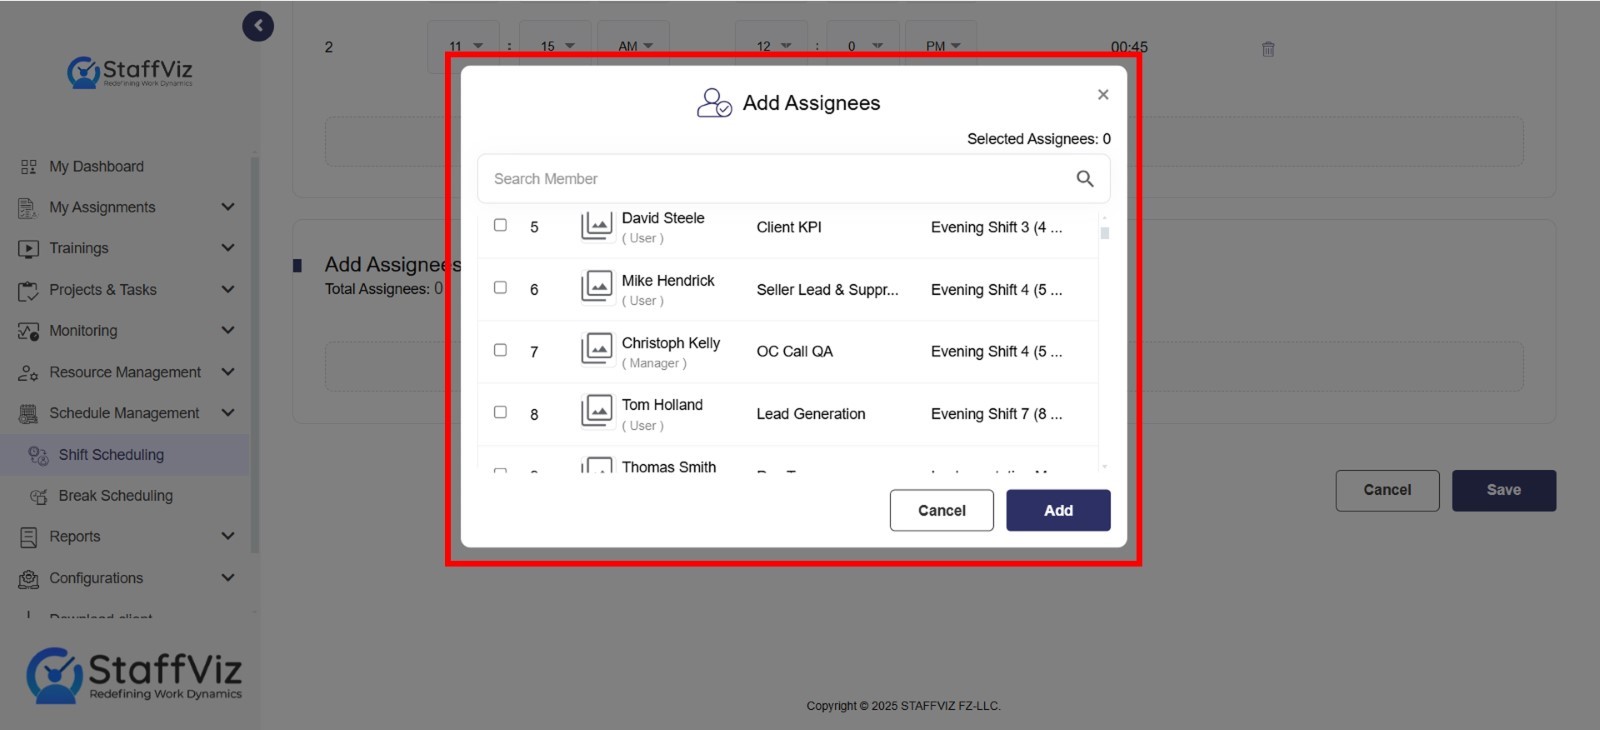
Selecting employees from a list.
Searching for employees by name.
Total Assignees: This field displays the current number of employees assigned to the shift.
1.1.4: Save
Click save to schedule this shift by saving all the previous settings.
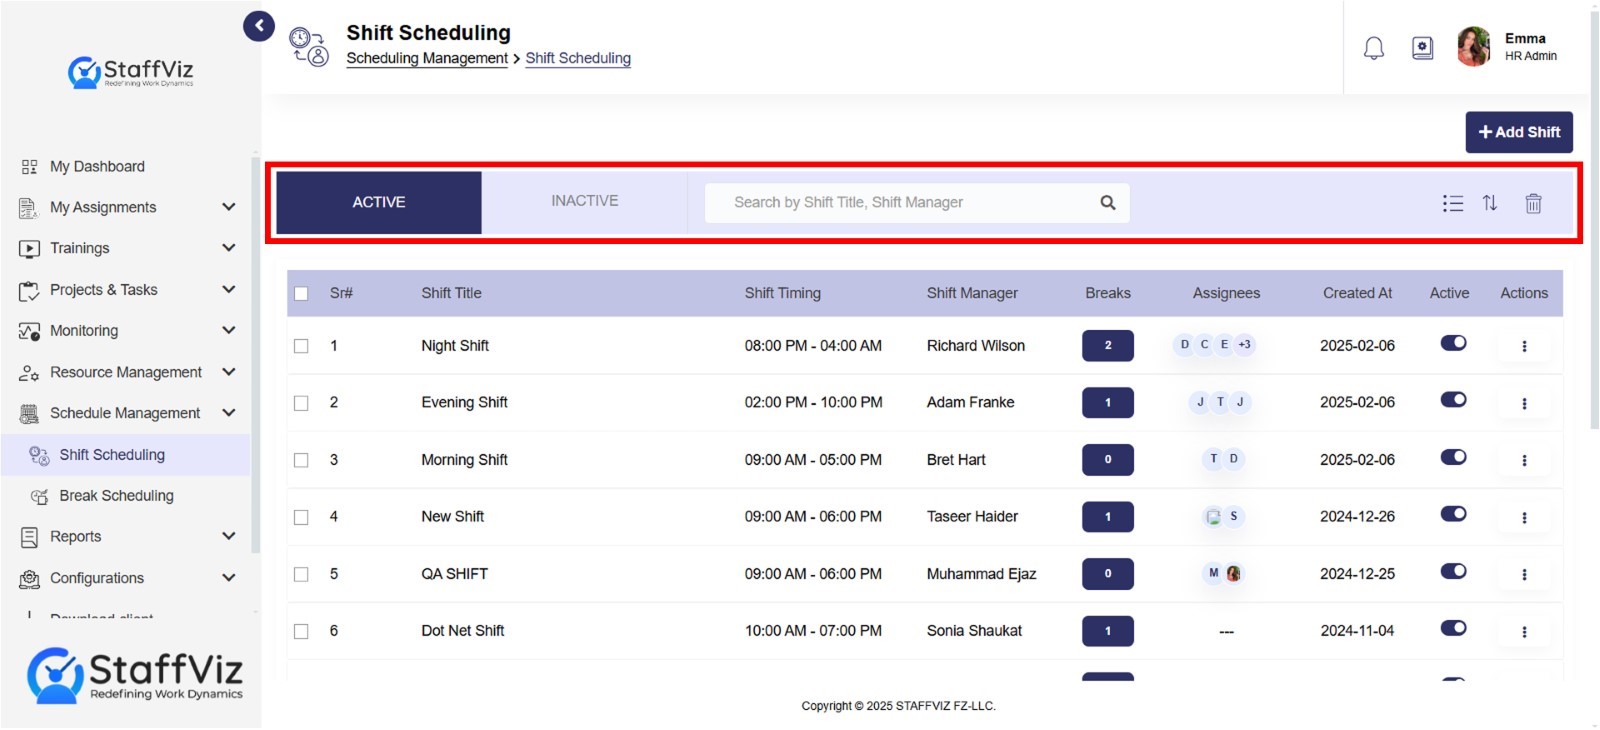
Section 1.2: Navigation Bar
The Navigation Section contains filters that allow you to manage shifts using various filters. Here's a breakdown of the available filters:
Active
Shows shifts added and are currently active.
Inactive
Shows shifts that are currently disabled.
Search Bar
Locate shifts(s) instantly by name or manager assigned to, saving time compared to browsing through long lists.
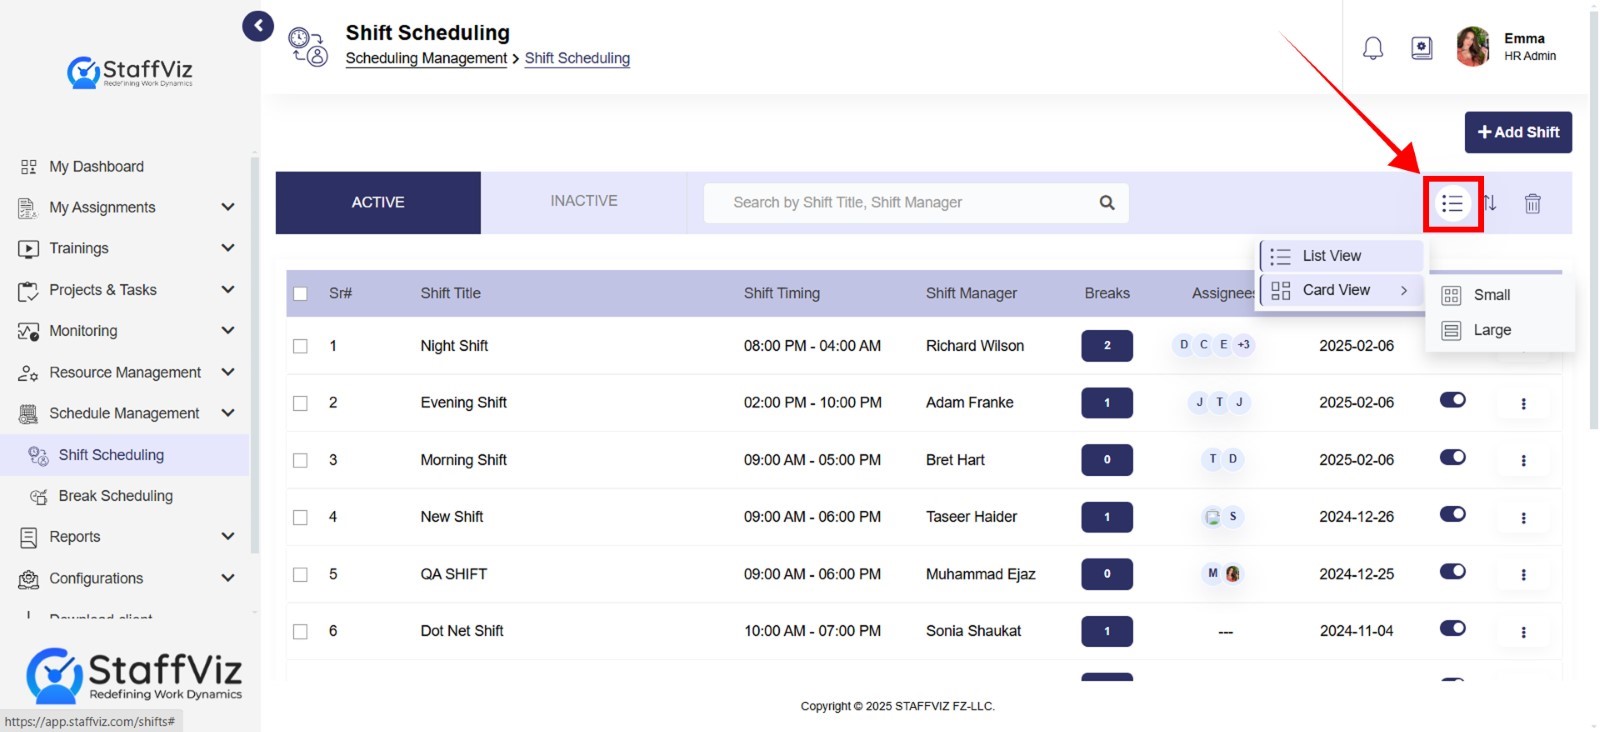
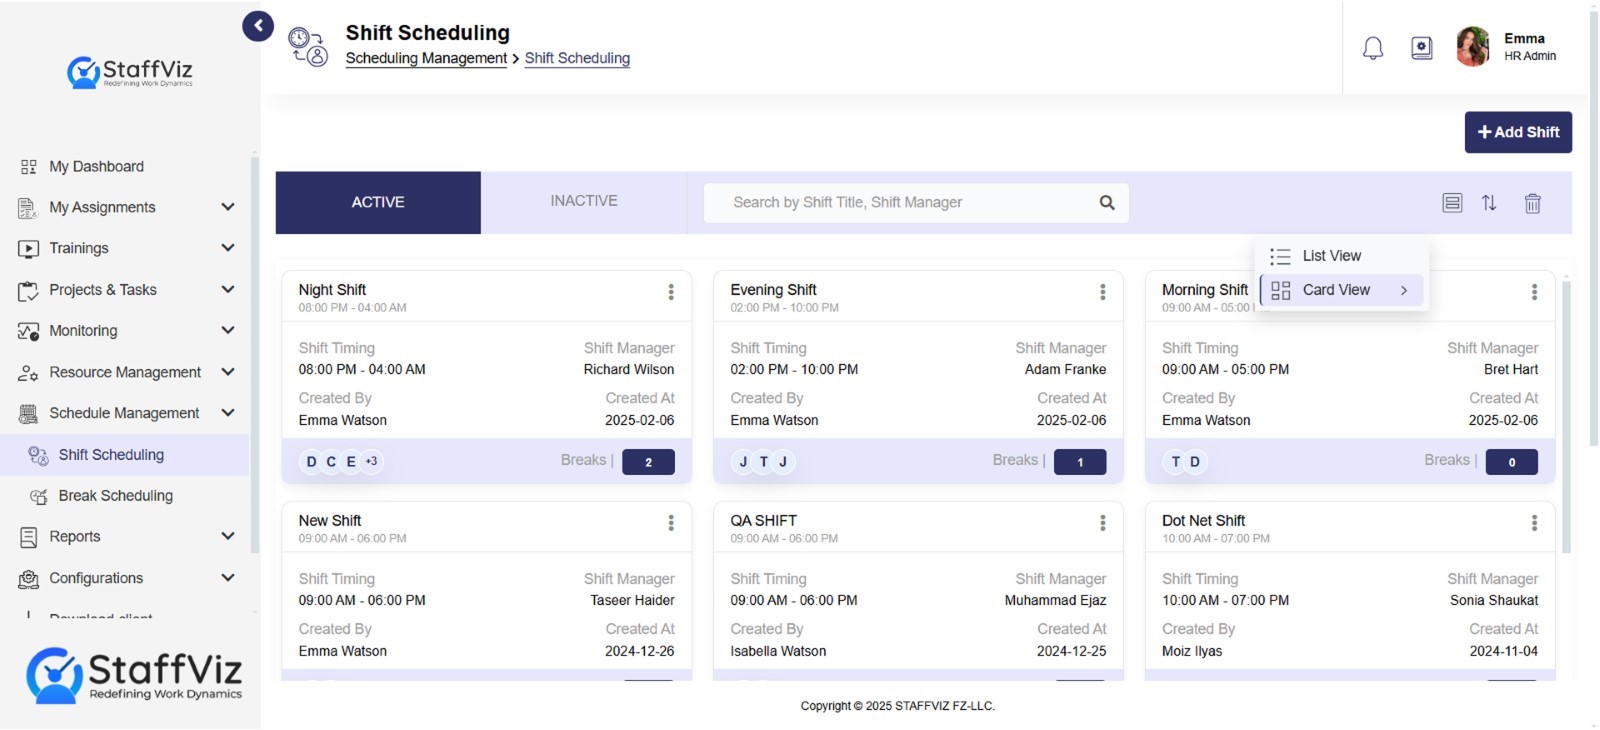
List/Card View
List views and card views are both methods for displaying information in a mobile app or on a website, they offer different visual presentations.
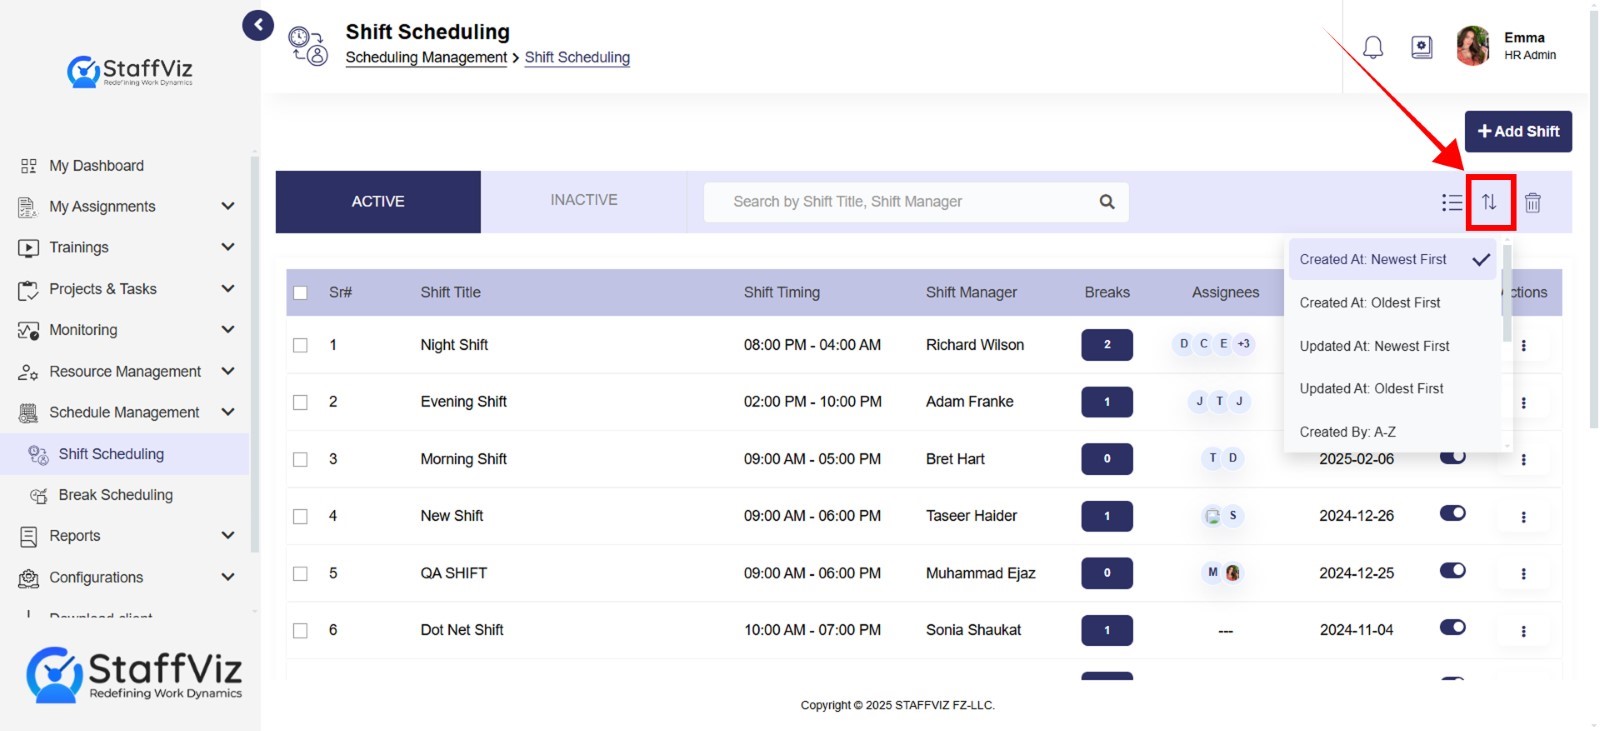
Sorting Options
Created At: Sorts shifts by the date and time they were initially created. This is a frequent sorting option, especially for chronologically tracking history.
Updated At: Sorts shifts by the date and time they were last modified.
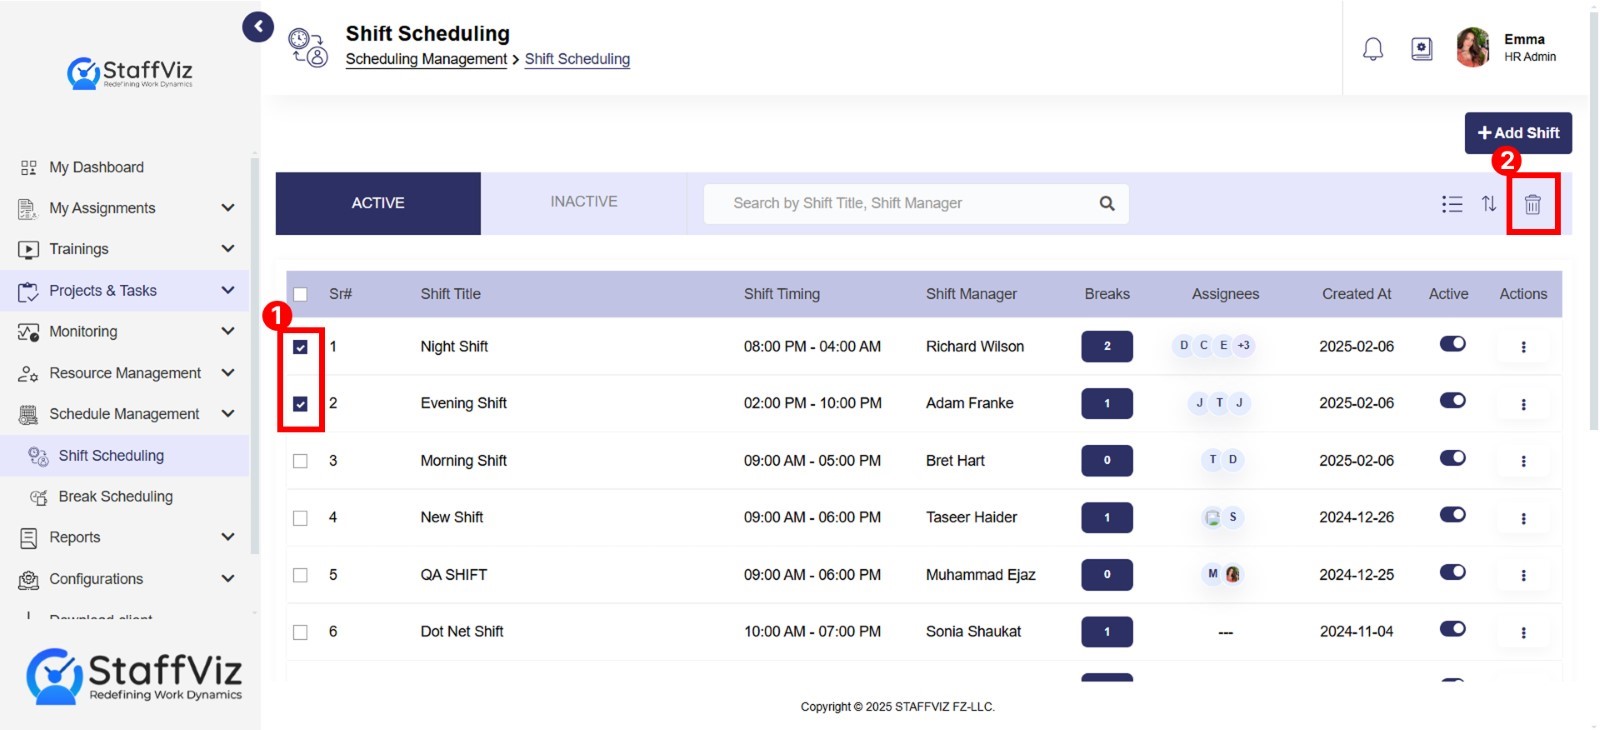
Delete Option
Allows scheduling manager to select multiple shifts and delete them at once.
Section 1.3: Shift Details in List View
The StaffViz shift details table provides a comprehensive overview of all your scheduled shifts within the system. Let us break down the meaning of each column:
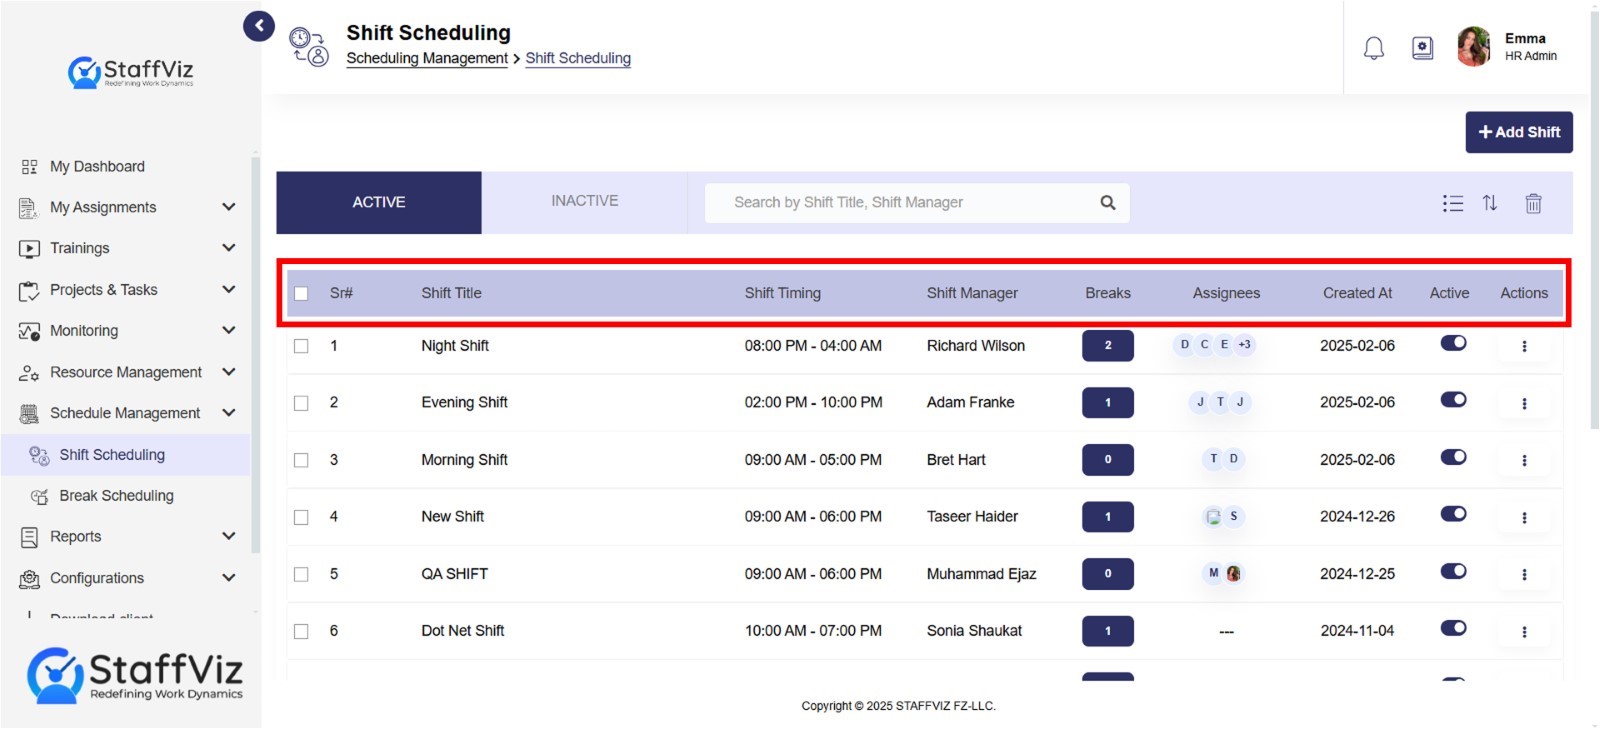
Sr#: This column refers to a sequential number assigned to each shift within the system. It is primarily used for basic identification and sorting purposes.
Shift Title: This field displays the name you assigned to the shift during creation (e.g., "Morning Customer Service," "Night Audit").
Shift Timing: This column shows the start and end times of the shift, displayed in a clear time format (e.g., "09:00 AM - 05:00 PM").
Shift Manager: This field indicates the employee designated as the manager responsible for overseeing this specific shift.
Breaks: This section displays the designated break structure for the shift. It could show options like:
No Break
Single Break
Multiple Breaks
Assignees: This column shows the number of employees currently assigned to work the shift.
Created At: This field displays the date at which the shift was created within StaffViz.
Active: This indicates whether the shift is currently active (scheduled to occur) or inactive (potentially canceled or archived). Admins can activate or deactivate shifts using the toggle option.
Actions: This section provides a dropdown menu or buttons with various actions you can perform on the shift record, depending on your permissions within StaffViz.
Action options are explained in detail within section 1.5.
Section 1.4: Shift Details in Card View
Card view is another view of the same data provided in the list view. Users have options to view data in large or small cards based on their preferences.
Section 1.5: Action Options
The action button holds various options, allowing managers to edit or delete shifts.
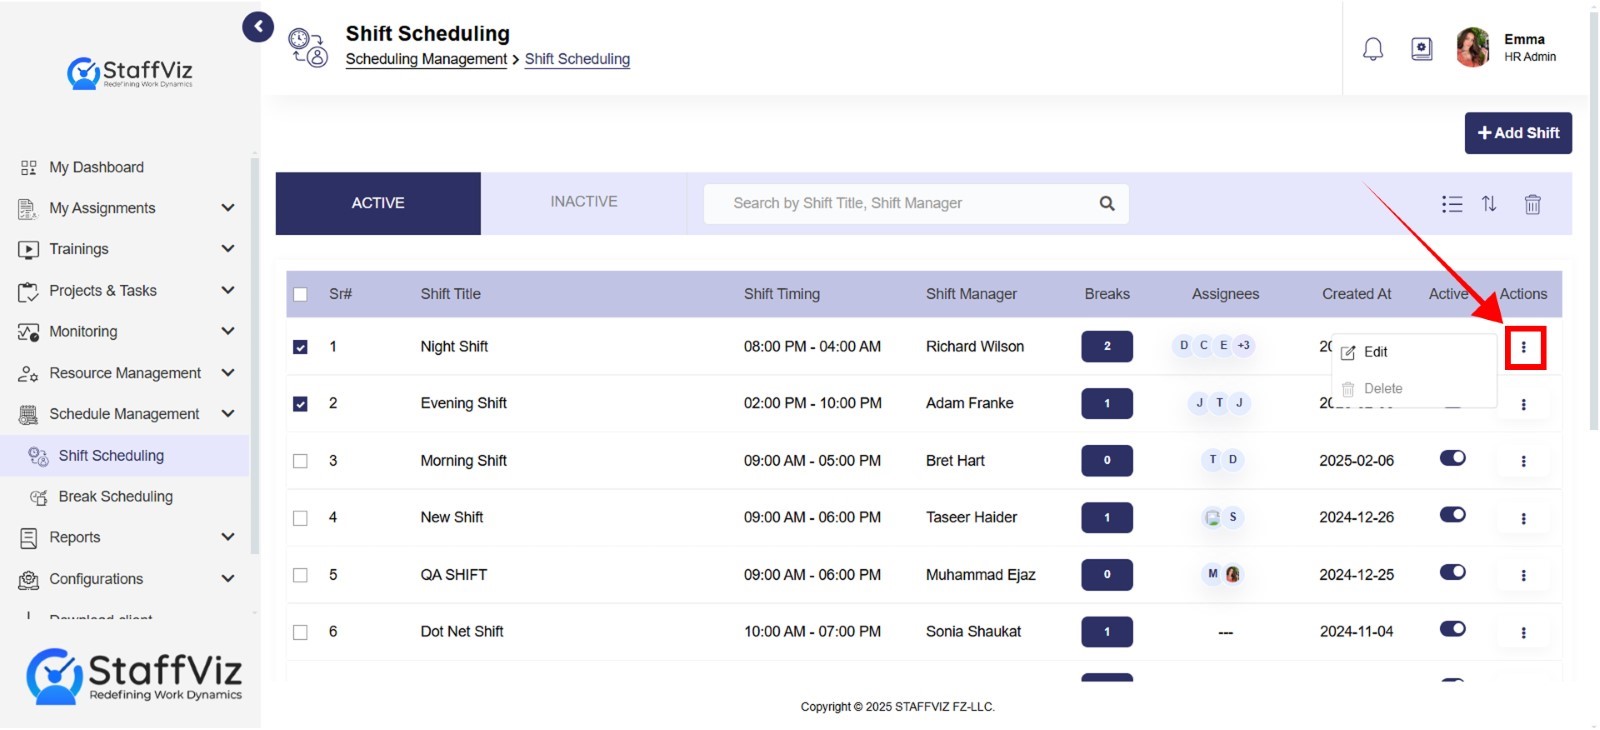
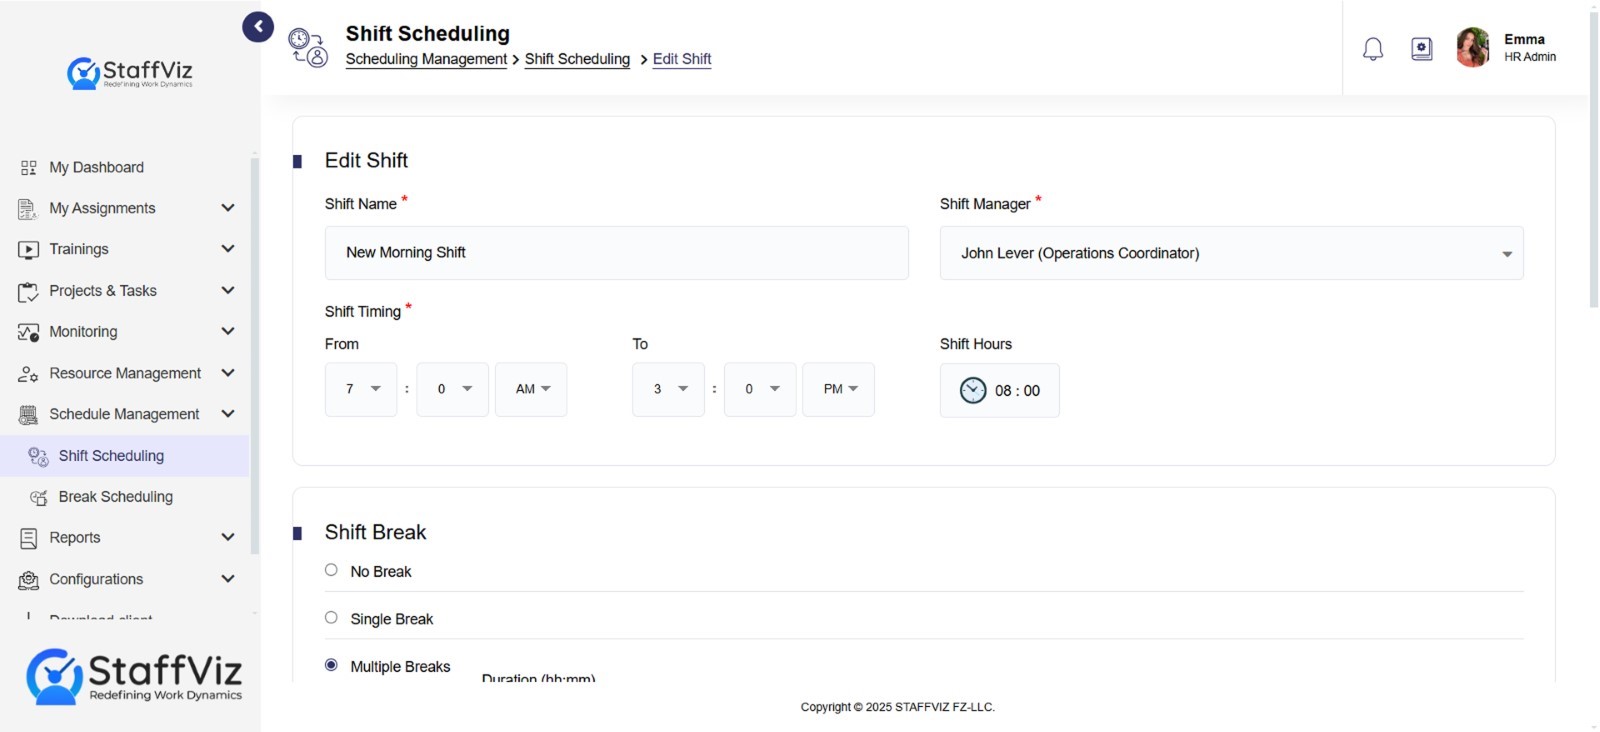
1.5.1: Edit Shift
StaffViz allows you to modify the details of existing shifts to ensure your schedule remains accurate and reflects any changes. Here is a breakdown of the edit shift details process:
Locating the Shift:
Identify the specific shift you want to edit in the shift details table (refer to the previous guide for details on the table). You can use the table's sorting or filtering functionalities (if available) to locate the shift efficiently.
Look for an "Edit" option within the "Actions" column for the chosen shift. Clicking this button will open a view to modify the shift details.
Modifying Shift Information:
The edit shift view will mirror the add shift form you previously encountered, allowing you to change various details:
Shift Name: Modify the name assigned to the shift for better clarity.
Shift Manager: Change the designated manager overseeing the shift if needed.
Shift Timing (To, From): Update the start and end times of the shift to reflect any adjustments.
Shift Hours (Optional): This field might automatically update based on the new timings.
Shift Break: Modify the break structure (No Break, Single Break, Multiple Breaks) as required.
How to Setup a Single Break
Step 1: Navigation
Navigate to Shift Scheduling > Add Shift section.
Step 2: Select Single Break
Select the Sigle break options and setup the break duration using the hours and minutes option.
How to setup Multiple Breaks
Step 1: Navigation
Navigate to Shift Scheduling > Add Shift section.
Step 2: Select Multiple Breaks
Select multiple breaks in the shift break section.
Step 3: Setup Specific Break Time
Unlike the Single break, Multiple breaks are fixed time breaks. So, you need to select the exact time using to and from options while keeping in mind that the break schedule must be within the shift hours. When you set up the to and from times the duration will be automatically calculated.
Step 4: Add Multiple Break Slots
To add multiple break slots, just click the Add Break Slot button and follow step 3 to set up the break schedule.
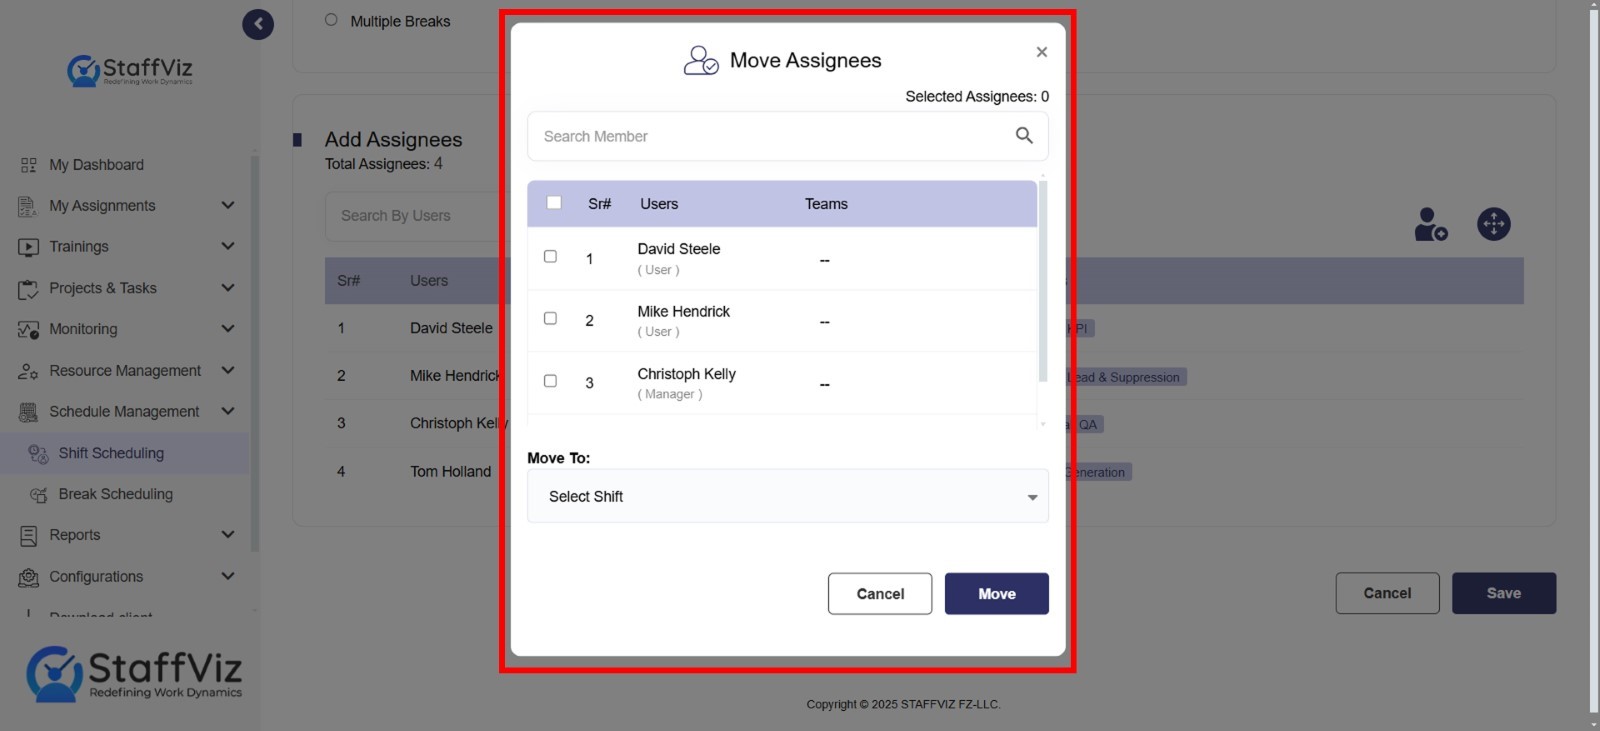
Assignees: Manage the employees assigned to the shift.
Add additional employees to cover the shift.
Step 1

Step 2
Move employees for whom you wish to change the shift
Step 3

Step 4
1.5.2: Delete Shift
To delete a shift, click the action button for the shift you wish to delete and click the delete option.
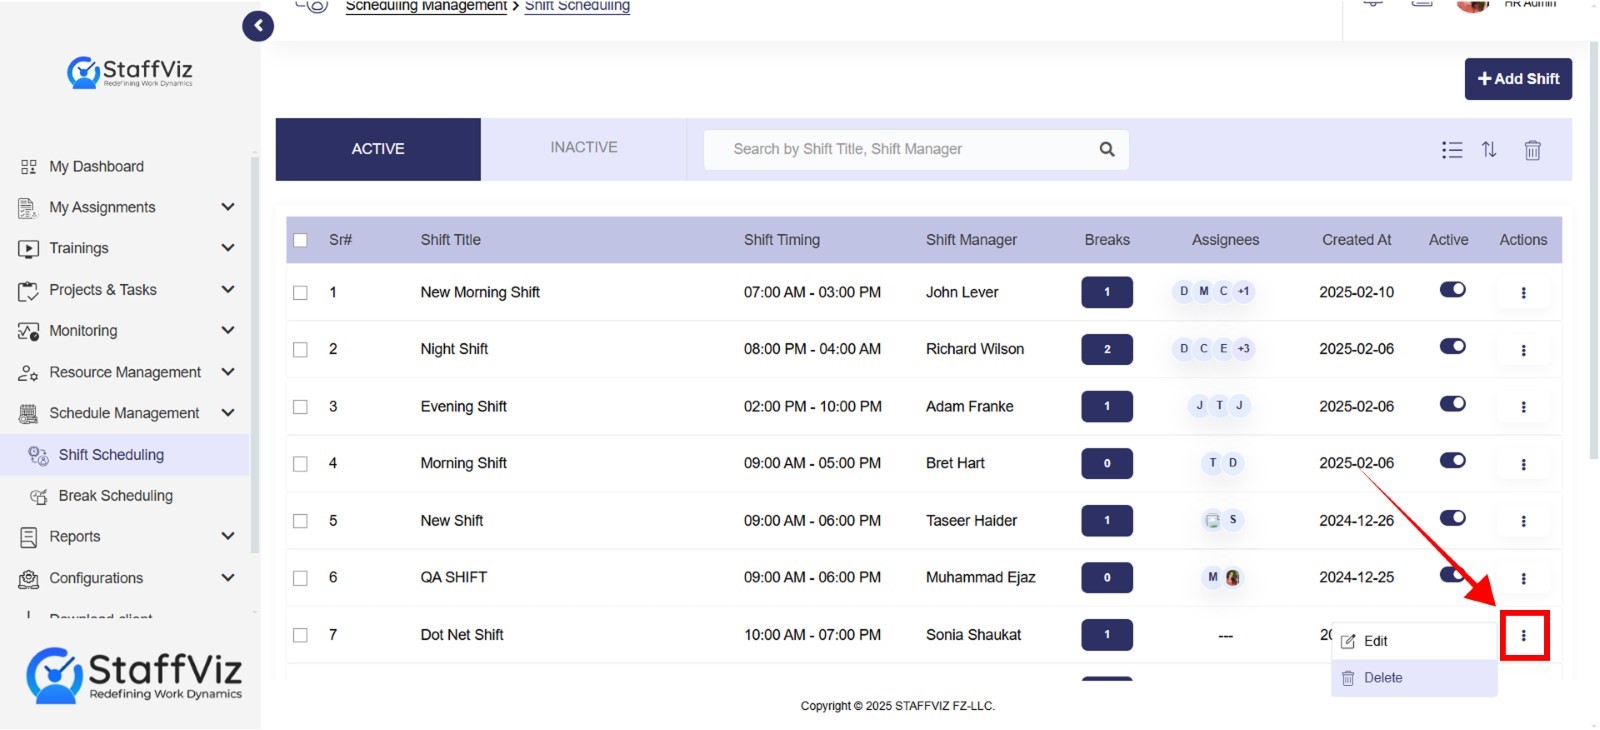
After the confirmation, the selected shift will be deleted.
Note that the shifts with active users can’t be deleted. To delete such a shift, you can move the users to other shifts and then delete it.