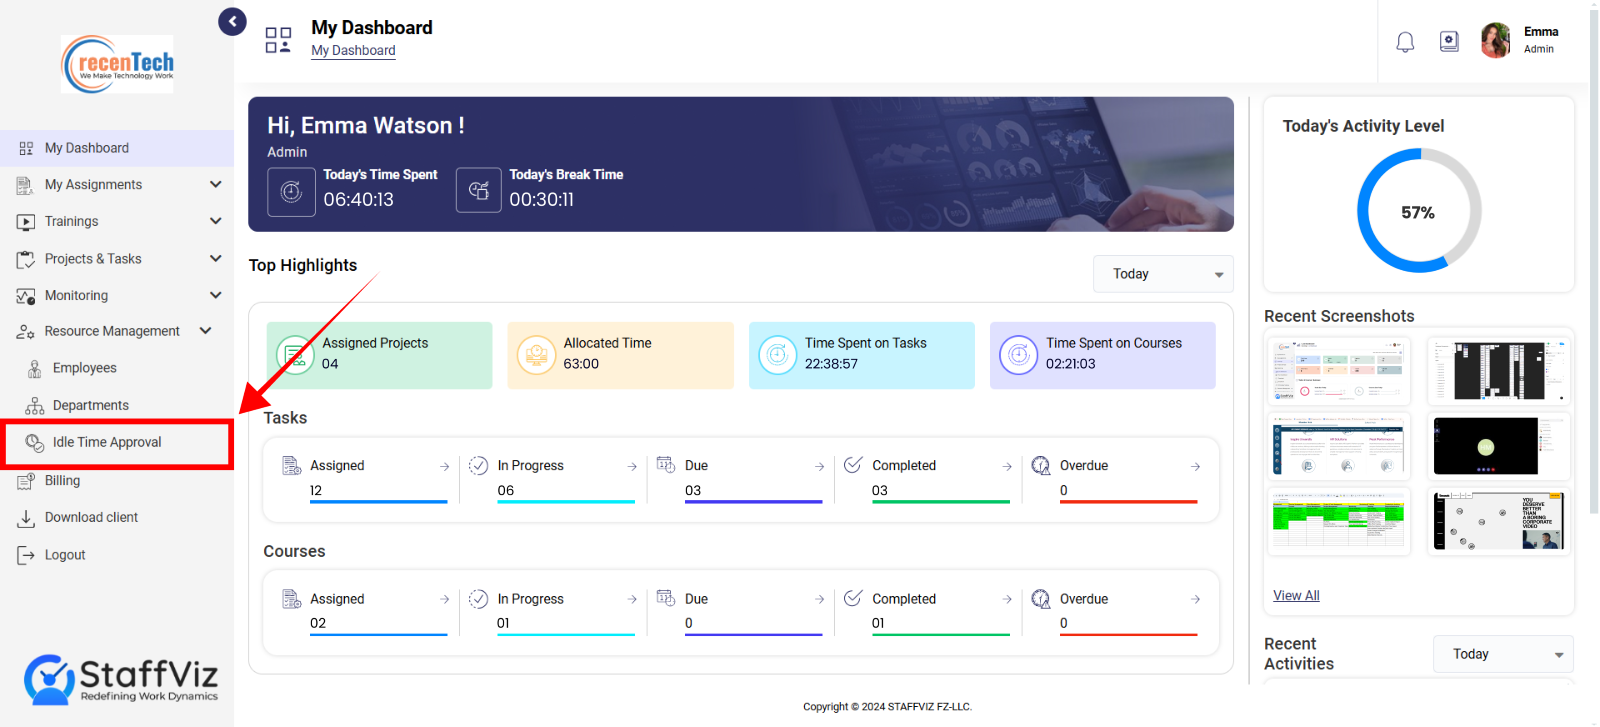
Section 3: Idle Time Approval
Navigating to Idle Time Approval Section
Click Resource Management in the main navigation panel and select the Idle Time Approval option from the dropdown.
A new panel will open, this is the Idle time approval section, where you can manage all the captured idle time slots.
Idle Time Approval Overview
The Idle time approval section allows admins to manage all the idle time slots being recorded by StaffViz, in case the user doesn’t showcase any activity for a certain time period. Admins can accept or reject the idle time and even accept a part of the total idle time and reject some from the same time slot. We’ll learn the details about idle time approval management in this section.

Section 3.1: How to Access Idle Time Requests Data
Follow the given steps to access the idle time requests data.
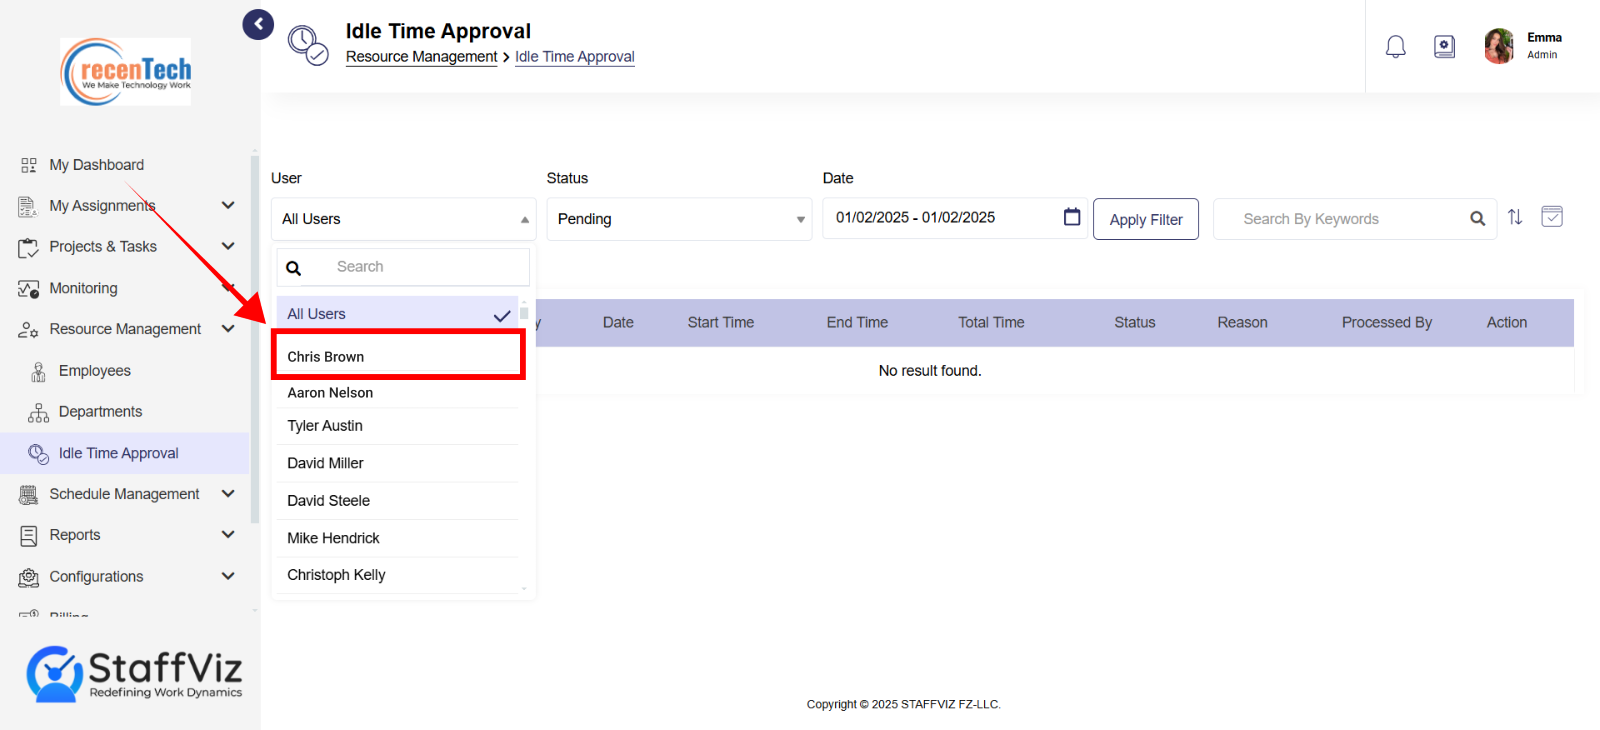
Step 1: Select User
Admins have two options while selecting users.
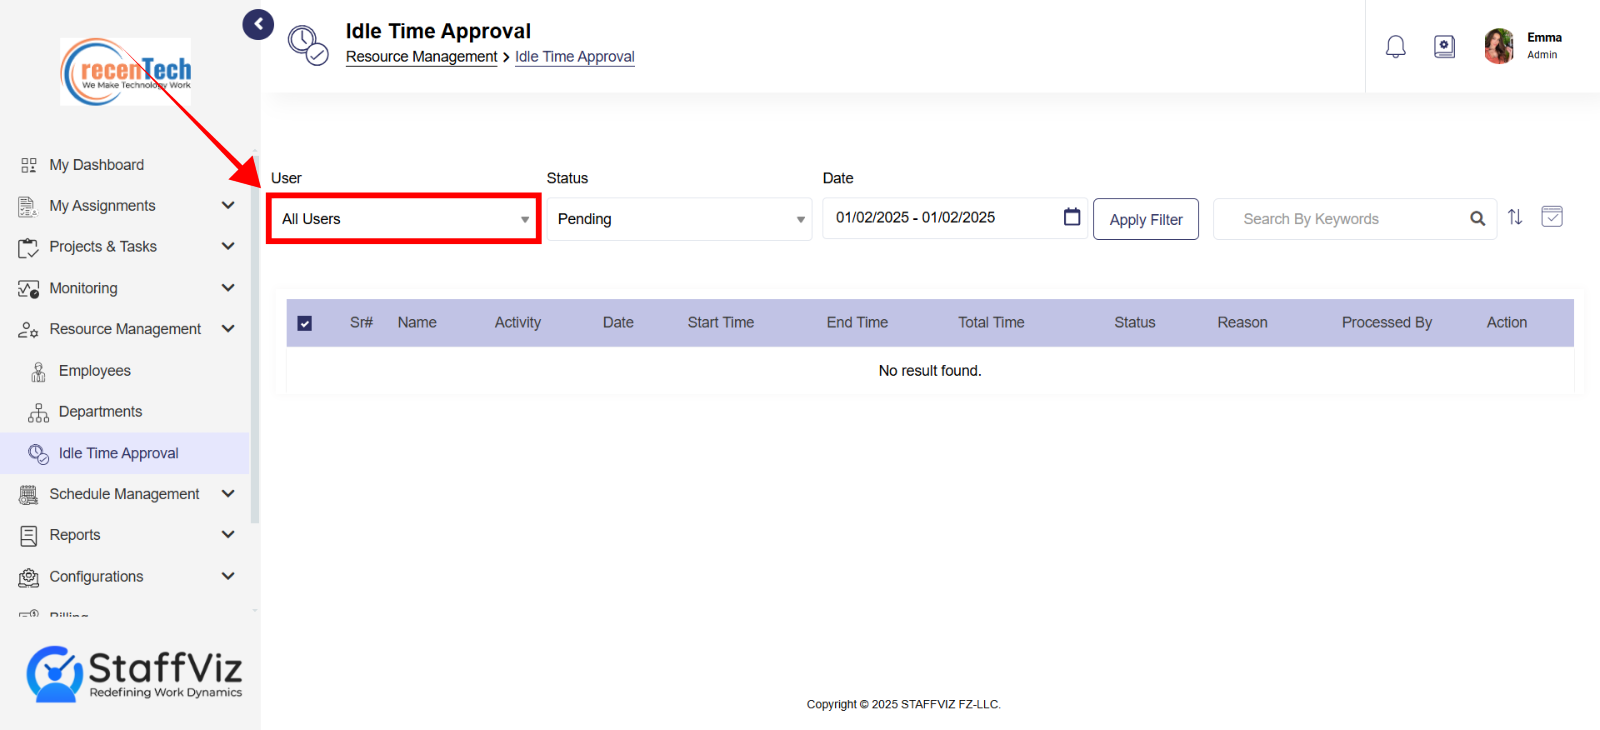
All Users: Provides idle time requests from all the users within the organization.

Individual User: Select or Search for any individual user you want idle time requests data for.
Step 2: Status
Select one status from the dropdown.
Pending: Sorts Idle time requests that are unattended.
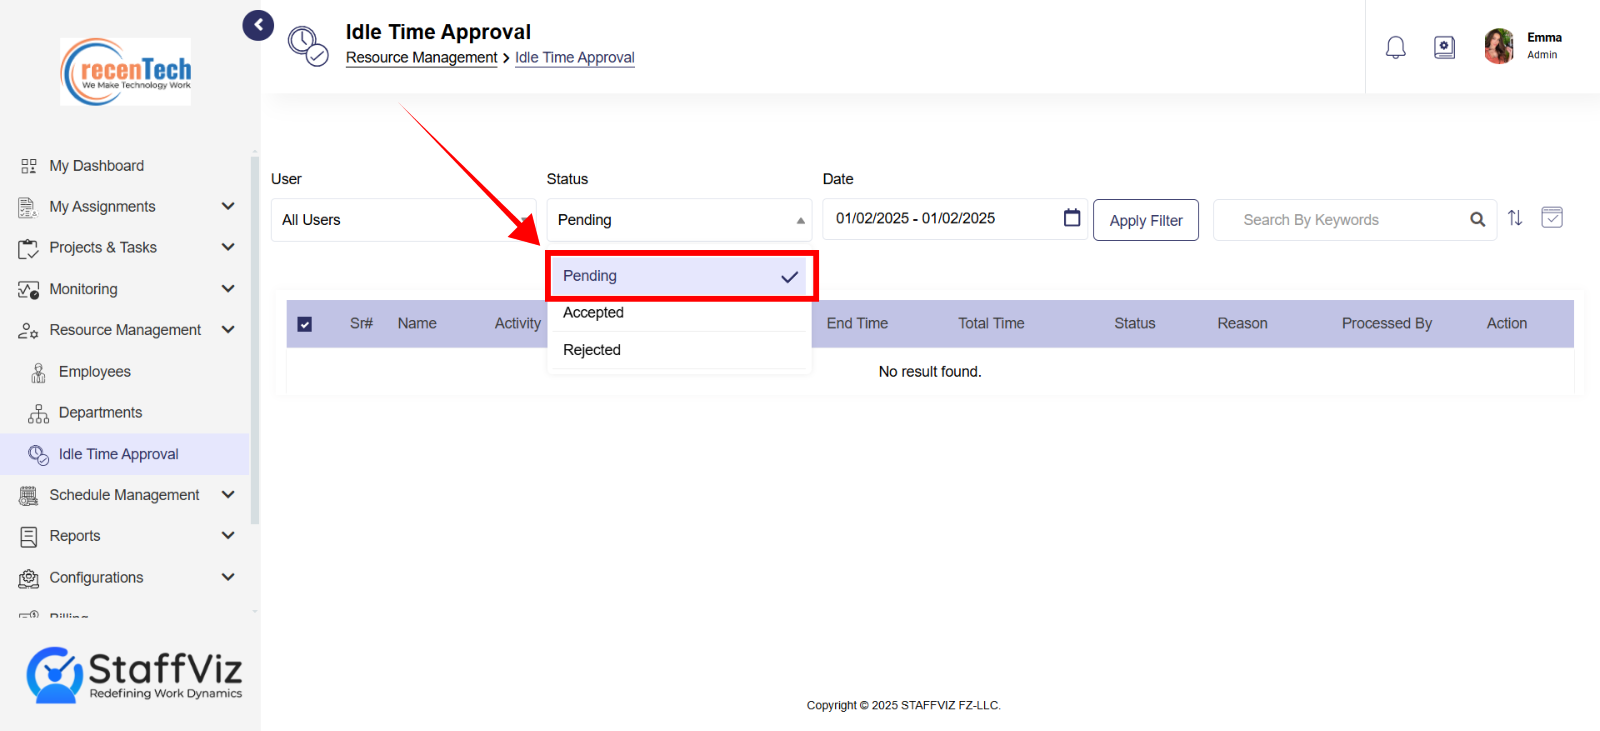
Accepted: Sorts Idle time requests that are accepted.
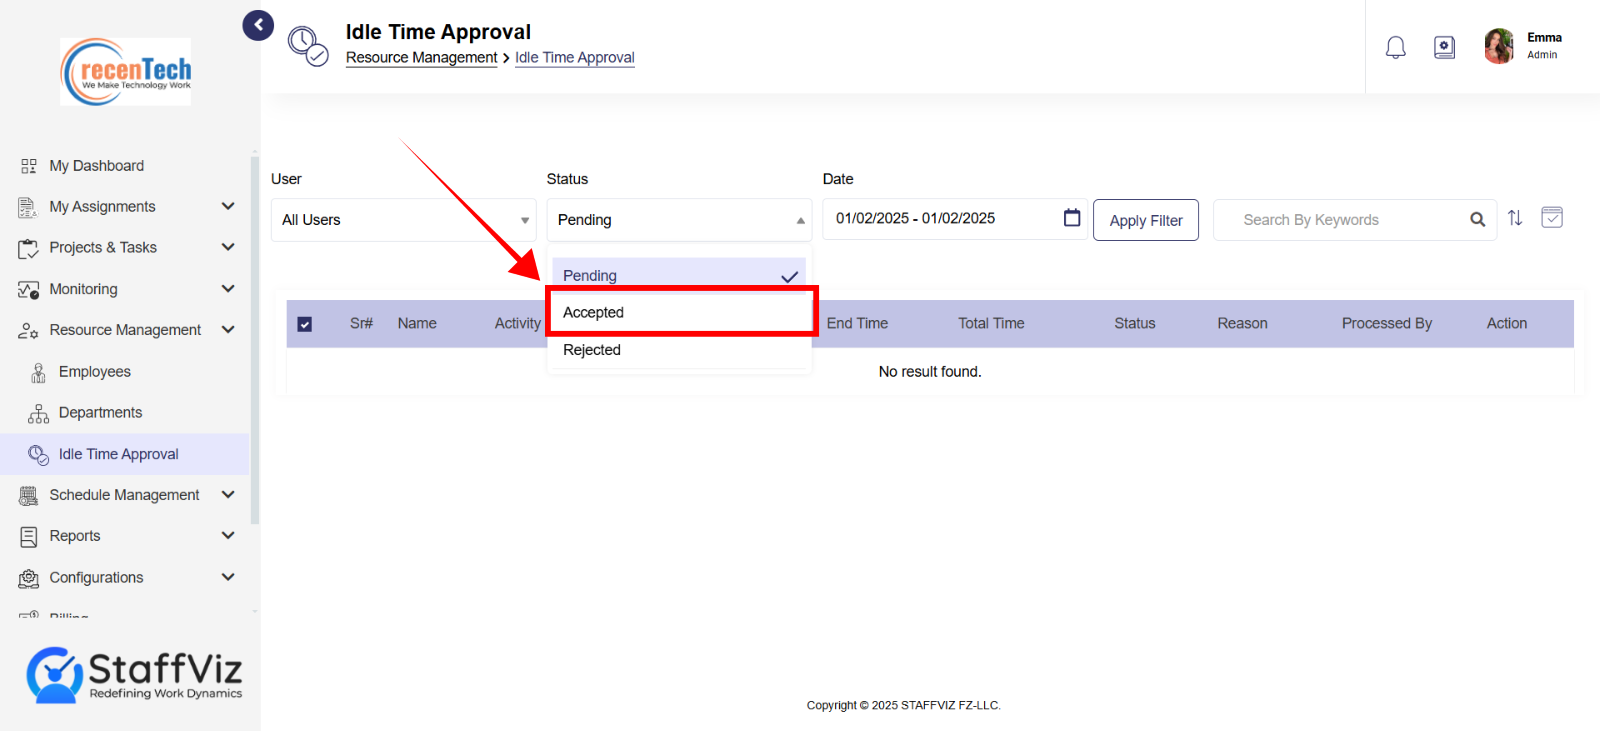
Rejected: Sorts the idle time request that are rejected.

Step 3: Date
Select a specific date range for the required idle time requests.

Step 4: Apply Filter
Once all the filters are set, click the apply filter button.
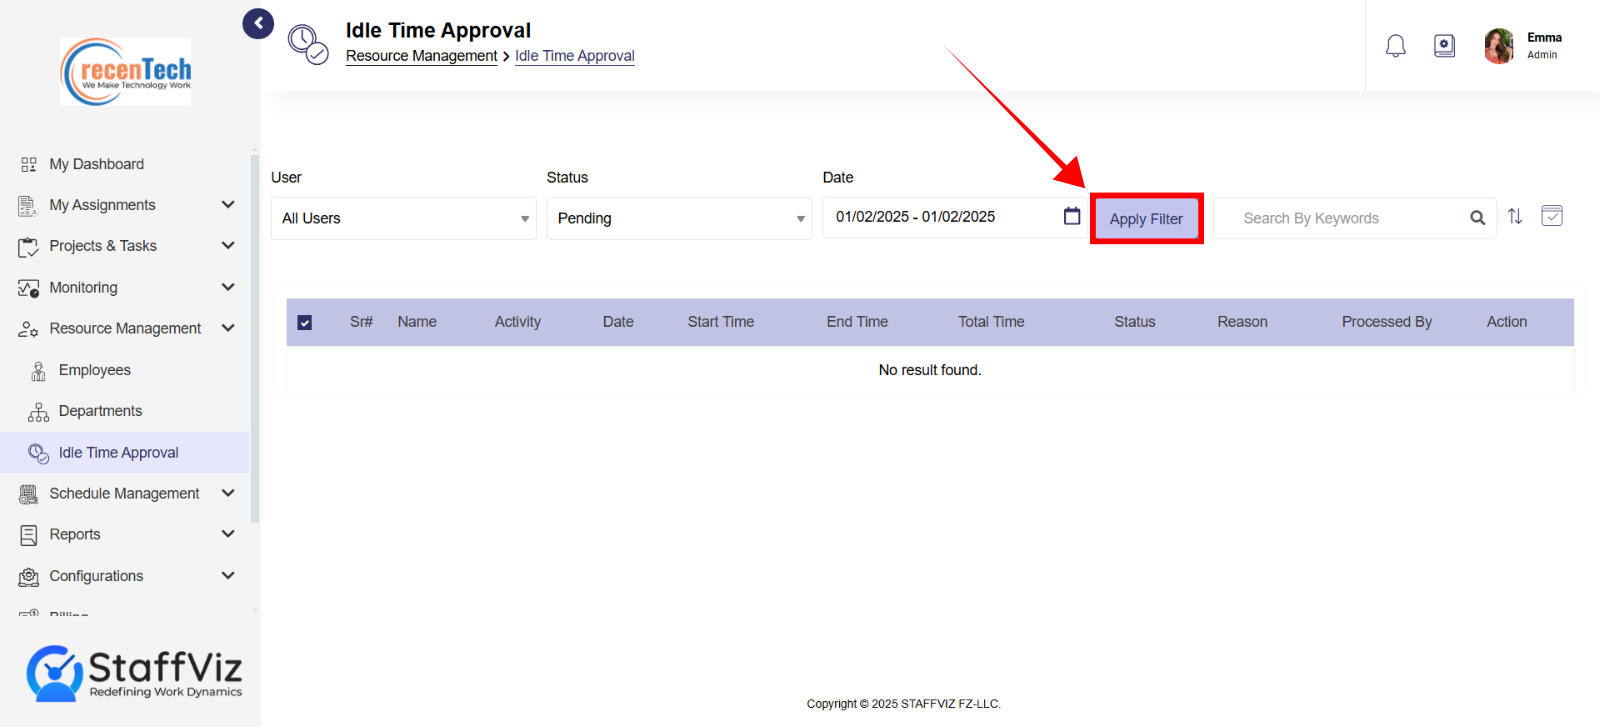
With this step you’ll get all the idle time requests you’ve required data for.
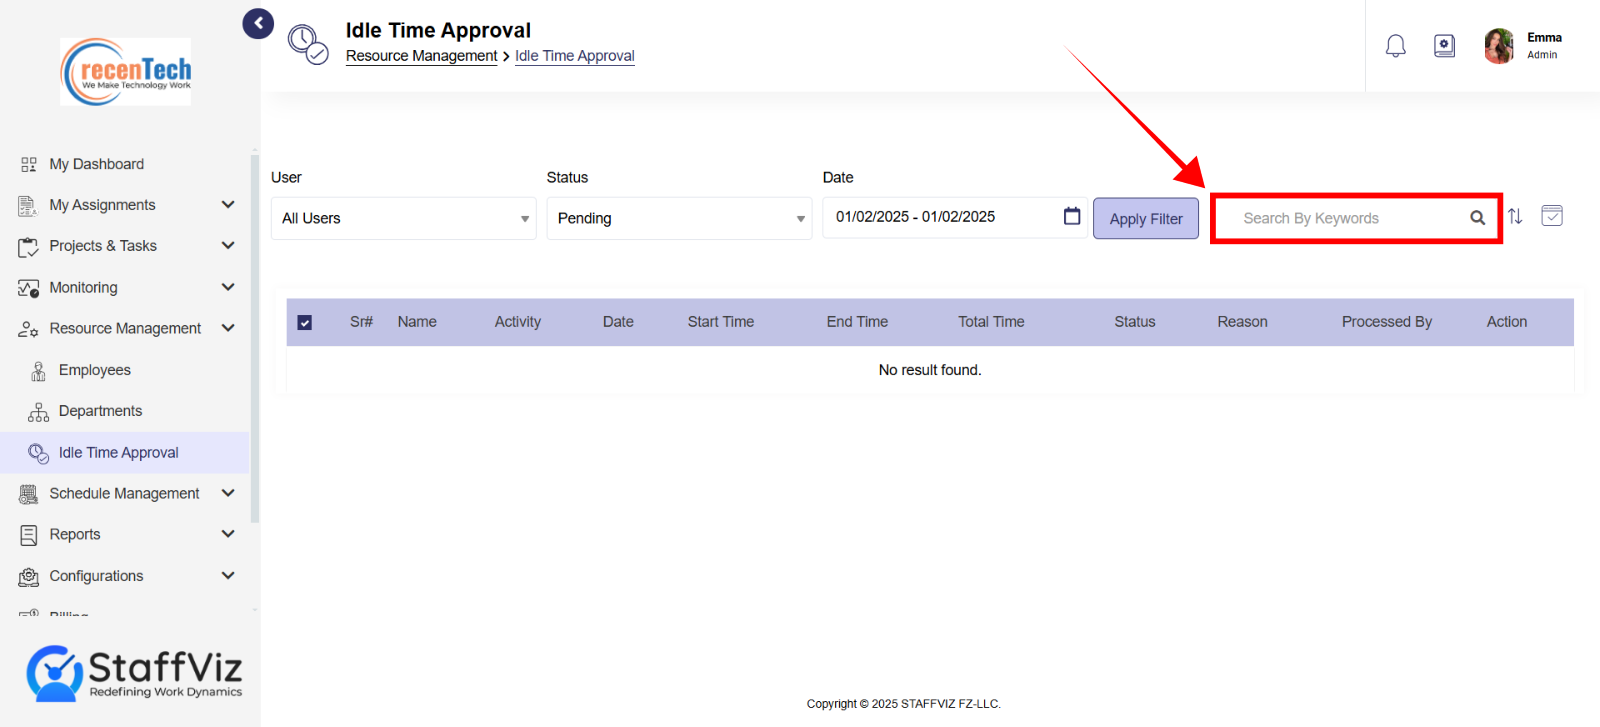
Step 5: Search Bar
The search bar can be used to search idle time requests using the user or task name.
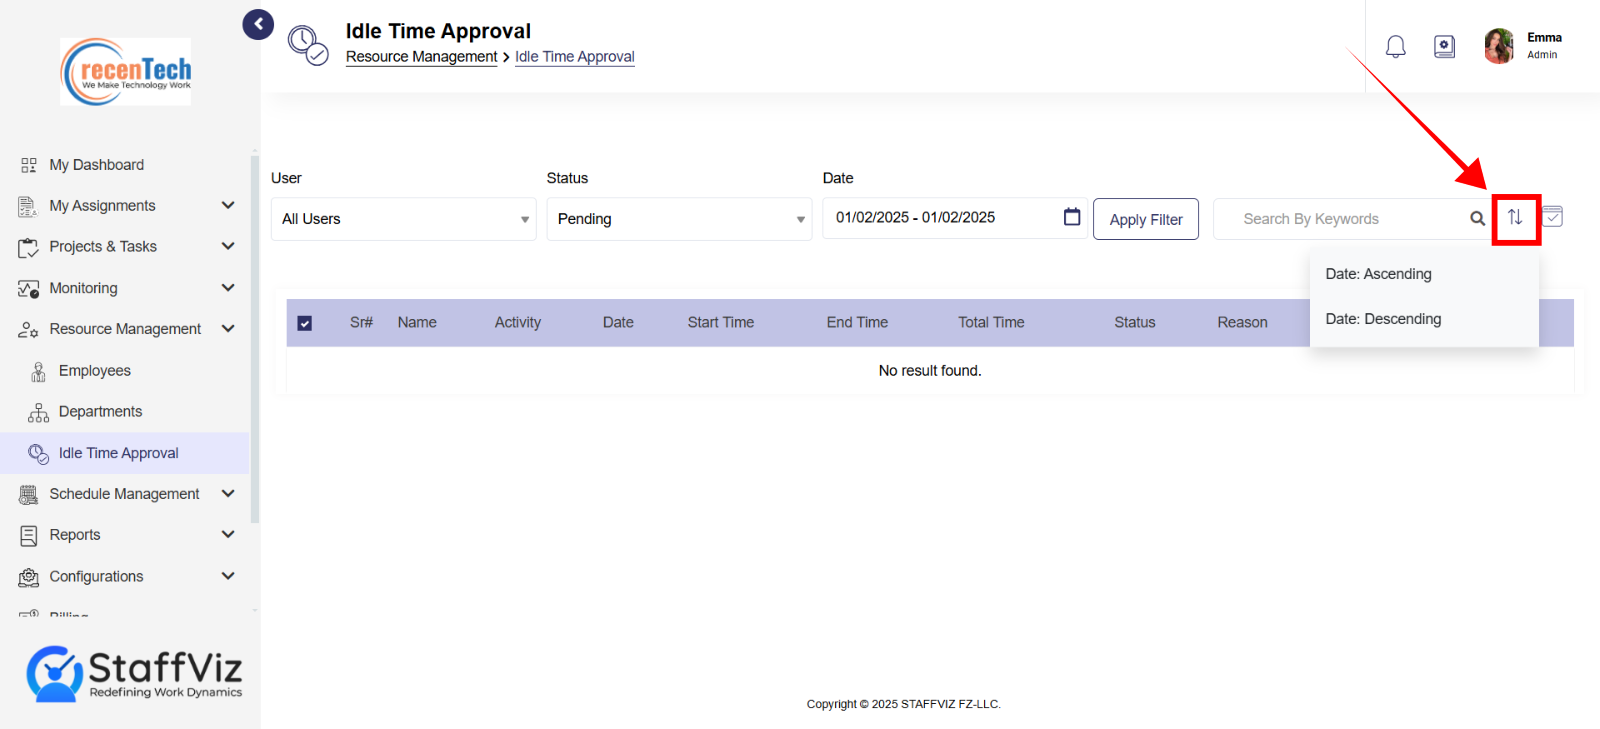
Step 6: Sorting Options
Admins can sort the data based on the date and letters of the user’s names. This helps them save time while searching for required idle time requests.
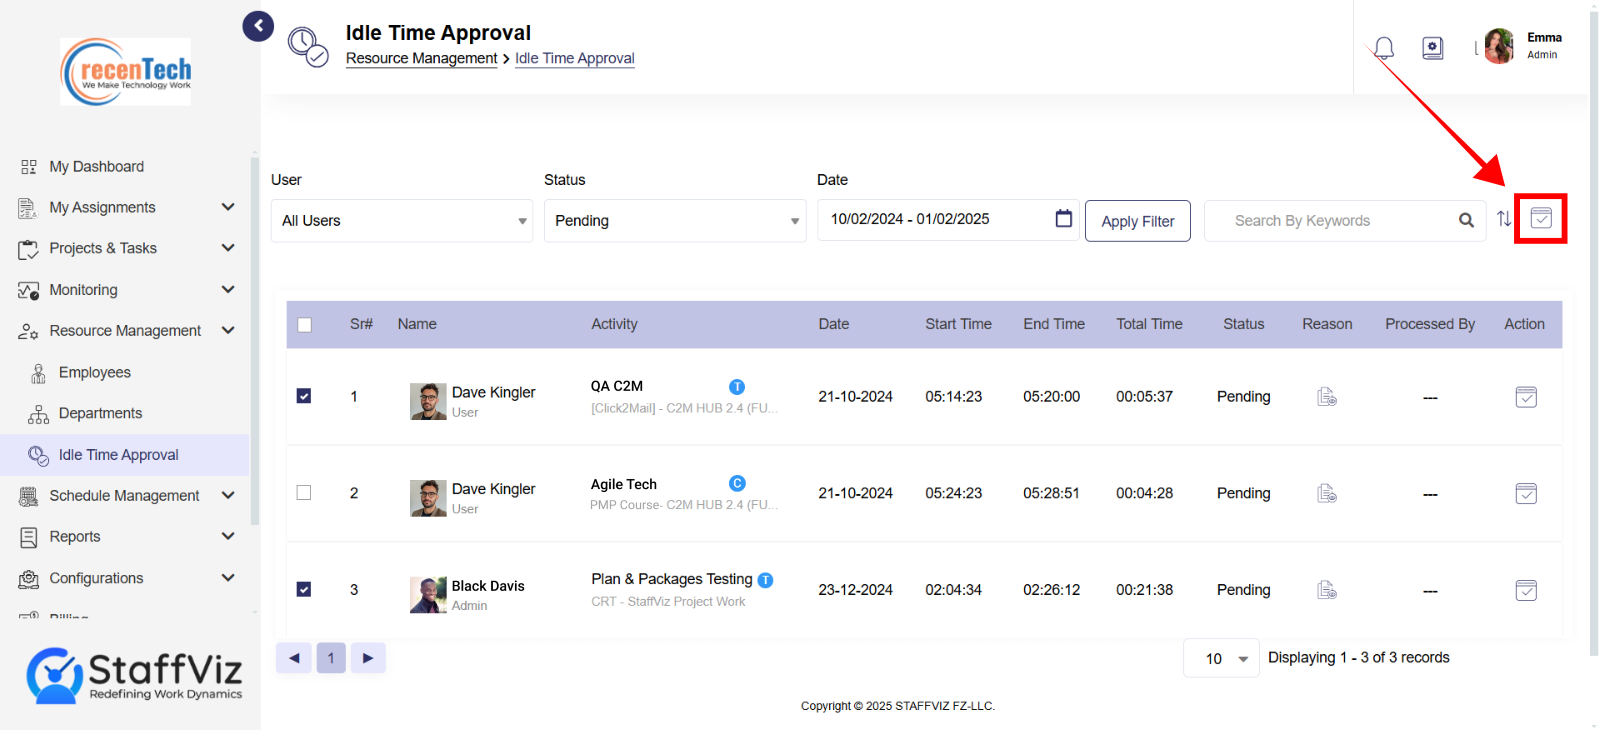
Step 7: Idle Time Action Option
This action option on the top bar allows admins to manage idle time requests for multiple time slots at once. In further section you’ll learn how to use this option to manage Mutiple idle time requests at once.
Section 3.2: Understanding Idle Time Lists Data
Once you follow all the steps in section 3.1, you’ll get the idle time data. Here is what every column showcases in the list.
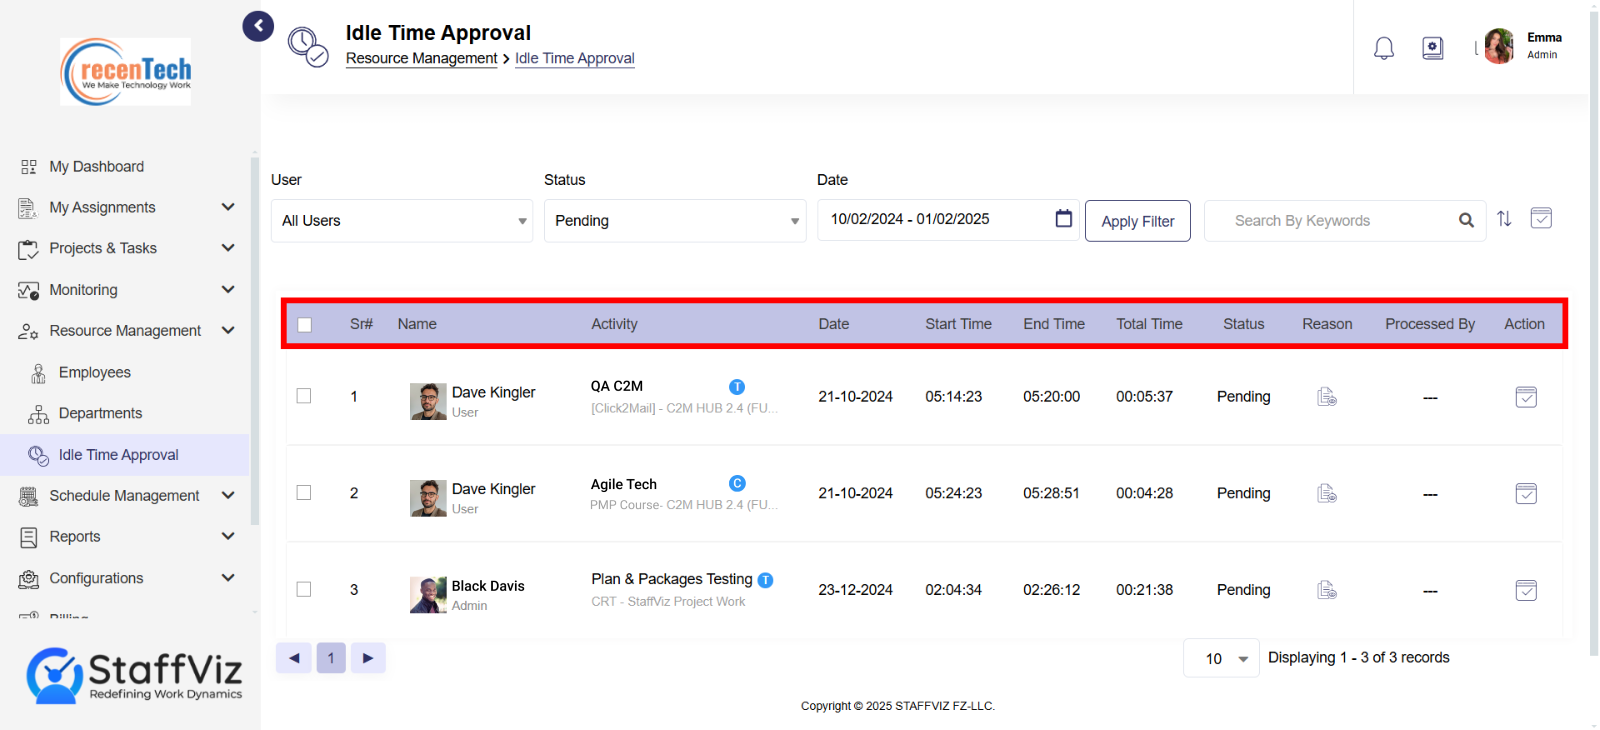
Sr#: Showcase the number of the row in the list.
Name: Showcase employee’s name for whom the idle time request is received.
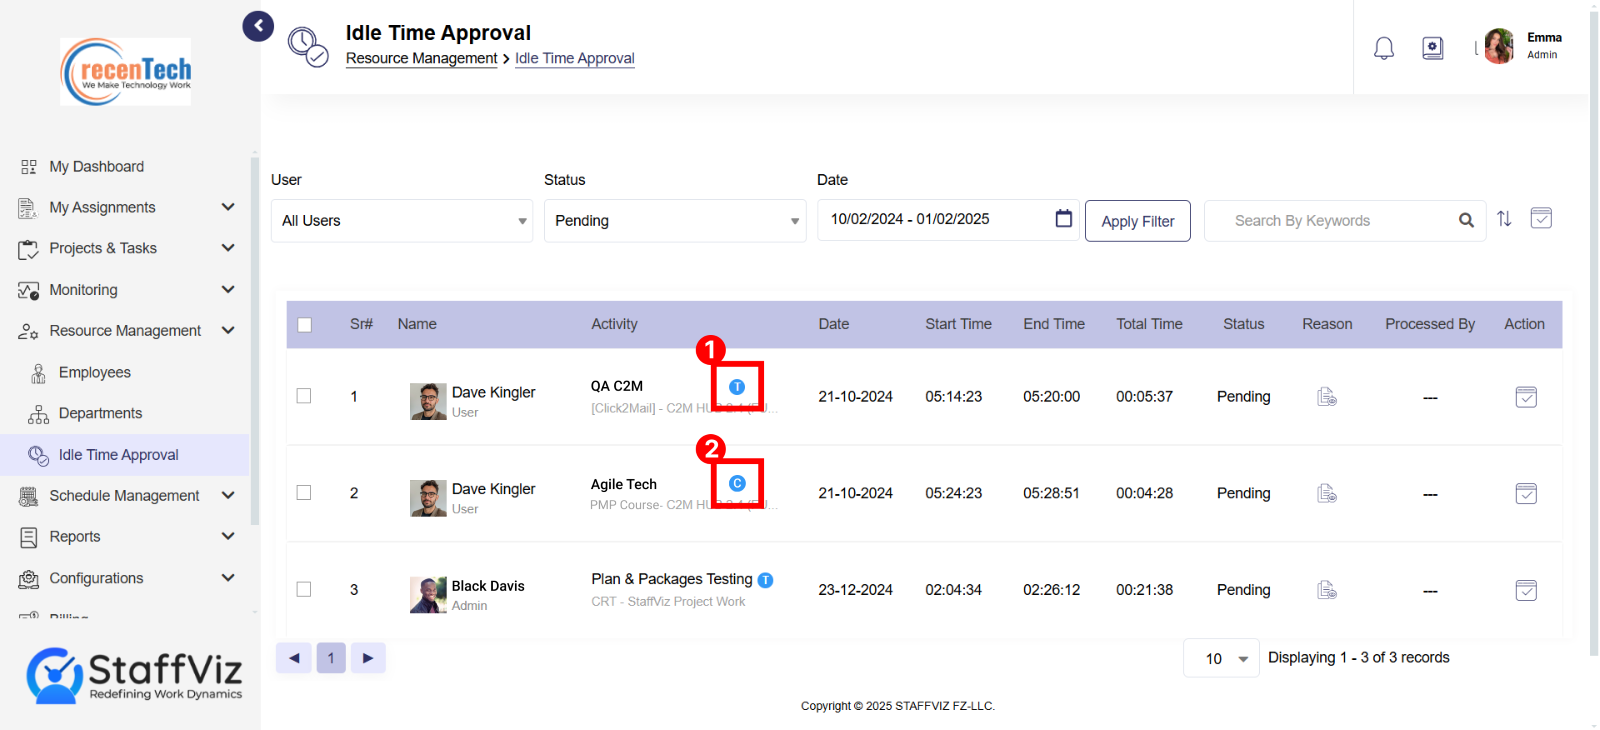
Activity: This column gives the name of a task and the project it is created under.
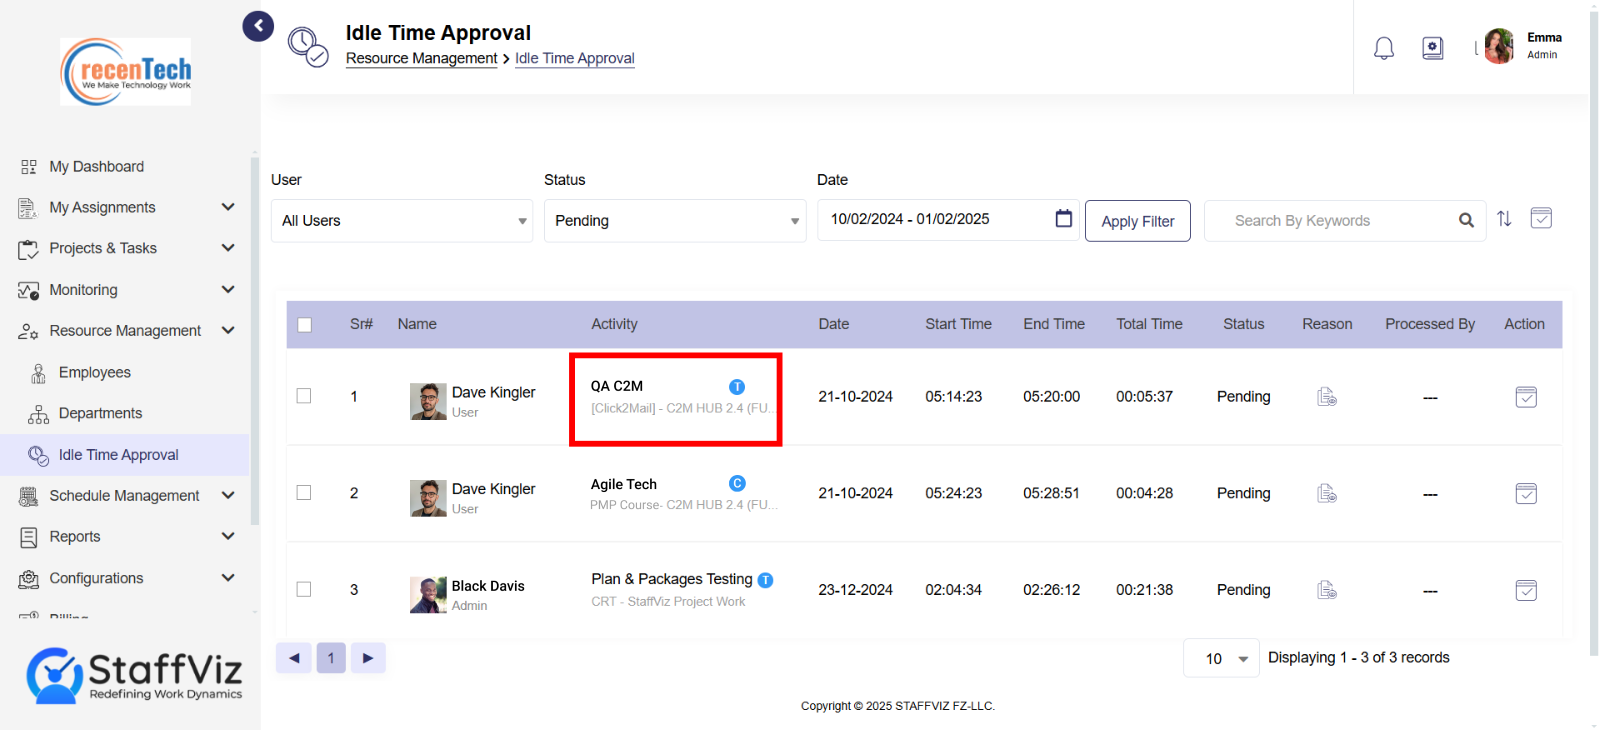
A “T” mark indicates the task for which the idle time request is received.
The “C” mark is for the course for which the idle time request is received.
Date: Corresponding date when the idle time was captured.
Start Time: Exact time when StaffViz started capturing the idle time.
End Time: Time when the user turned off the idle time and continued the task/course.
Total Time: Total idle time calculated within the idle time session.
Status: There can be three statuses which depend on what you’ve selected from the above filters.
Pending: Sorts Idle time requests that are set to “request for approval” in settings.
Accepted: Sorts Idle time requests that are accepted.
Rejected: Sorts the idle time request that are rejected.
Reason: Showcase the reason provided by the user for the idle time. This helps admin in deciding whether to accept or reject idle time as productive.
Processed By: Showcase the person who’ve processed the idle time request.
In case of pending requests, no name will be shown as the idle time is not accepted or rejected by anyone yet. However, when someone accepts or rejects the idle time request the data moves to the corresponding status filter and the name of the person who’ve accepted/ rejected the idle time is displayed there.
Action: Action option is the section where the admins process the idle time requests. In the following section 3.3. We’ll guide you all about managing the Idle time requests.
Section 3.3: How to Manage Idle Time Requests
To manage idle time requests there are few scenarios that a manager/admin may come across.
Here’s how you as an admin/owner can accept/reject manual time requests.
3.3.1: Accept/Reject the Pending Idle Time
To accept the idle time, follow the given steps.
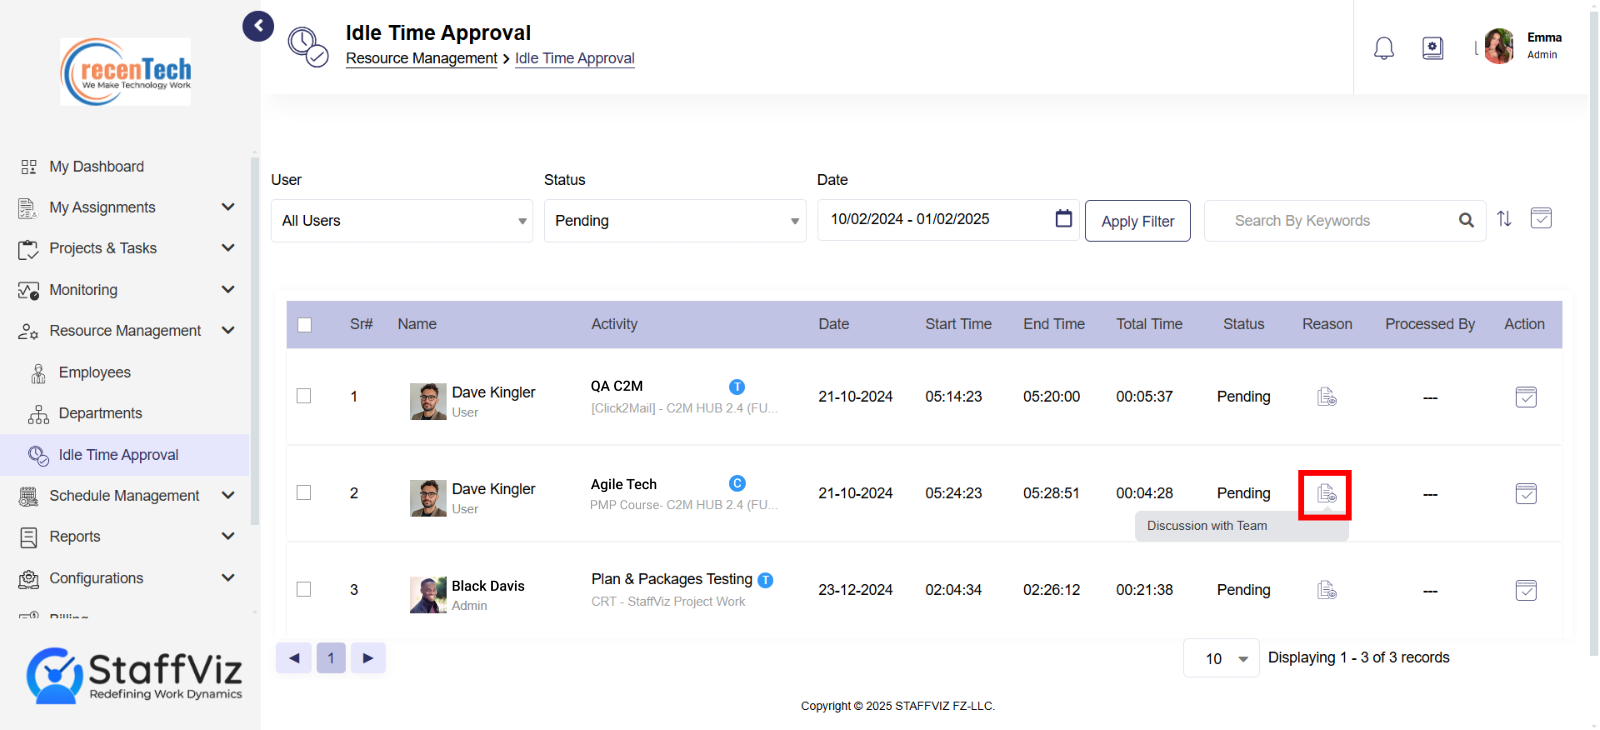
Step 1: Pending Requests
Follow section 3.1 to access idle time requests data.
Step 2: Click Action Option
From the list, select the idle time request you want to accept/reject. In the same row click the action option on the right side of the screen.
Step 3: Idle Time Approval Pop Up
A pop up will appear on your screen. On this panel admins/managers can manage the idle time.

Step 3.1: Approval/Rejection Percentage
Managers/Admins can fully or partially accept the idle time. Managers can select any percentage number from 1% – 100% and the selected percentage will be considered as Accepted and remaining as Rejected.
For example: If a manager allocated 50% (out of 100%) of idle time as productive it means, the 50% of selected percentage is accepted and remaining 50% is rejected.
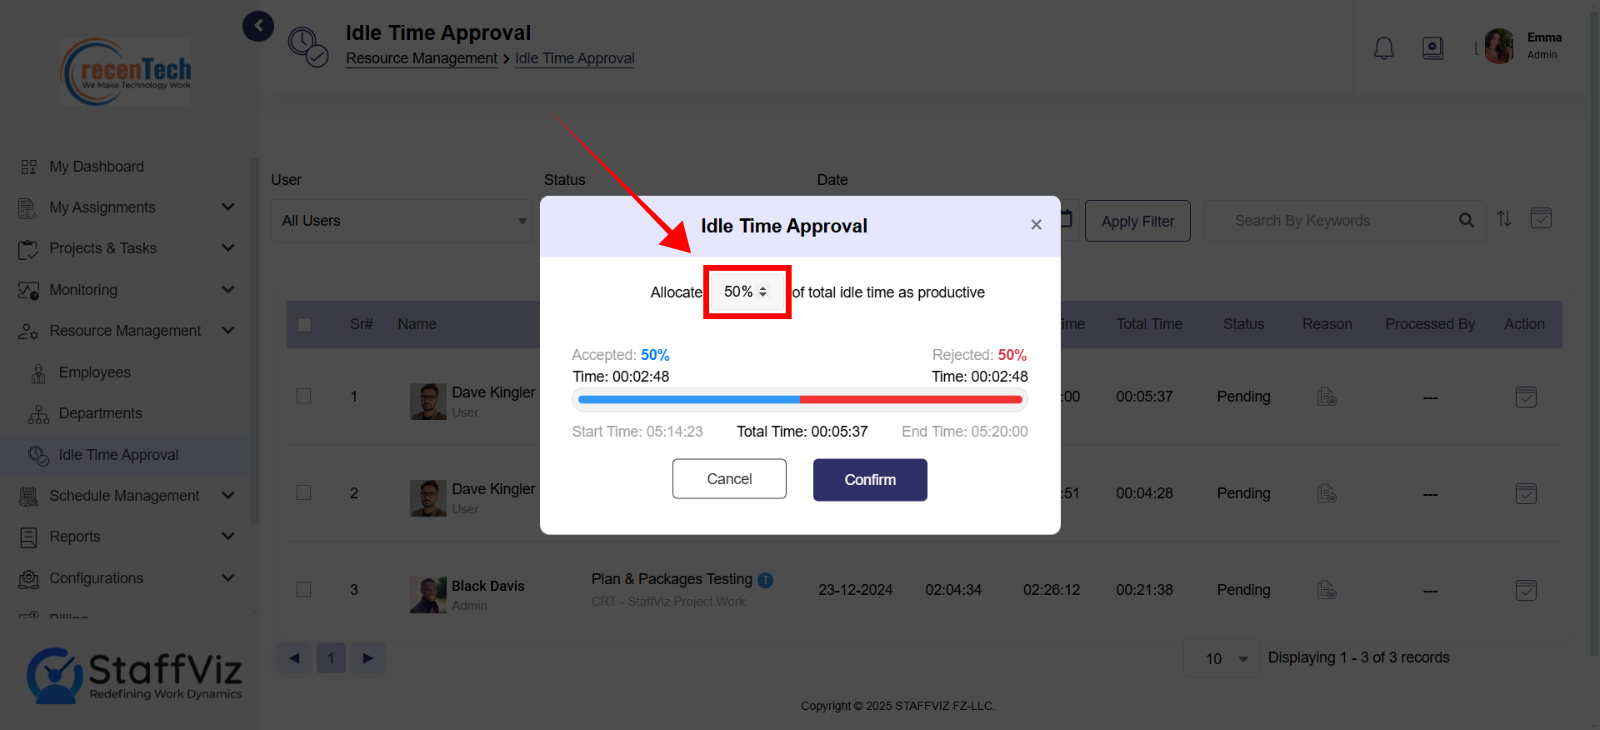
To completely accept idle time, manager/admins can select 100% of the idle time as accepted (productive).
To completely reject the idle time, admins/managers can set the percentage to 0% and the idle time will be considered rejected.
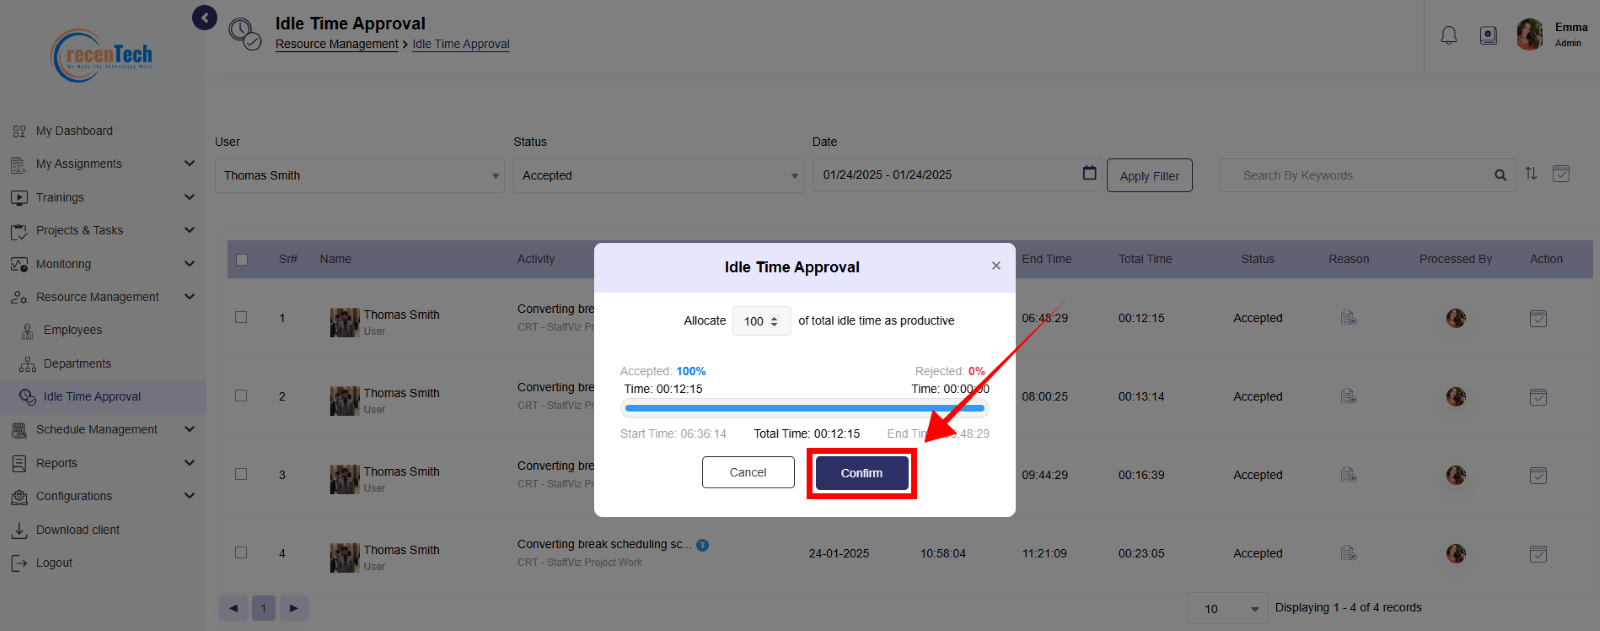
3.3.2: Convert Accepted Idle Time to Rejected
Step 1: Accepted Idle Time List
Follow section 3.1 to access idle time requests data. Please select the Accepted option from the status filter.
Step 2: Click Action Button
Click the action button on the right side of the screen.
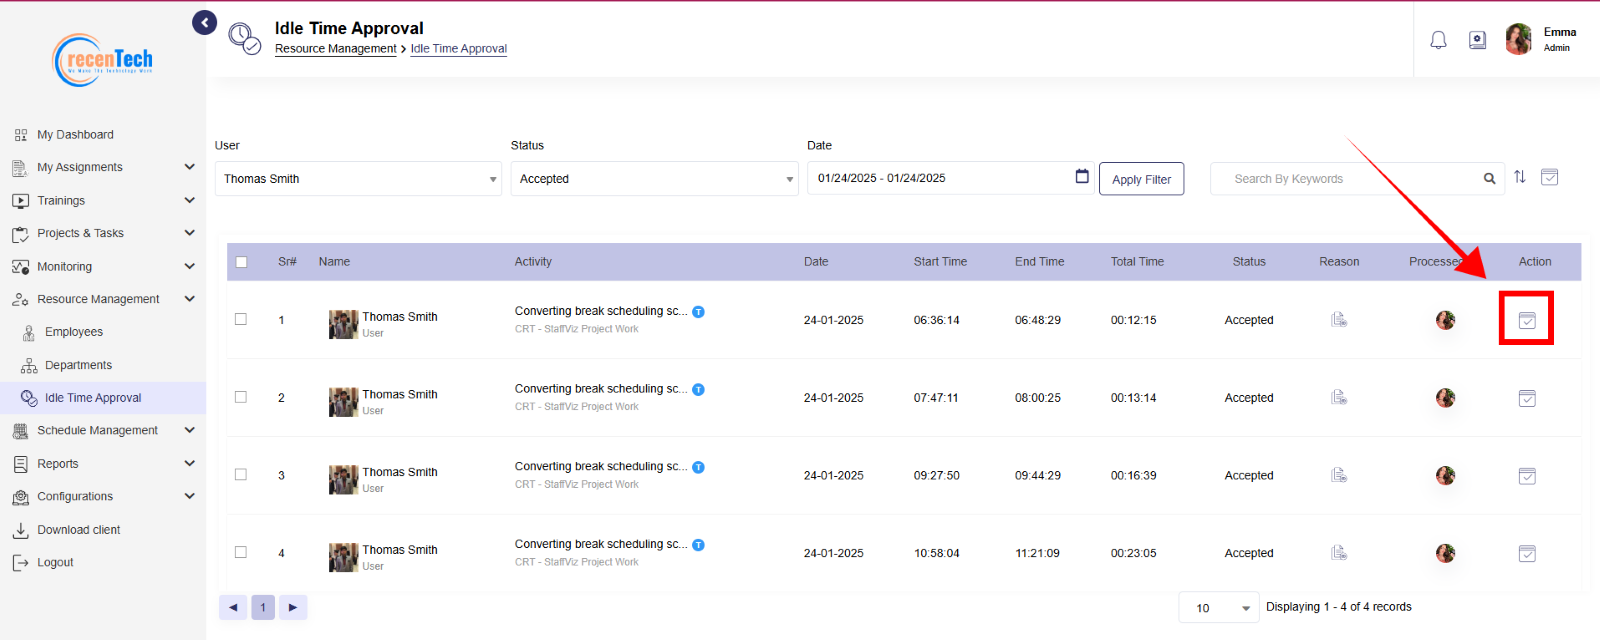
Step 2: Click Action
A pop up will appear on the screen. Here admins can select the percentage of the accepted idle time and convert it to rejected (idle).
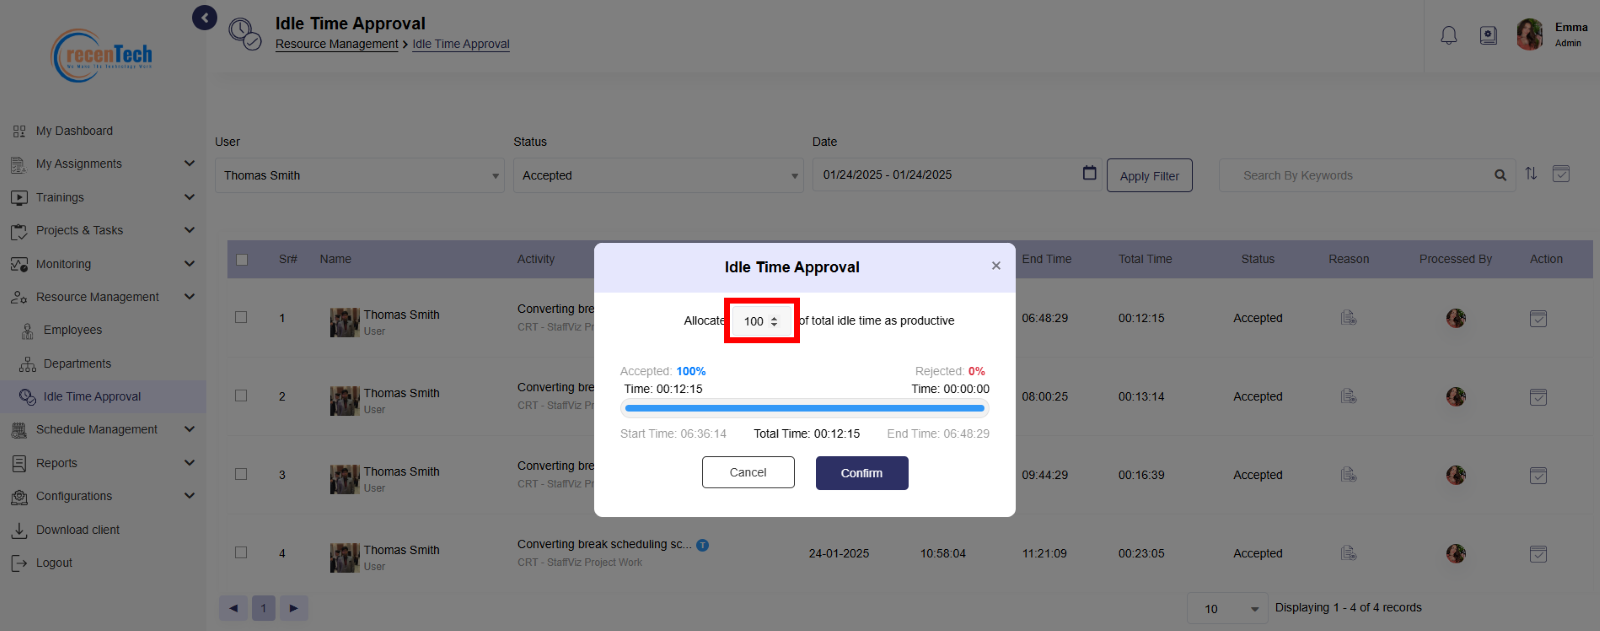
Step 3: Click Confirm
Finally click the confirm button.
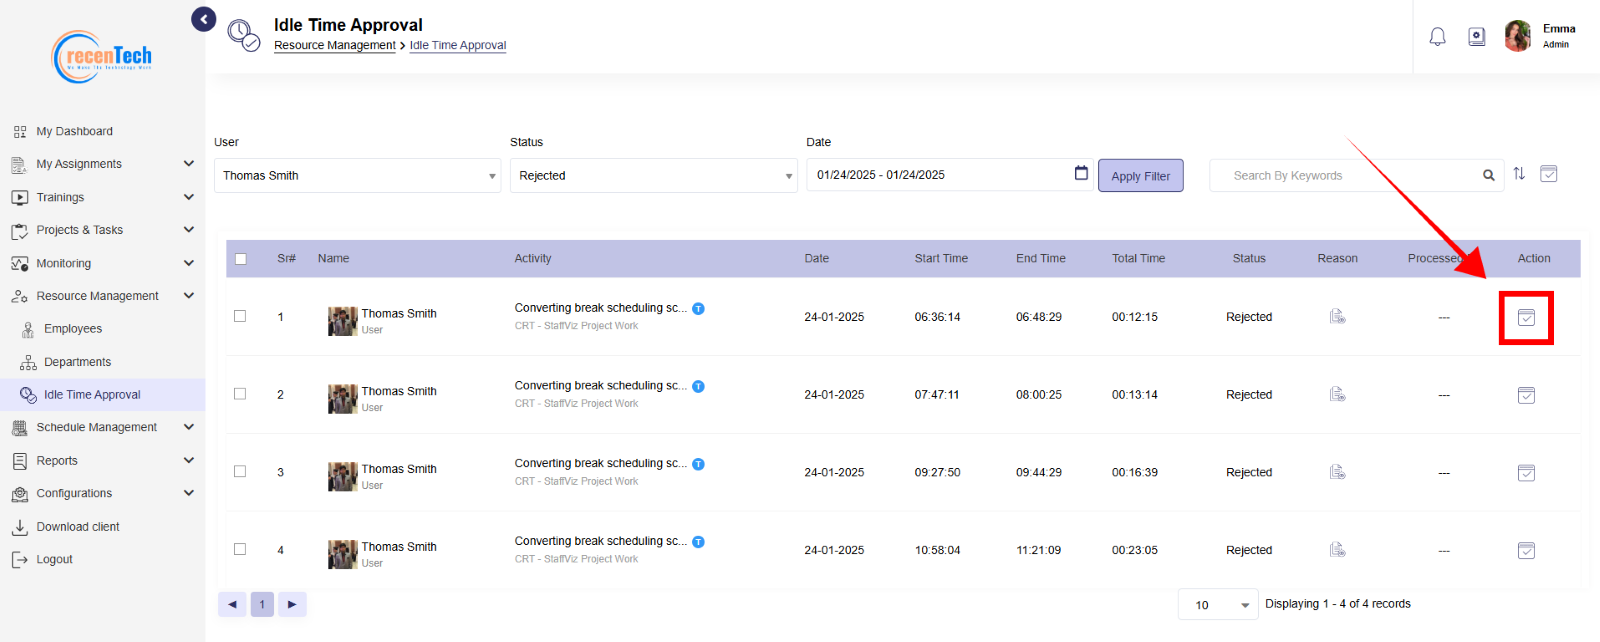
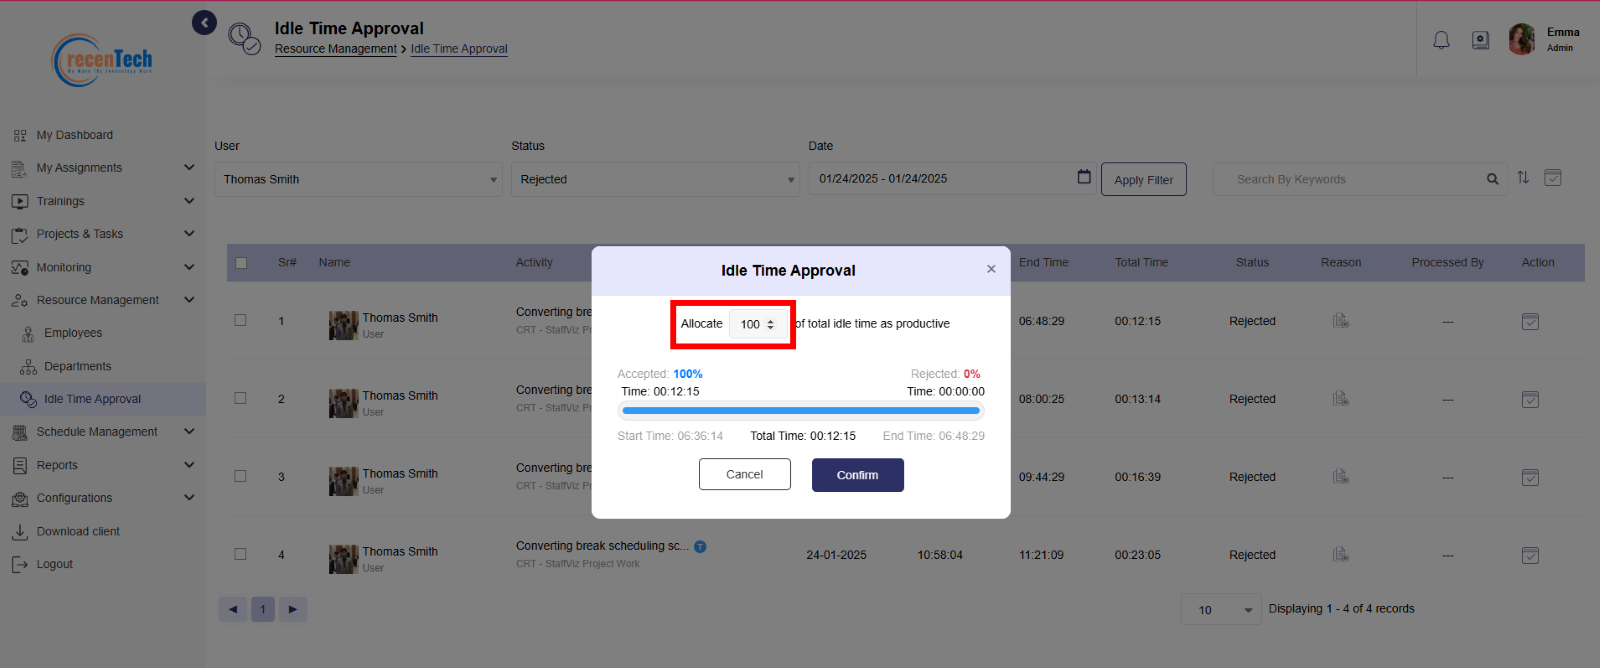
3.3.3: Convert Rejected Idle Time to Accepted
Step 1: Rejected Idle Time List
Follow section 3.1 to access idle time requests data. Please select the Rejected option from the status filter.
Step 2: Click Action Button
Click the action button on the right side of the screen.
Step 3: Accept Rejected Idle Time
A pop up will appear on the screen. Here admins can select the percentage of the rejected idle time and convert it to accepted (idle).
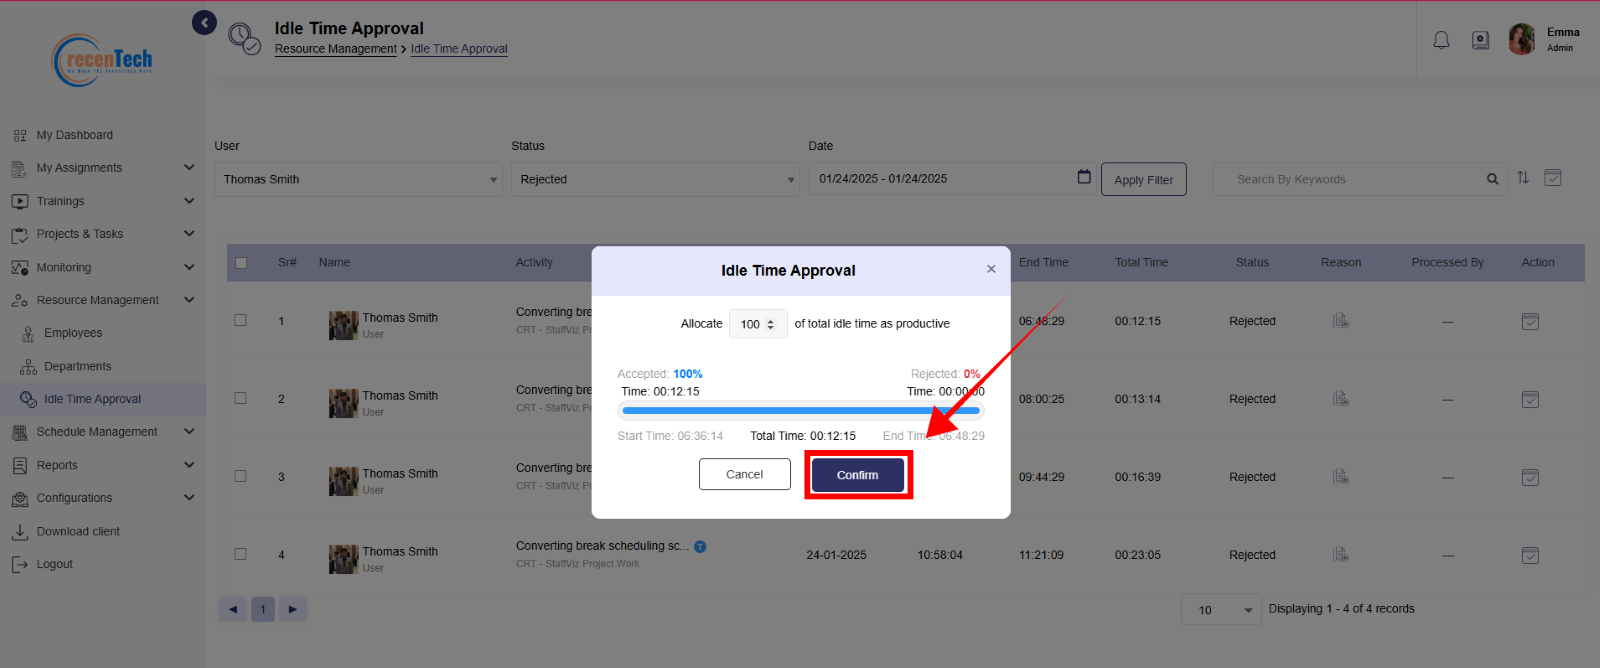
Step 4: Click Confirm
Finally click the confirm button.
Section 3.4: Manage Multiple Idle Time Requests
There could be multiple idle time requests within an organization. So, to make idle time request management easier, StaffViz allows admins to accept/reject multiple idle time requests at once.
Follow the steps to manage multiple idle time requests.
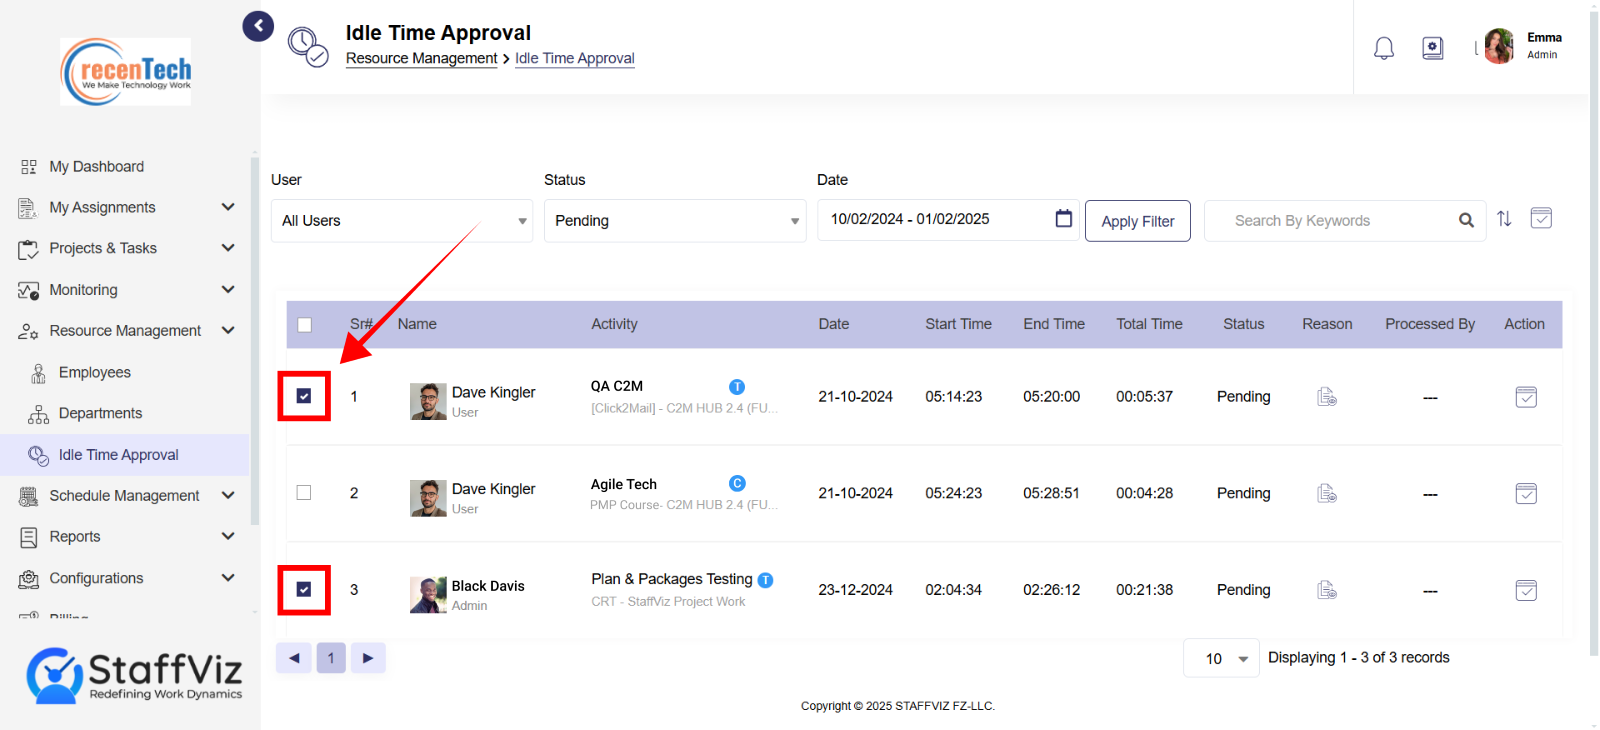
Step 1: Idle Time List
Follow section 3.1 to access idle time requests data. You can select pending, accepted, and even the rejected idle time option in the filter panel.
Step 2: Select Idle Time Requests
Select multiple idle time requests by checking the box on the left side of your screen.
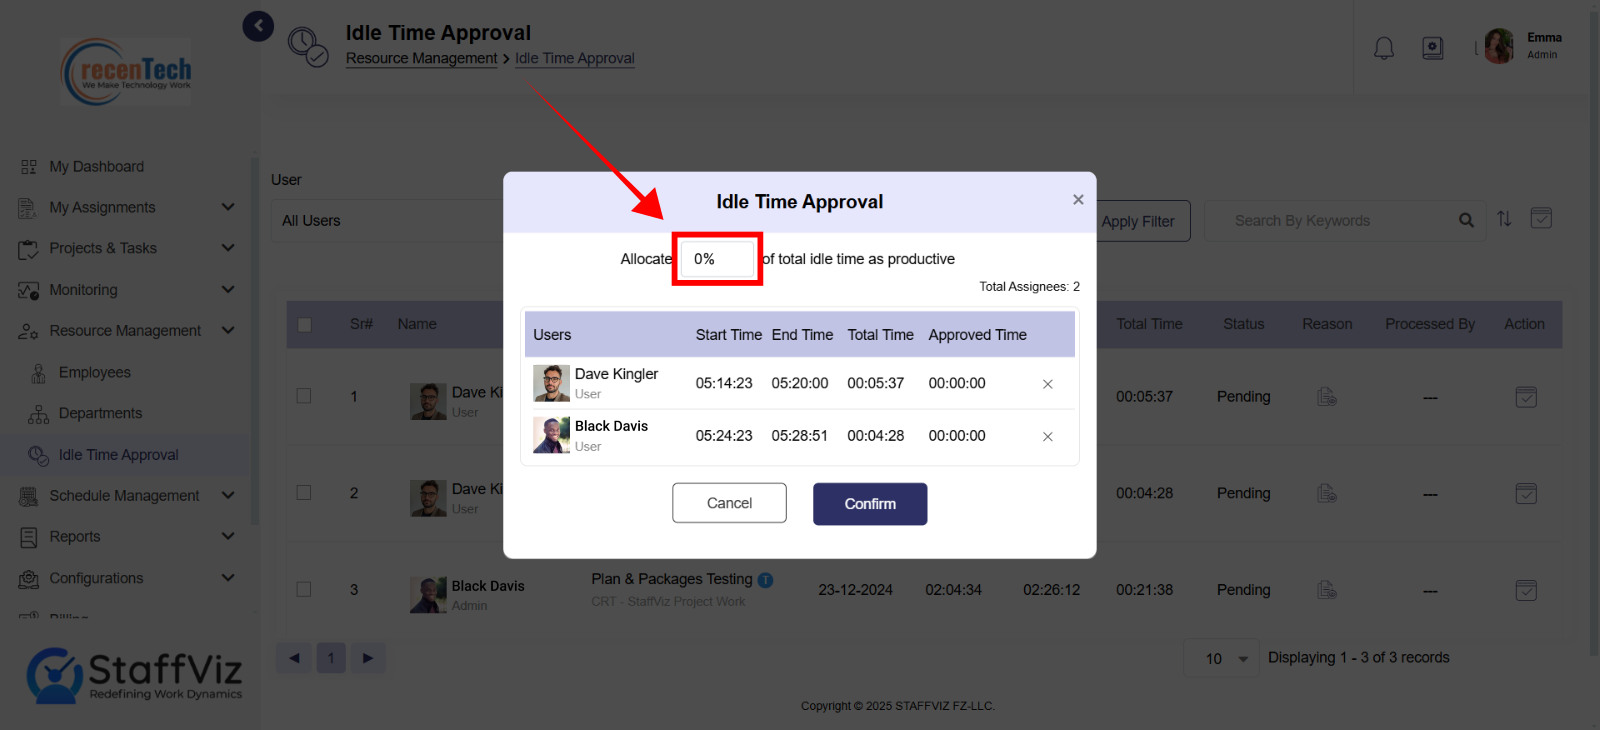
Step 2: Click Action Button
Click the action button on the top right corner of your screen.
Step 2: Action Pop Up
A pop up will appear on the screen. Here admins can select the percentage, and the action will be applied on all the selected idle time slots.
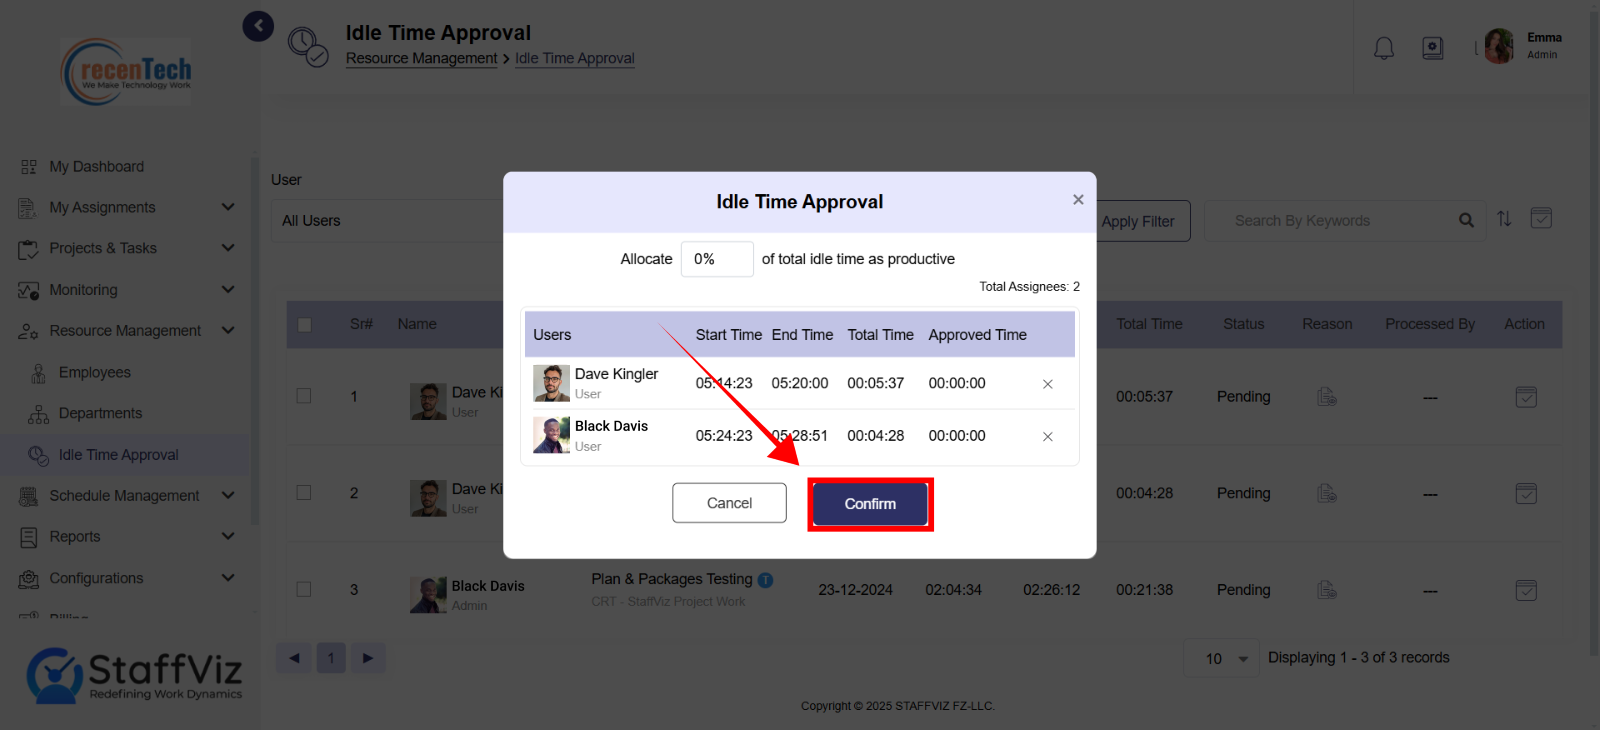
Step 3: Click Confirm
Finally click the confirm button and the action will be applied on all the selected idle time slots.
The Resource Management Module streamlines the management of employees and departments, centralizing data for improved coordination and resource allocation. It empowers HR managers and team leaders to optimize workforce productivity and maintain organizational efficiency.
Hopefully, we defined everything within the Resource Management module. You can contact us at support@staffviz.com in case you need any guidance.