Projects and Tasks
The Project and Tasks Section helps you efficiently manage your company's projects, tasks, and clients. Projects are broken down into multiple tasks, each assigned to user/s. This section enables you to track project progress, allocate budgets, set deadlines, and monitor time spent on each task. It also allows you to maintain a clear relationship with clients by linking tasks and projects to client-specific requirements, ensuring organized workflows and successful project completion.
Project and Tasks
module is further classified in three sections.
·
Section 1: Projects
·
Sections 2: Tasks
· Section 3: Clients
Section 1: Projects
This section helps in managing projects by providing tools to track time,
allocate resources, and monitor progress. Creating and organizing projects
ensures streamlined collaboration and clear visibility into team efforts and
outcomes.
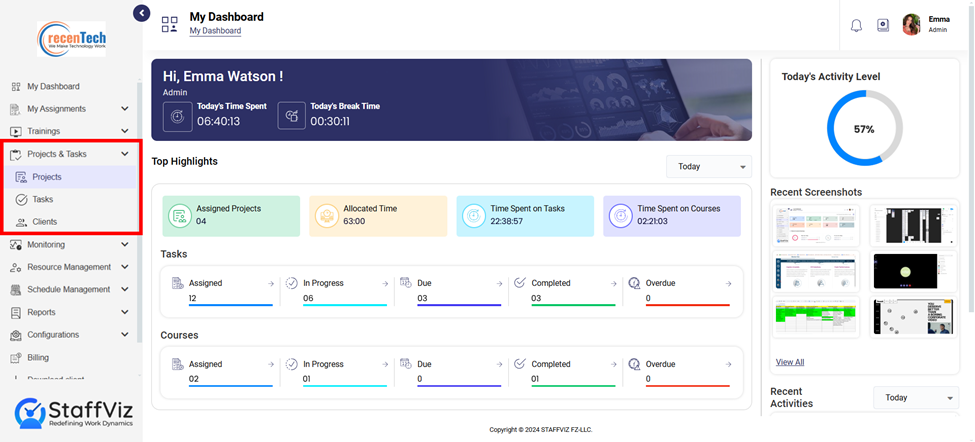
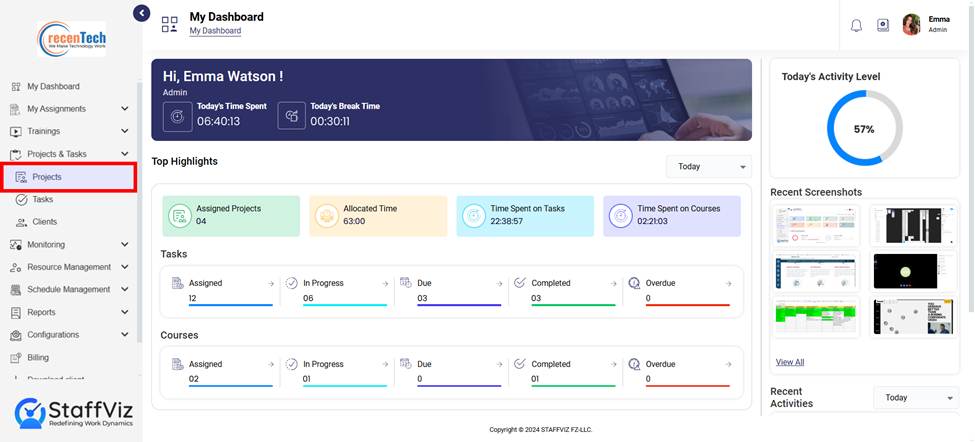
Step – 1: Navigate to Project Section
Select Project & Tasks > Projects from
the main navigation menu.
Click Add project.
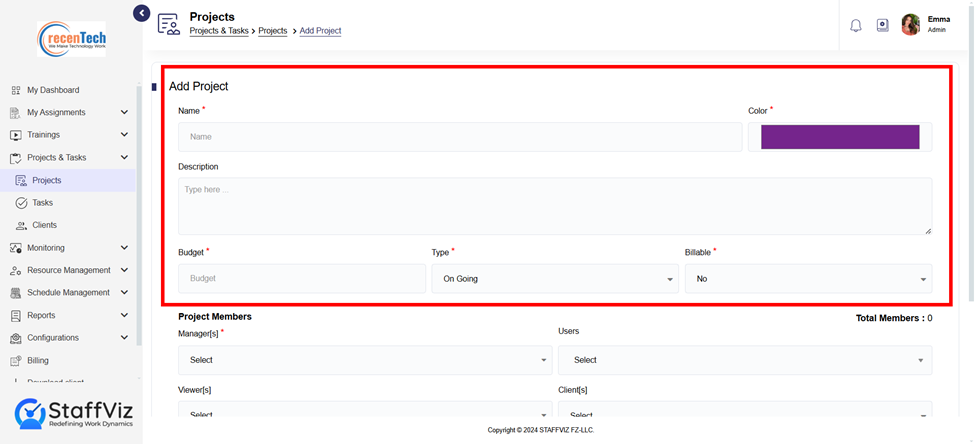
Add Project Section
Project Name: Enter a clear and concise name for your
project.
Color: Set a unique color as it makes it easier for
you to find your project from the many.
Description: Provide a more detailed explanation of
your project. This can include the project's goals, deliverables, and any other
relevant information.
Budget: Type the maximum budget allocated for this
specific project.
Type: Choose if the project is ongoing or one time.
a.
On-Going project: An on-going project is
referred to as a long-term project with multiple goals.
b.
One Time Project: Focused, goal-driven execution
to deliver a complete solution in one go.
Billable: Choose if the project is billable or not.
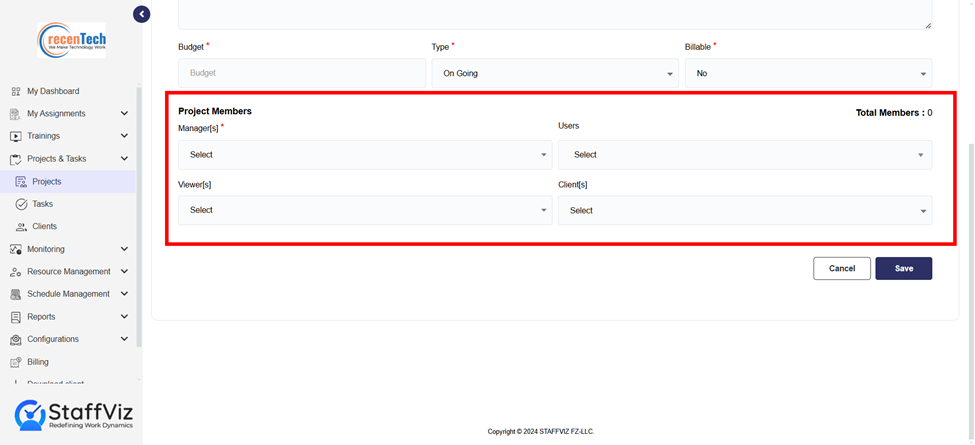
Project Members
Manager(s): Assign one or more users as project
managers. Click "Select" to choose them from a list.
Users: This allows you to assign individual users
with a specific project.
Viewer(s) (optional): This option is used to provide
visibility of project to the project owner or even the client. For this access
the client must have the StaffViz viewer account.
Client: The dropdown menu contains a list of your
existing clients to choose from.
Total Members: This number reflects the combined total of both managers and users assigned through the "Manager(s)" and "User(s)" sections we mentioned earlier. Note that viewer(s) and client(s) are not included in this.
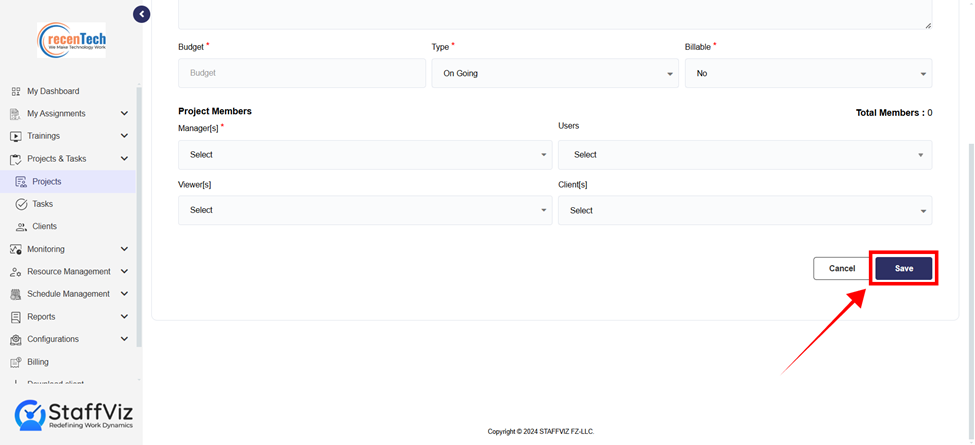
Once you are done filling in the form click Save to
add project.
Section
1.1: Navigation Tab
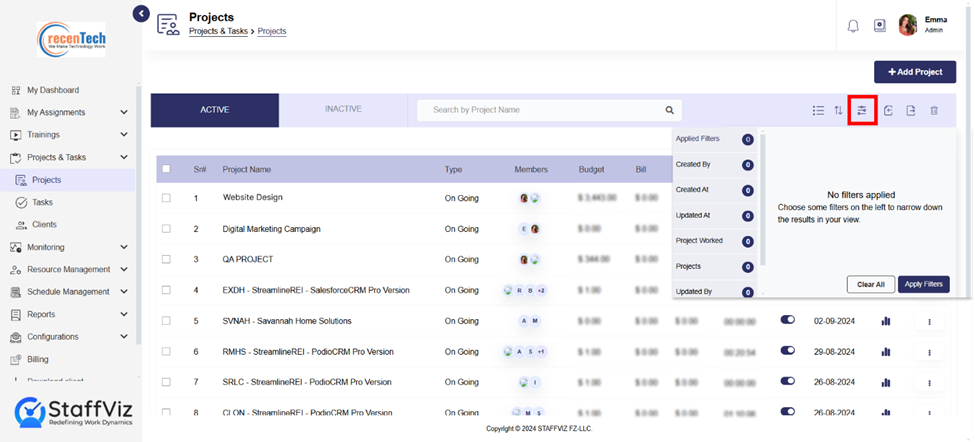
The Navigation Tab streamlines project and task management with features
like active/inactive toggles, search, sorting, filters, and import/export
options for seamless organization and accessibility.
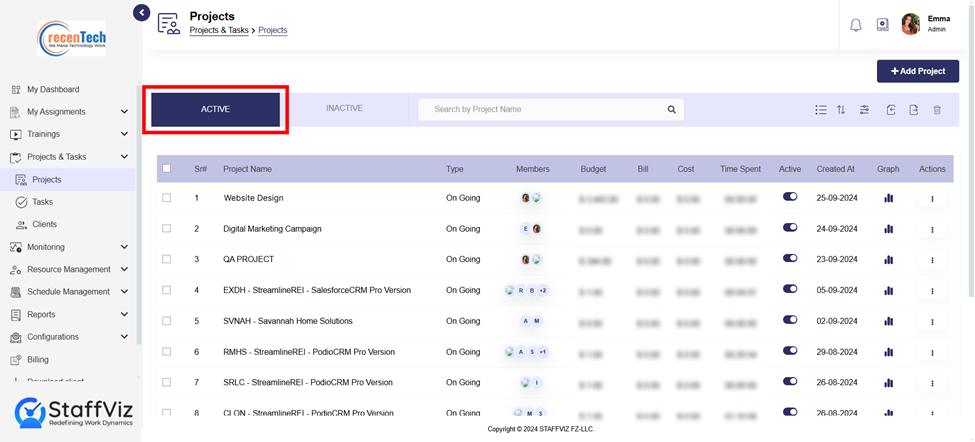
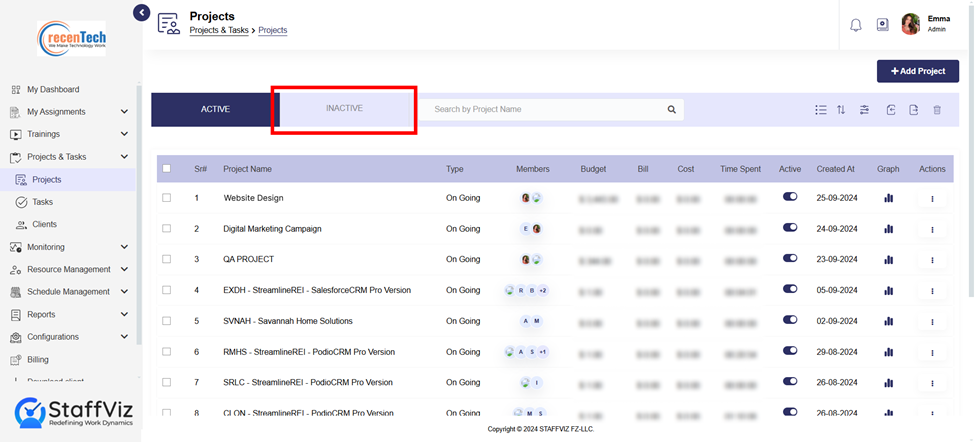
The Active and Inactive tabs are at the top of your project list. These tabs help you to view only active/inactive projects and tasks, keeping your current priorities clear.
Locate projects and tasks instantly by name or keyword,
saving time compared to browsing through long lists.

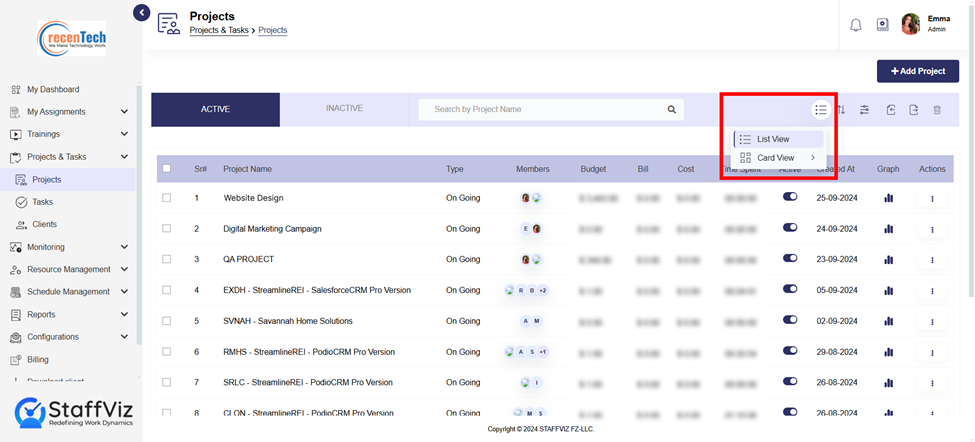
List views and card views are both methods for displaying
information on web application, they offer different visual presentations.
All the distinctions between list view and card view are
provided in detailed in Section 1.3 (Projects
Table & Project Cards).
·
Created At: Sorts projects or tasks by
the date and time they were initially created. This is a frequent sorting
option, especially for chronologically tracking project history.
·
Updated At: Sorts projects or tasks by
the date and time they were last modified. This is useful for focusing on
projects with recent activity or identifying areas requiring attention.
· Budget: Sorts projects or tasks by their associated budget. This helps prioritize projects based on resource allocation and identify potential budget constraints.

The Filter Panel allows you to view the filters you’ve currently applied. Plus, here you can manage filters, enabling you to find the required data with ease.
Section 1.2: Import And Export Projects Data
These buttons allow you to transfer data between the
application and other programs or file formats.
How to Export Project Data
Exporting project reports requires one click in StaffViz.
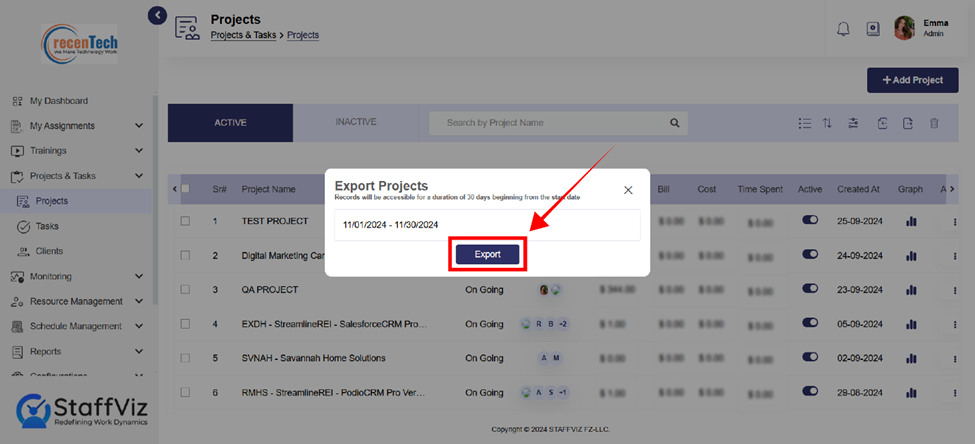
Step 1: Navigate To Projects
Please click Projects & Tasks > Project. Here Select the projects you want to export and click the Export button.
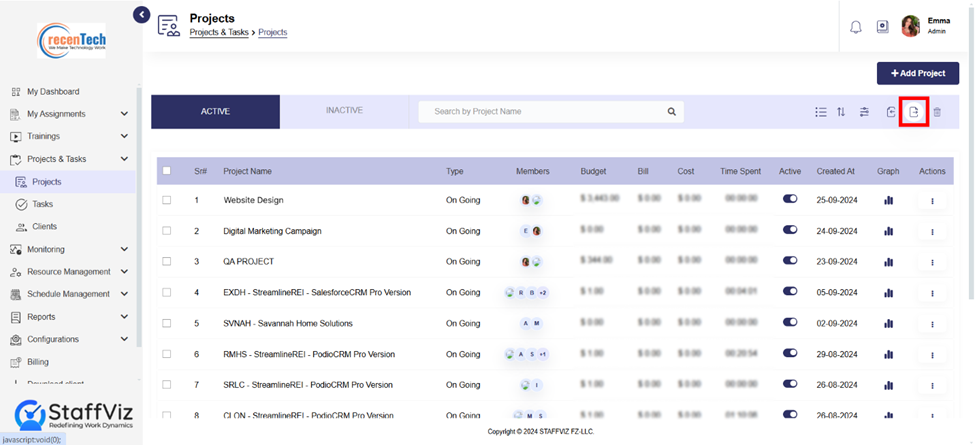
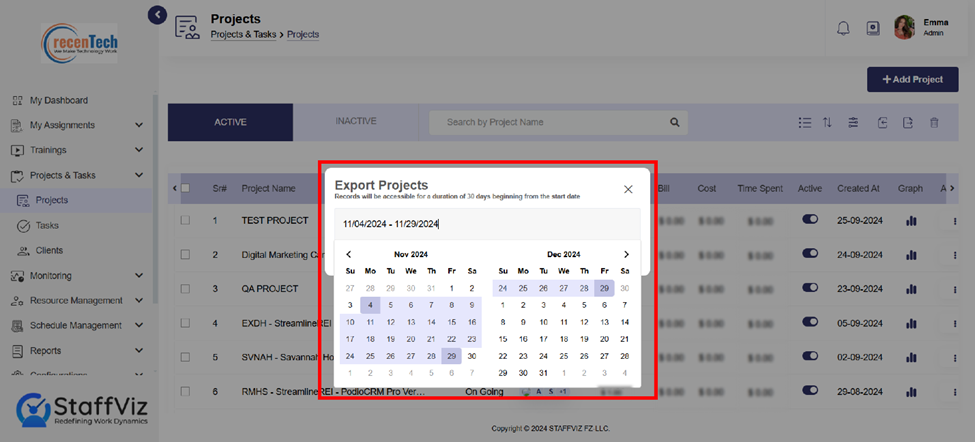
Step 2: Export Project Pop Up
A pop up will appear on your screen.

Step 3: Select Range
Please select a starting and end date for the project data you require.
Step 4: Export Data
Finally, click the Export button. With this project data from the
selected date range will be exported to your device in an excel worksheet.
How to Import Project Data
To import project data into StaffViz, it's important to
setup your file into a specific format. Please follow the steps given to import
project data into StaffViz.
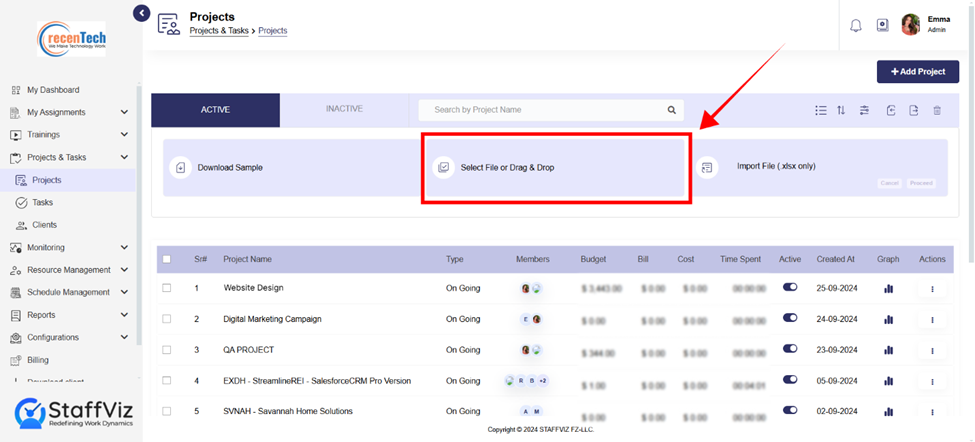
Step 1: Click Import
Click the Import file button and further options will drop down on your screen.
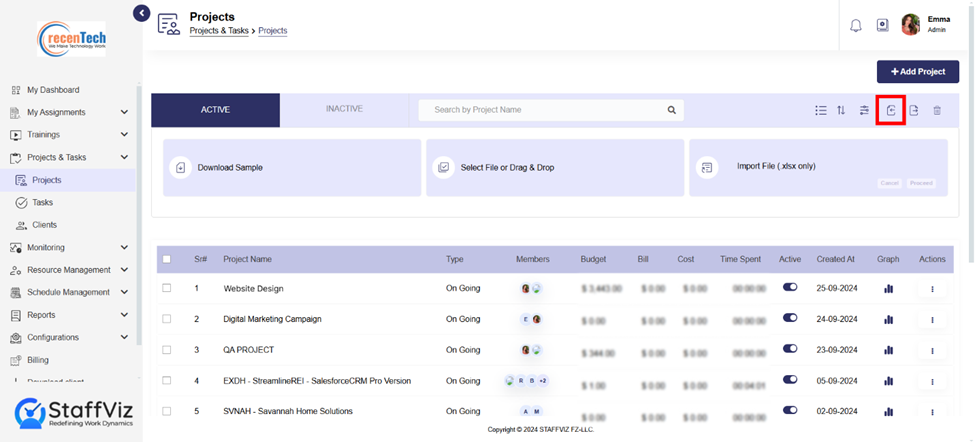
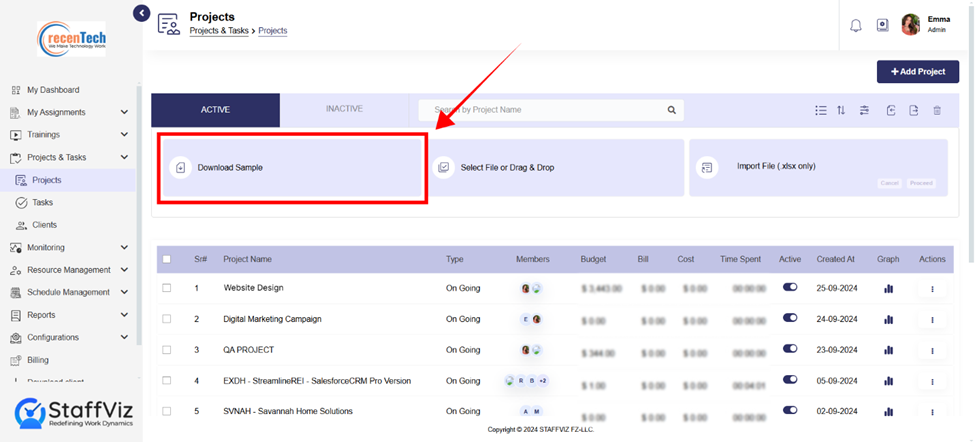
Step 2: Download Sample
Click the download sample button and format your data as per this file.
Step 3: Select File
Click Select File or Drag & Drop button and browse the file you have created in the prescribed format to import.
Step 4: Data Validation
If all the data and file format is correct, your file will be uploaded and can be seen here.
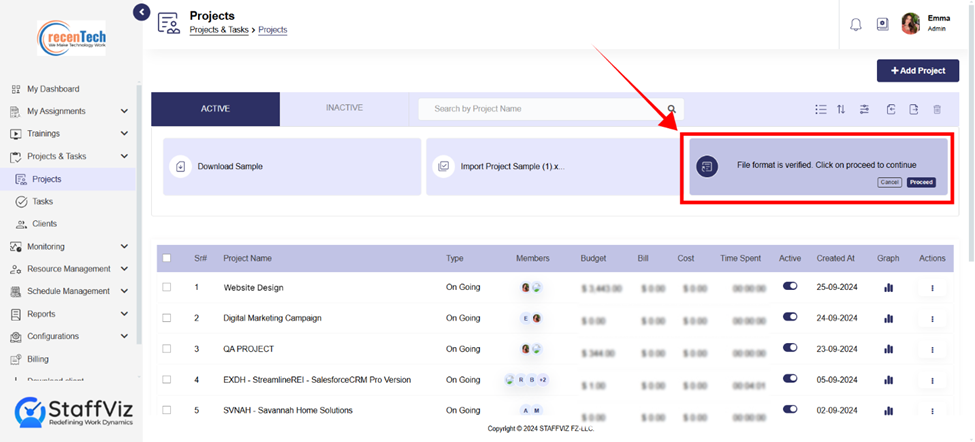
Step 5: Proceed
Click the Proceed button. With this final step your file is uploaded to StaffViz.

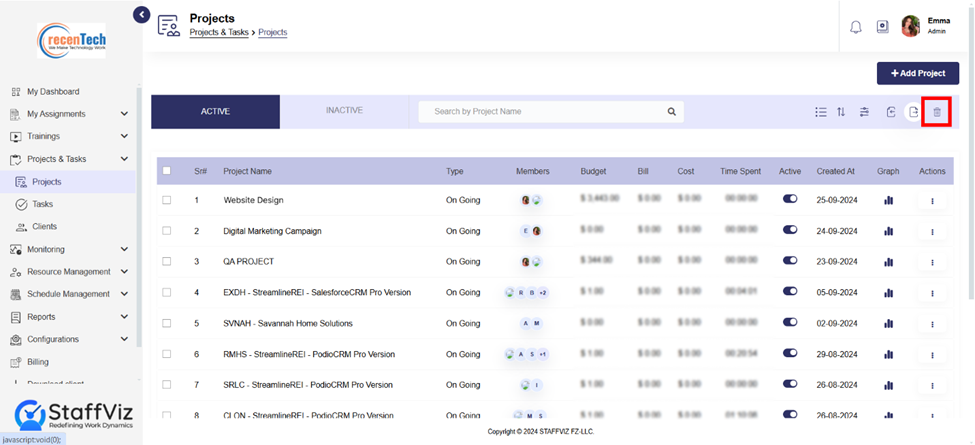
The delete button allows you to permanently remove projects from the Staffviz. This action should be used with caution as deleted projects cannot typically be recovered.
Section
1.3: Projects
Table & Project Cards
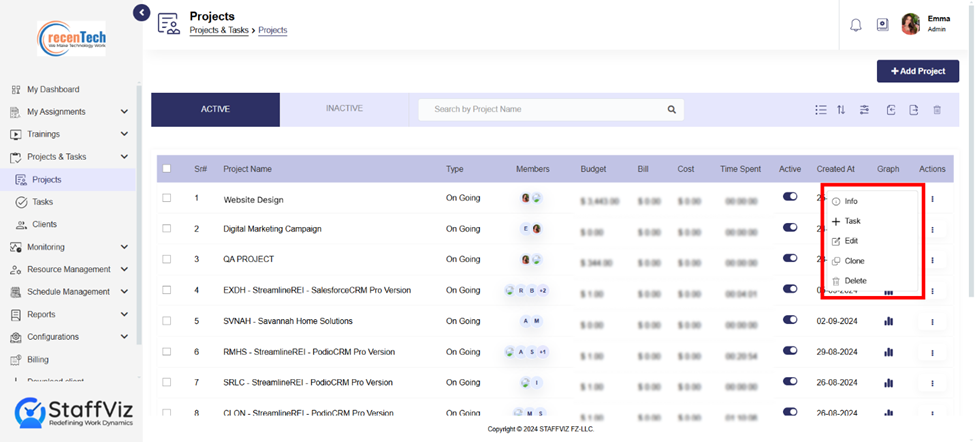
1.3.1: Projects Table (List View)
If the user has selected the list view the data will be
showcased in a table format.
The projects table within your projects section displays a comprehensive overview of your projects.
Let us break down the meaning of
each field in the table:
1.
Sr#: This column represents the Serial
Number or unique identifier assigned to each project within the system.
2.
Project
Name: This is the
main title given to your project and is typically used for easy identification.
3.
Type: This field categorizes your
projects based on their nature or purpose. The available project types include
options like "Ongoing" or "One Time".
4. Members: This column shows the number of team members assigned to work on the project. Clicking on this number reveals a list of those members and their time allocation in this project.

5.
Budget: This field displays the allocated
budget for the project.
6.
Bill: This column shows the total amount per
hour charged to the client.
7.
Cost: This column shows the hourly cost incurred for a resource(employee).
8.
Time Spent: This field displays the total
amount of time logged in by members working on the project.
9.
Active: This indicates whether the
project is currently active, paused, or completed.
10.
Created At: This column shows the date
and time the project was initially created.
11. Graph: This column displays a small graph that visually represents the previous trends of hours spent on the project within a specific time range.
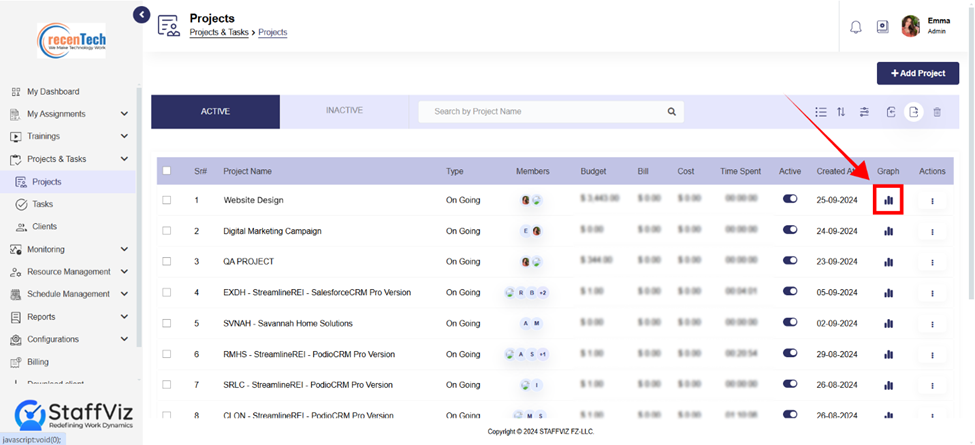
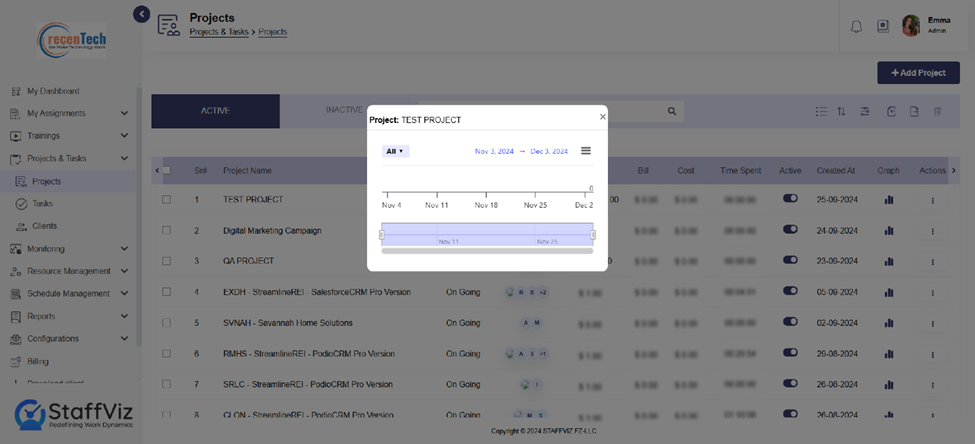
Downloading and Interacting with Project Graphs
The Graph column in your project management software's projects table offers options to download the graph and interact with graph in a vector format. Vector graphics are scalable and maintain high quality even when resized, making them suitable for presentations or reports where you might need to enlarge the graph.
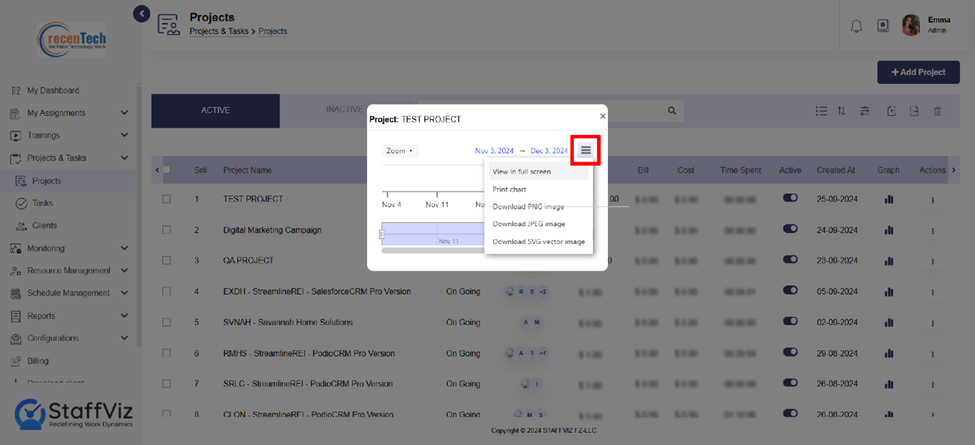
Downloading the graph as a PDF creates a portable document
format file containing the graph. This is a versatile option for sharing the
graph with others who might not have access to the project management software.
This downloads the graph as a standard image file. While
convenient for sharing, JPEGs might lose quality when zoomed in due to their
pixel-based nature.
Step – 3: Print Chart (Software
Specific)
This option offers a downloadable version of the graph in
the software's native chart format.
This option expands the graph to fill your entire screen,
allowing you to focus on the details and analyze trends more effectively.
1.3.2: Projects Cards
Incase user selects the projects card's view; the data will be showcased as the cards.
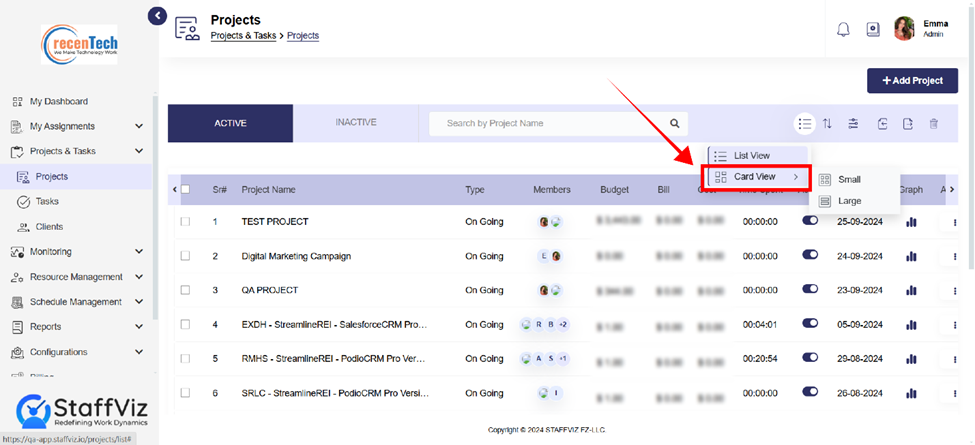
Projects cards almost the same data and options as the list view but in a different view. Let us break down the meaning of each field in the cards:
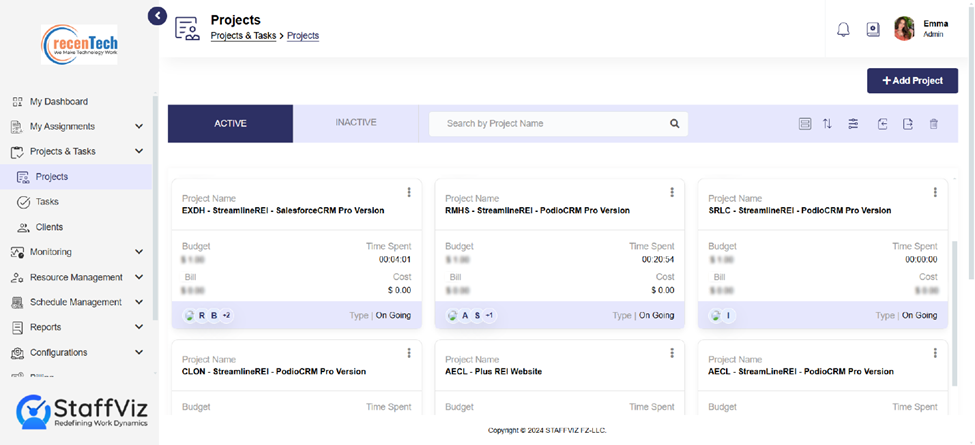
1.
Project
Name: This is the
main title given to your project and is typically used for easy identification.
2. Members: This shows the team members assigned to work on the project. Clicking on this number reveals a list of members and their individual time invested in this project.
3. Budget: This field displays the allocated budget for the project.
4. Bill: The amount per hour charged to the
client.
5. Time Spent: This field displays the total
amount of time logged by all members working on the project.
6. Cost: Amount per hour incurred on the
resource.
7.
Type: This indicates whether the project
is one time project or On Going.
8. Actions: The action buttons (three dots) further reveal the options that are discussed in detail in section 1.4: Actions.
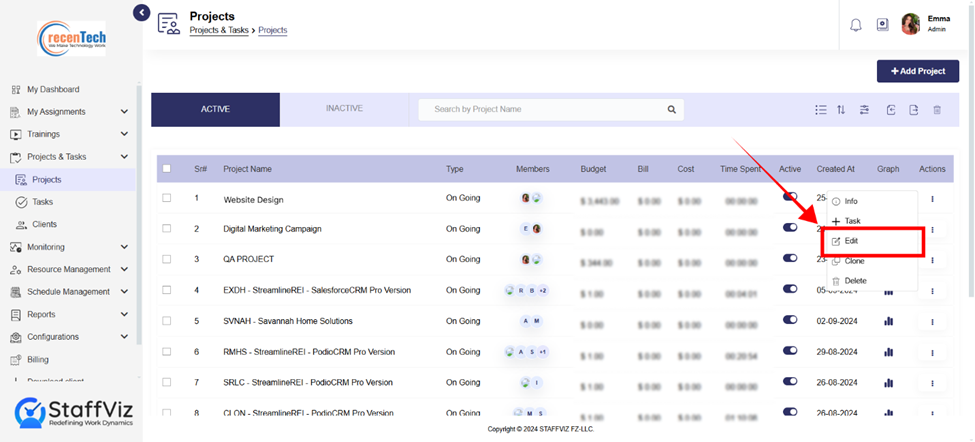
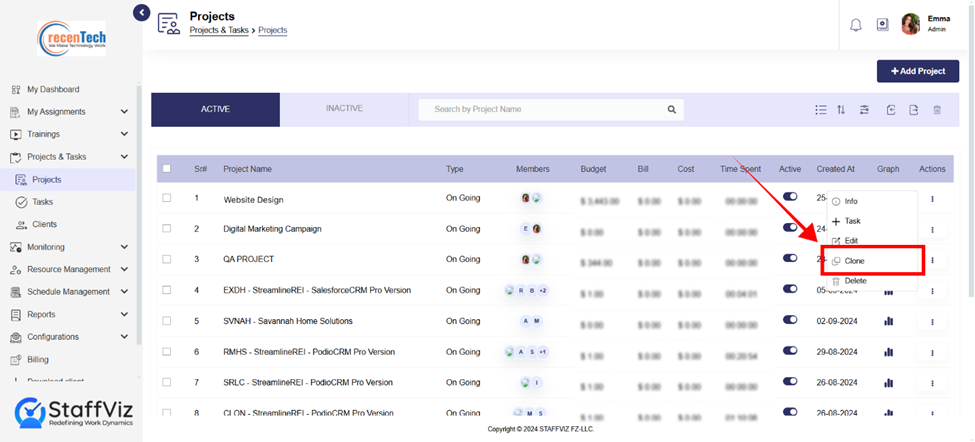
Section 1.4: Actions
This column displays a dropdown menu containing various
actions you can perform on the specific project.
These actions include:
- View project tasks
- Add task for the same project
- Edit project details
- Clone Project
- Delete
Section 1.4.1: View
Project Task’s Info
By clicking on the info button, you will be presented with a
more comprehensive overview of the project compared to the information
displayed in the projects table.
Step 1: Click Info Button
From the action options, please click the Info button.
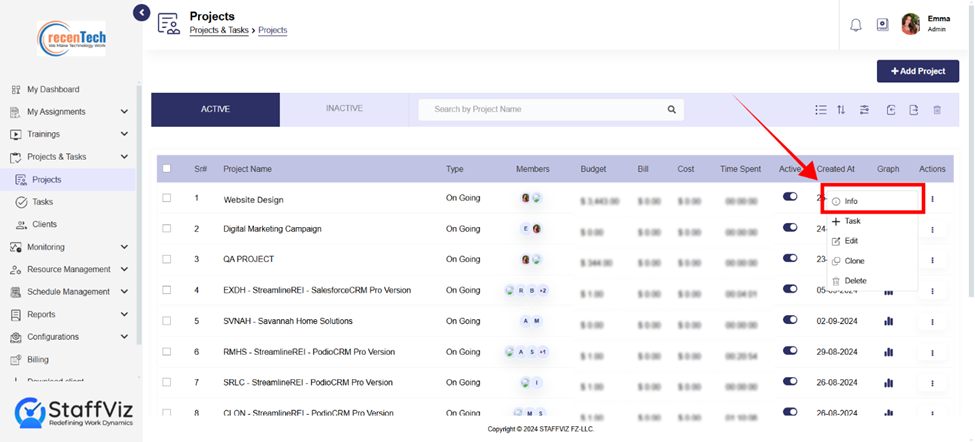
Upon clicking the info button, a more detailed task
information panel opens and provides the following details about the subsequent
task.
1.
Project Name: The main title assigned to
your project for easy identification.
2.
Client Name (Optional): If the project is
for a specific client, their name will be displayed here. This helps associate
the project with the relevant client information.
3.
Project Manager: This field identifies
the person responsible for overseeing and managing the project.
4.
Members: This shows the total number of
team members assigned to work on the project.
5.
Allocated Time: This field represents the
estimated or planned total time for completing the project. It helps assess
progress and identify potential delays.
6.
Time Spent: This displays the total
amount of time logged by team members working on the project tasks.
7.
Creation Date: This shows the date and
time the project was initially created.
8.
Bill: Refers to the amount of money
invoiced or charged to the client for the project.
9.
Cost: This represents the total amount of
money spent on the project from your own resources.
10. Budget: This bar on the graph shows the
total budget allocated for the project.
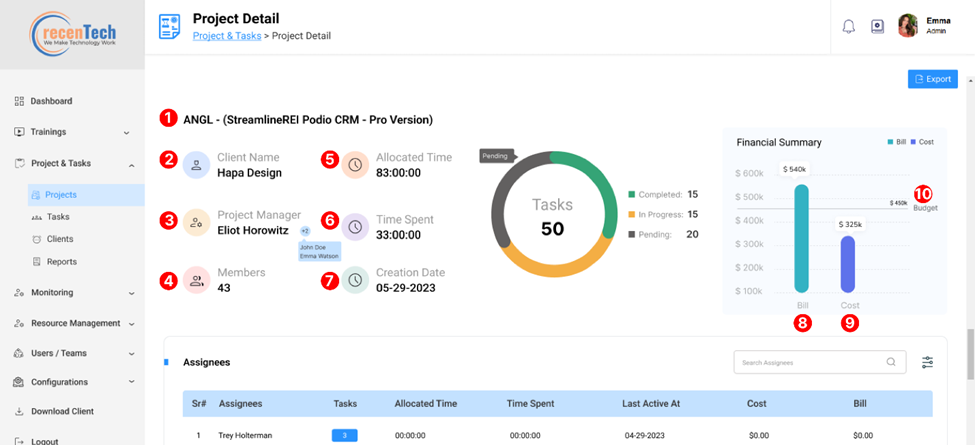
Export
The export to Excel functionality allows you to transfer
project information from your project management software into a Microsoft
Excel spreadsheet file.

Assignees Table
The Assignees table within your project detail provides a detailed breakdown of team members assigned to a specific project. This table helps you monitor individual contributions, track workloads, and identify potential bottlenecks.
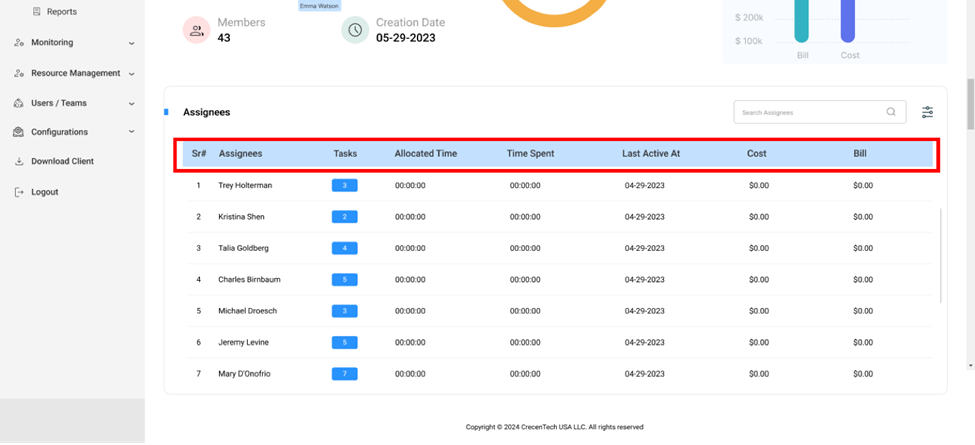
1.
Sr#: This column represents the Serial Number,
or a unique identifier assigned to each team member within the project.
2. Assignee: This displays the name of the
team member assigned to tasks within the project. Clicking on the name might
reveal their profile or contact information (depending on the software).
3.
Tasks: This field shows the number of
tasks assigned to the specific team member within the project.
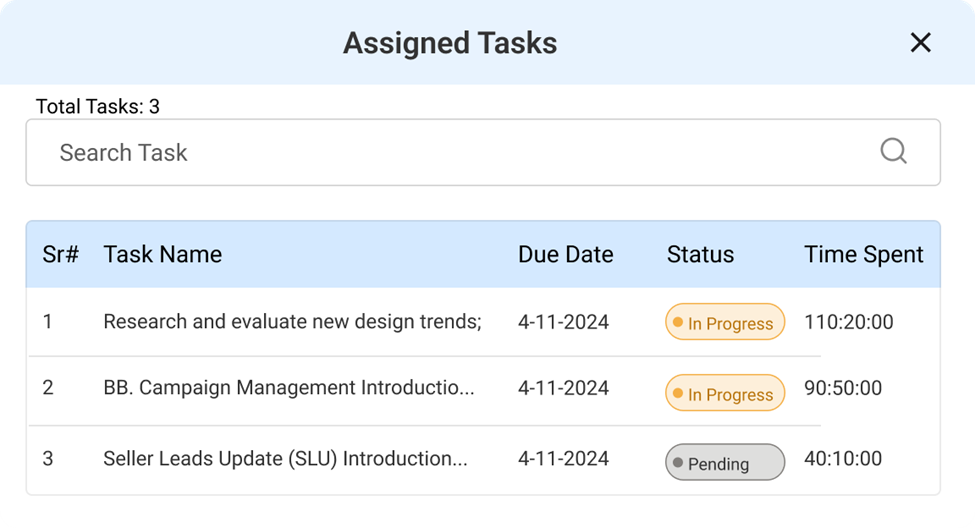
Clicking the tasks further opens a pop-up providing the
following information of each task within the project.
I.
Sr#: The number for each task in the
list.
II.
Task Name: The specific title of a
task to identify.
III.
Due Date: Due date is the predefined
date at/before which the task should be completed.
IV. Status: Current stage of the task. (e.g.;
Pending, in-progress, or completed).
V.
Time Spent: The total time spent on
the task till now.
4.
Allocated Time: This represents the
estimated or planned total time for the team member to complete their assigned
tasks.
5.
Time Spent: This displays the total
amount of time the team member has logged working on their assigned tasks.
6.
Last Active At: This indicates the date
and time the team member was last active on the project, potentially logging
time or working on tasks.
7.
Cost: This column might show the
calculated cost associated with the team member's work on the project. This
could be based on their hourly rate multiplied by the time spent.
8. Bill: This column, if present, might show the amount billed to the client for the team member's work on the project.
Section 1.4.2: Add New Task
This button creates new tasks within your projects. Tasks
are the building blocks of any project, representing specific actions or
deliverables that must be completed to achieve the overall project goal.
Please follow the guidelines in section
2.1 (How to Add a Task) to learn more about this section.

This button allows you to modify various aspects of an existing project. This functionality is crucial for keeping project information current, adapting to changing requirements, and ensuring project success.
What You Can Edit
Once you click the Edit Project button, you will be
presented with a form or interface allowing you to modify various project
details. Common editable elements include:
1.
Project Name: Update the project title if
needed.
2.
Project Description: Edit or refine the
project description to provide a clearer overview of the project goals and
objectives.
3.
Project Type: Change the project type if
it no longer accurately reflects the project's nature.
4.
Due Date: Modify the target completion
date for the project if necessary.
5.
Budget: Update the allocated budget for
the project if required.
6.
Members: Add or remove members assigned
to work on the project.
7.
User(s): Edit user(s) to replace or add
more user to the project.
8.
Viewer(s): Edit the viewer or add
multiple viewers if required.
9.
Client: Edit the client if required.
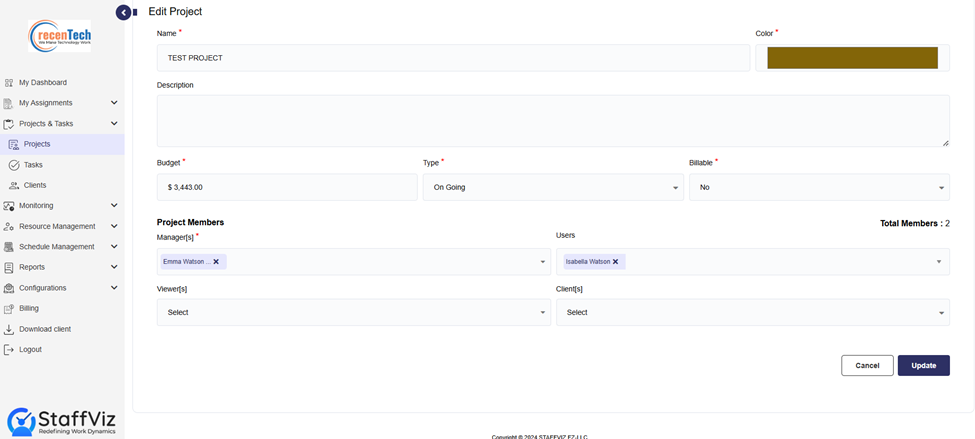
Once all the editing is done, please click the Update
button.
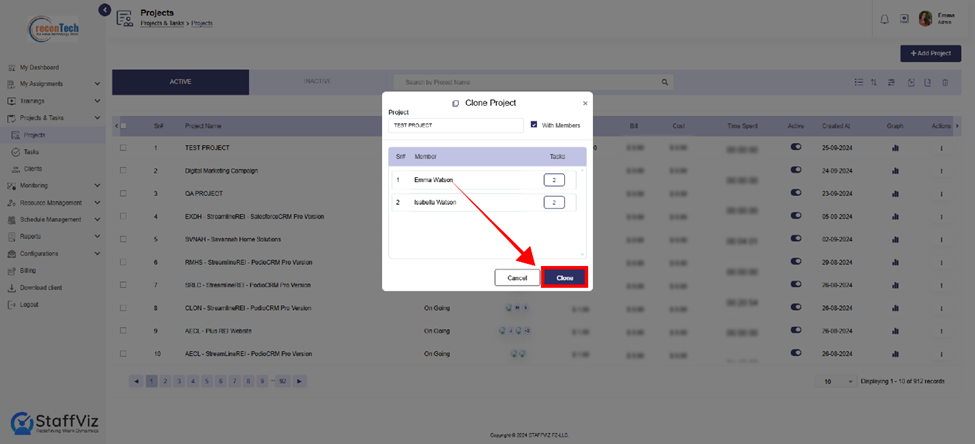
Section 1.4.4: Clone Project
The clone project functionality allows you to create a
duplicate of an existing project. This can be beneficial for distinct reasons:
·
Creating Templates: Clone a project with
a defined structure, tasks, and settings to serve as a template for similar
future projects.
·
Starting Similar Projects: Quickly create
a new project with a similar foundation to an existing one, potentially with
modifications.
Step 1: Click Clone Project
In the action options, please click the Clone Project
option.
Step 2: Cloning Options (With or Without Members)
When cloning a project, you might have the option to include
or exclude team members from the cloned version. Here is a breakdown of both
options:
a. Cloning With Same Members: This option creates a replica of the project with all the original team members assigned to the tasks within the cloned project.
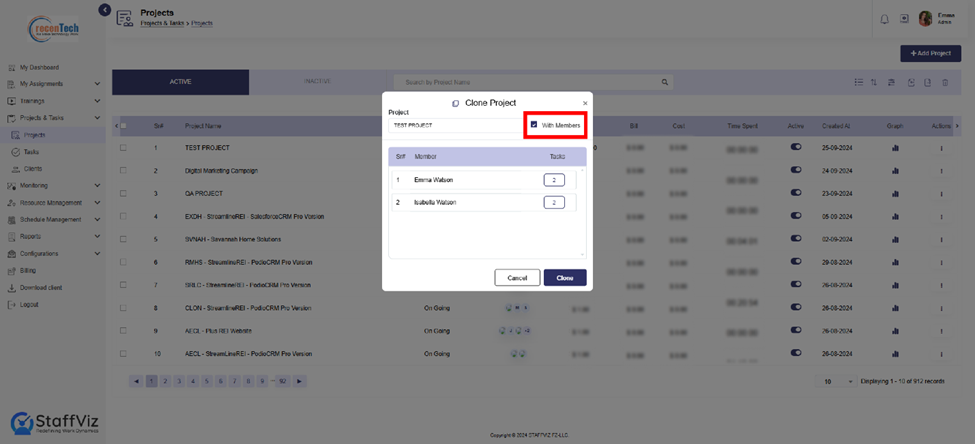
b.
Cloning Without Members: This option
creates a replica of the project with all the original team members assigned to
the tasks within the cloned project.
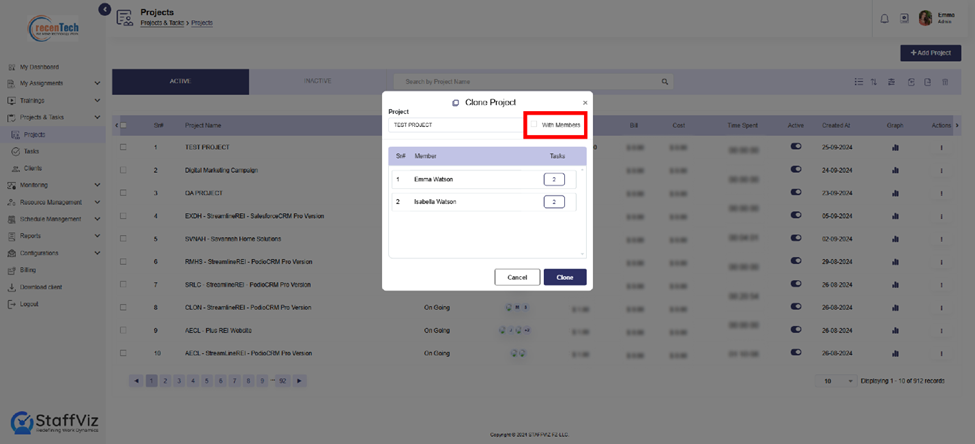
Step 3: Change Clone Project Name:
If you want to, you can use the project section and change the name of the cloned project.
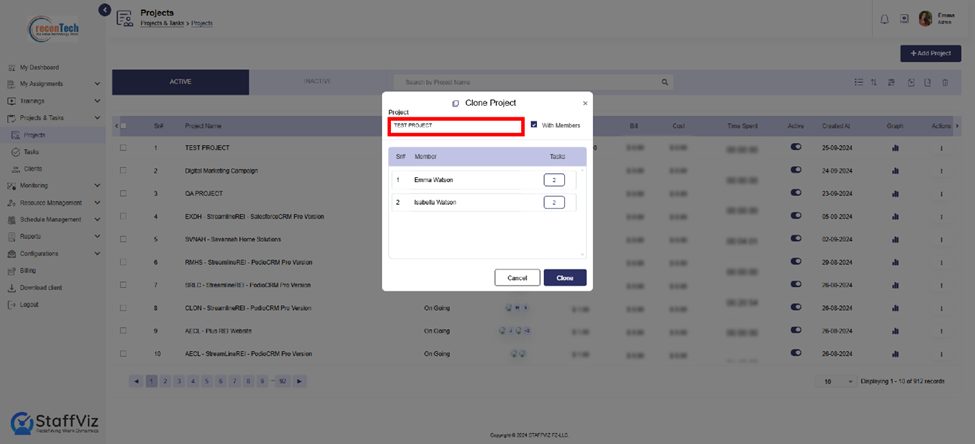
Step 4: Click Clone
Once you’ve selected your preferences, please click the clone button and a new cloned task will be created.