Section 3: My Timesheet
Step 1
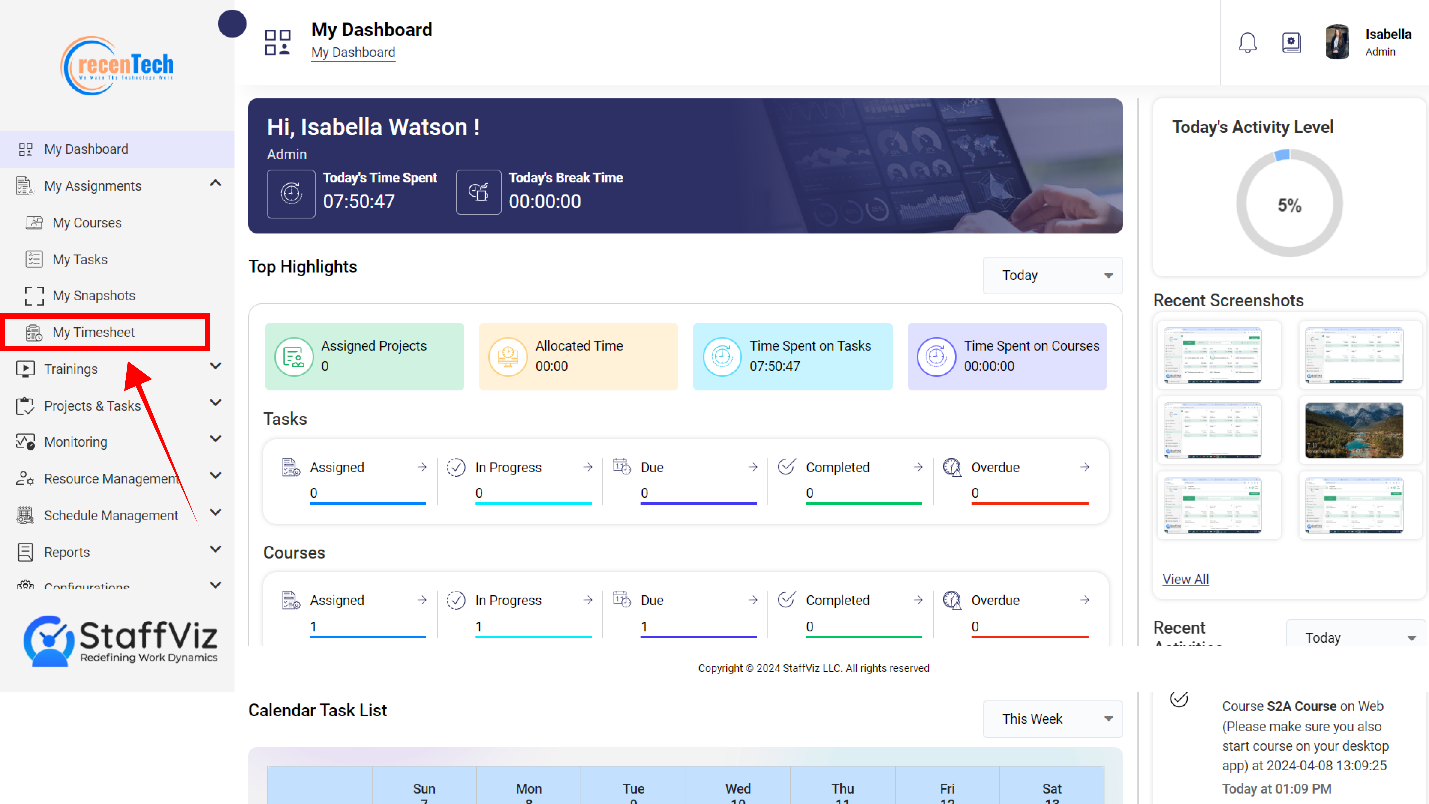
Click My Assignments > My Timesheet.
Step 2
Upon clicking the My Timesheet on the StaffViz dashboard a new page will open. This new page is My Timesheet Panel.
Section 3.1: My Timesheet Overview
My Timesheet is the crucial section of My Assignments module for which employees should always keep track of. My Timesheet has all the data about how much time you spent on any activity, project or break during and even after/before your shift hours.
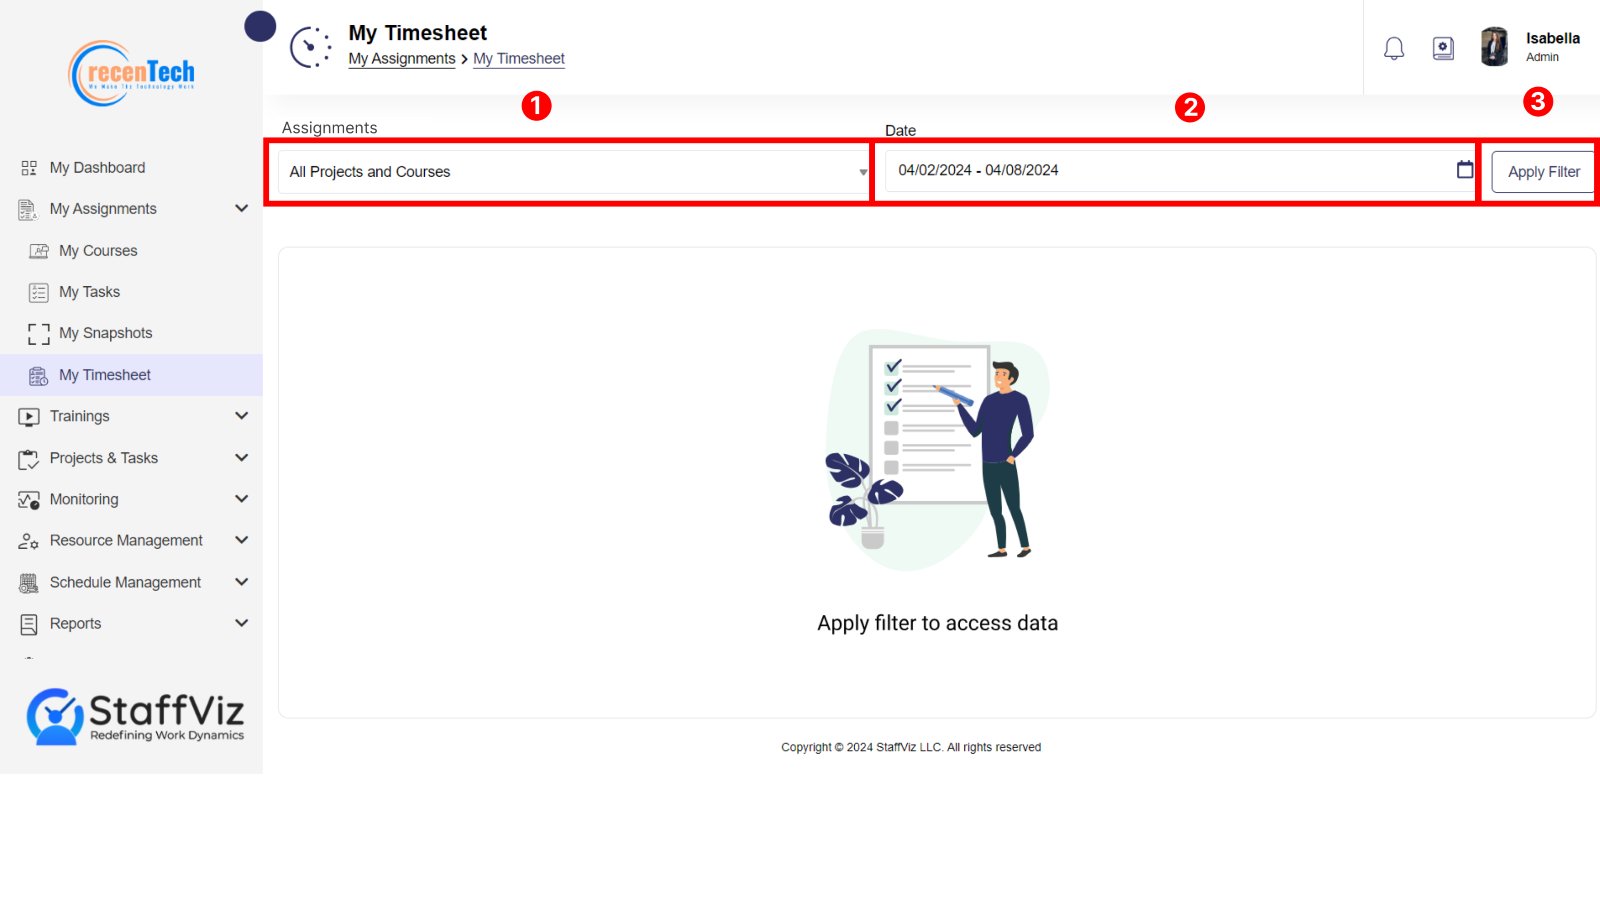
StaffViz always keeps a record of time spent and allows you to check your work efficiency. Using the following filters on the top bar on My timesheet panel, you can check the overall time data or time spent on specific activity or project.
Assignments: In this section, you can choose courses and projects to see the time spent on specific courses or projects. You can also choose All option if you aren’t looking for the timesheet for the specific course or project.
Date: You can either choose to start and finish date to select specific days for which the time data is required, or you can use the options like today, last 7 days, last 30 days, this month, last month, or even last months.
Apply Filter: Once you set the filters, click this button to get results.
Section 3.1.1: How To Track Your Time Using My Timesheet
Follow the steps to get the timesheets for your assignments.
Step 1
Click My Assignments > My Timesheet.
Step 2
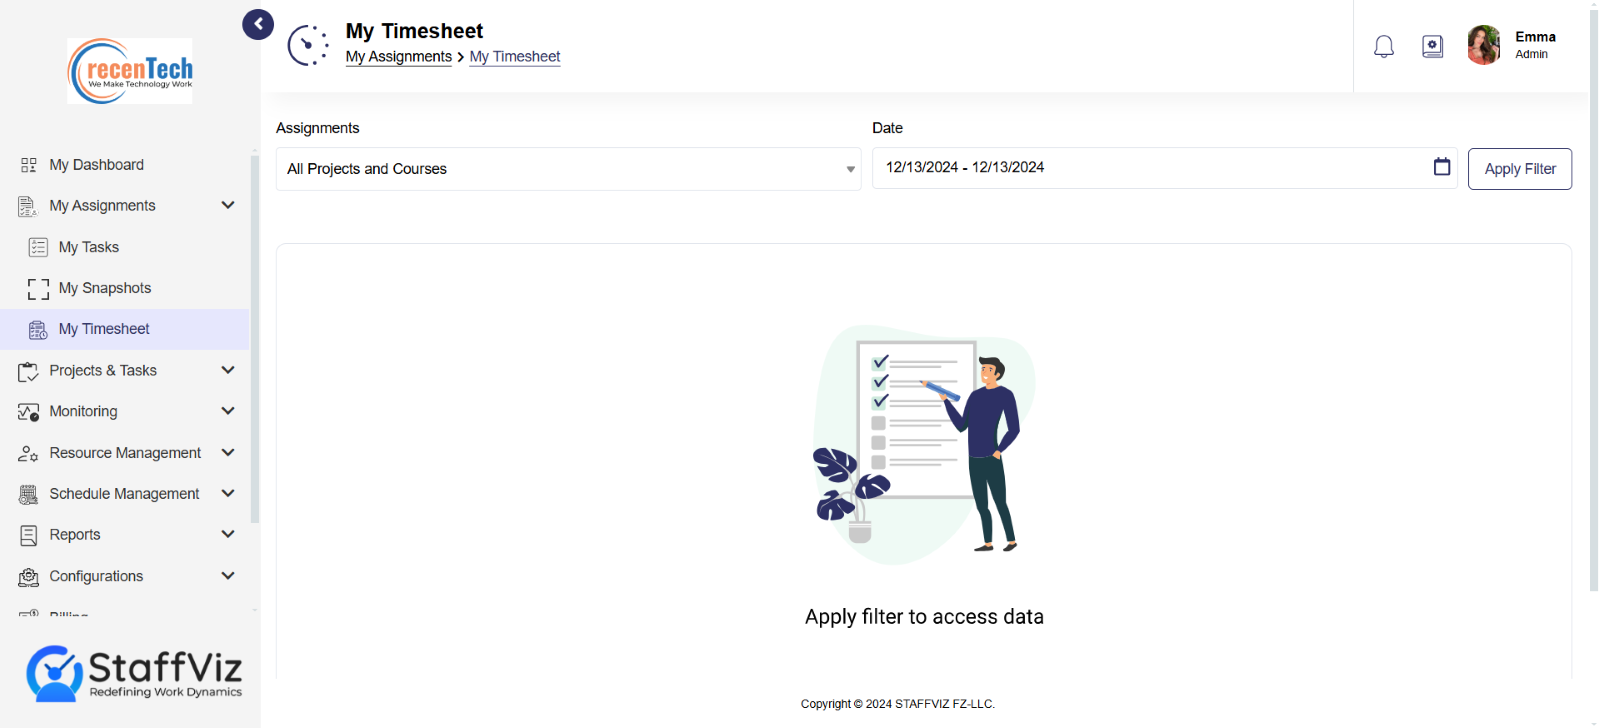
A new page will appear on your screen. This is My Timesheet panel.
Step 3
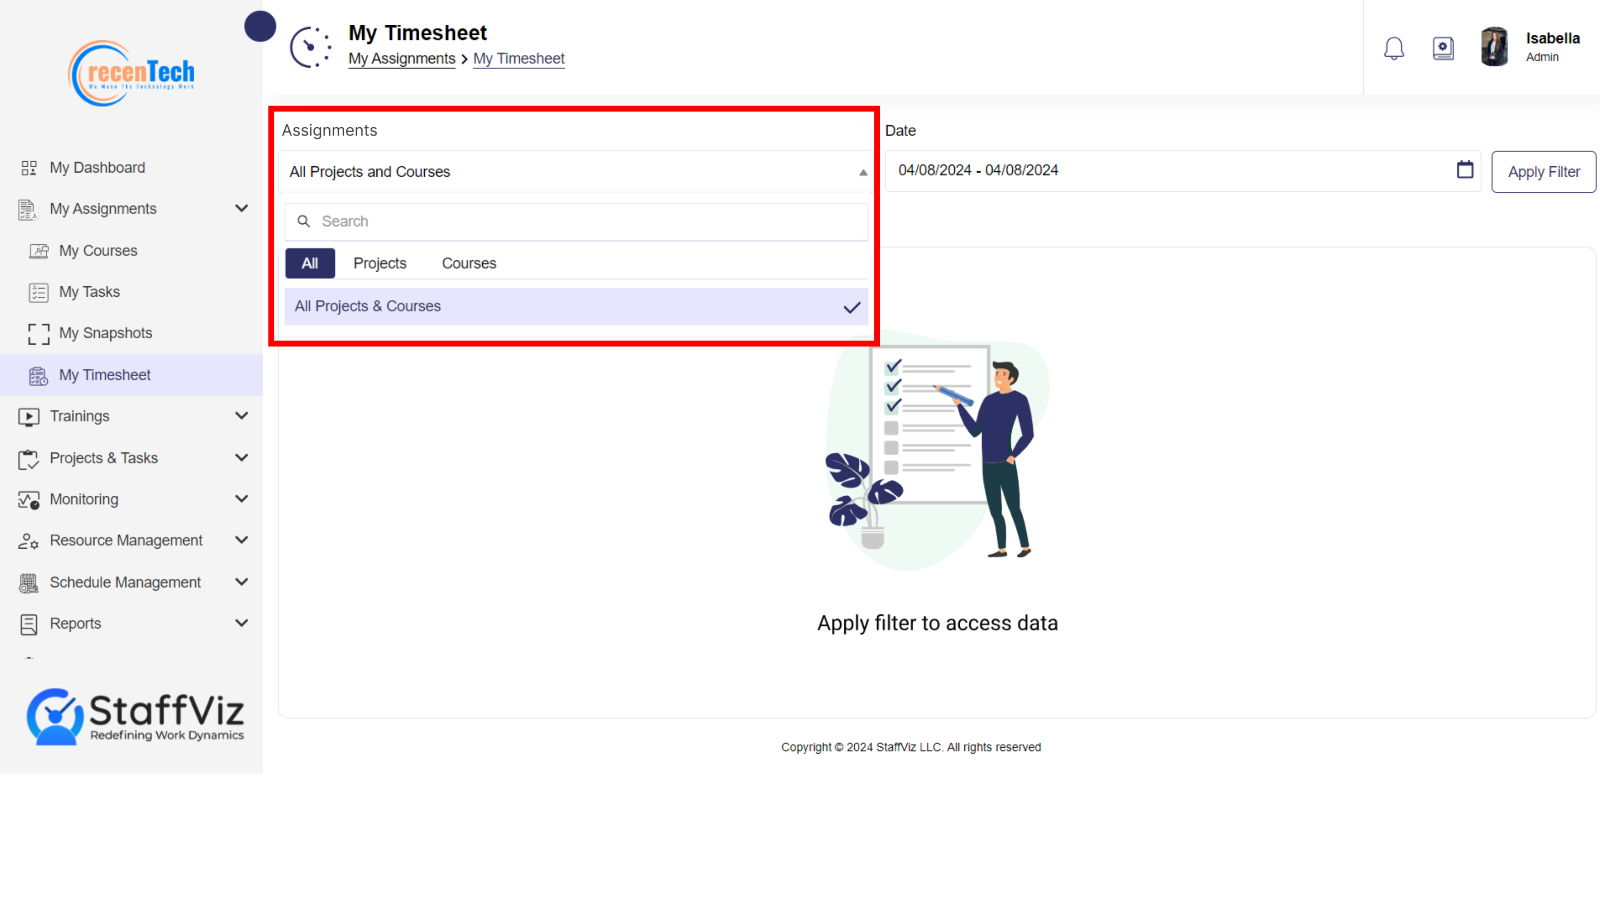
Click Assignments dropdown. You have three options.
All: Includes timesheets of all the projects and courses.
Projects: To get Timesheets of all assigned projects.
Courses: To get Timesheets of all assigned courses.
Step 4
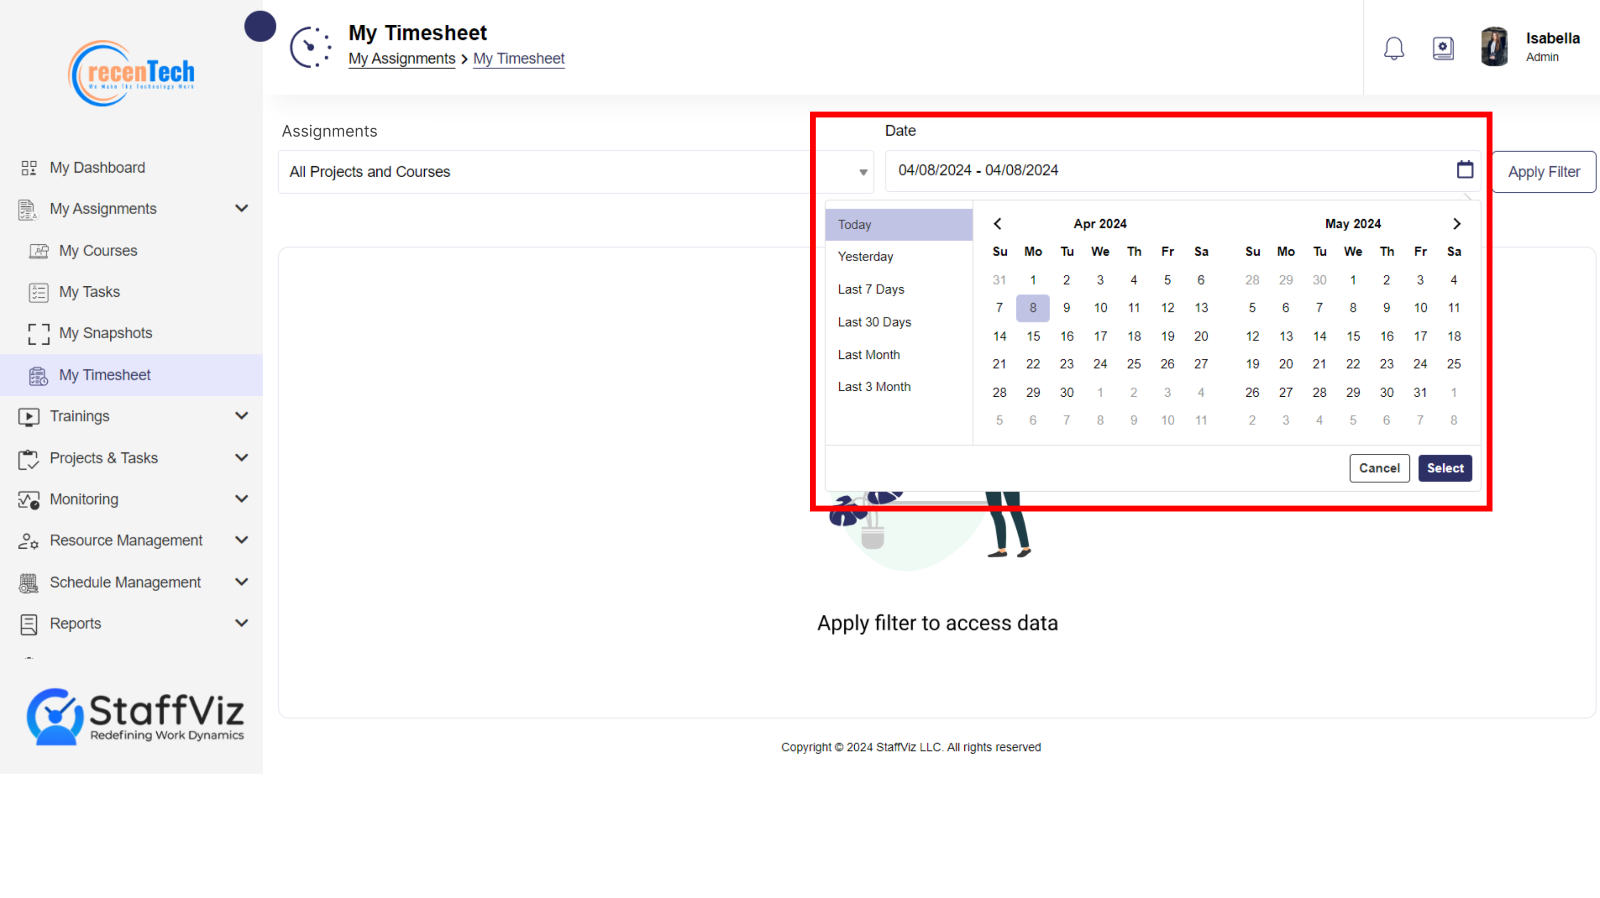
Select the date(s) for which you want the timesheets.
You can choose Starting and Ending dates manually from the calendar.
You also have the option to choose a time from the panel beside the calendar showing options like Today, Yesterday, Last 7 days, Last 30 days and so on.
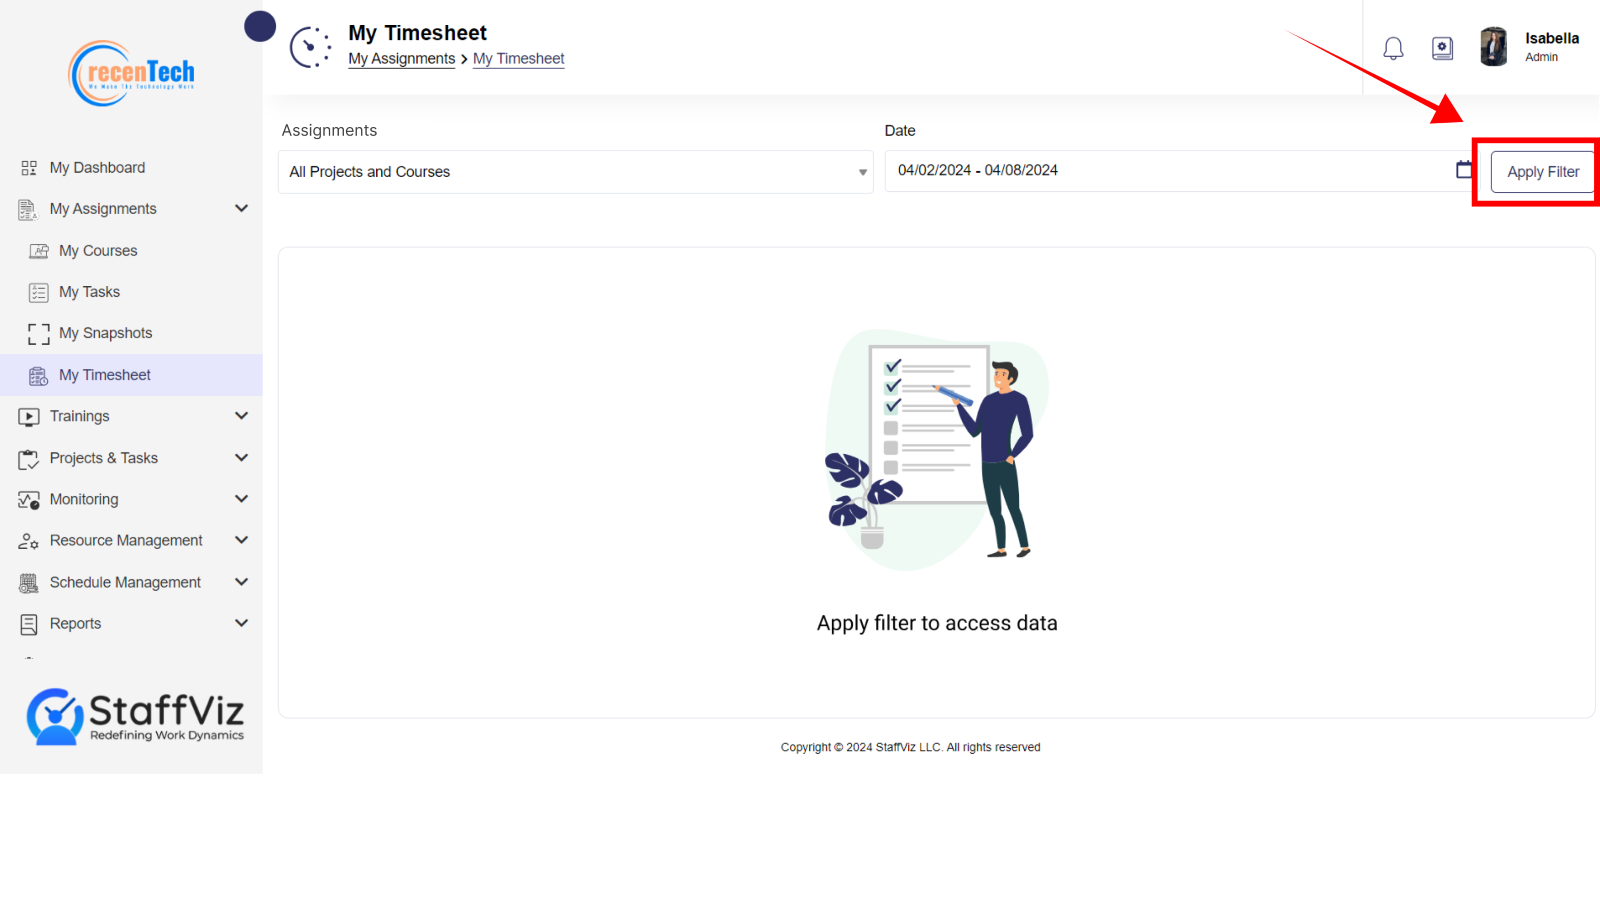
Step 5
Once all the filters are set, Click Apply Filter button.
Step 6
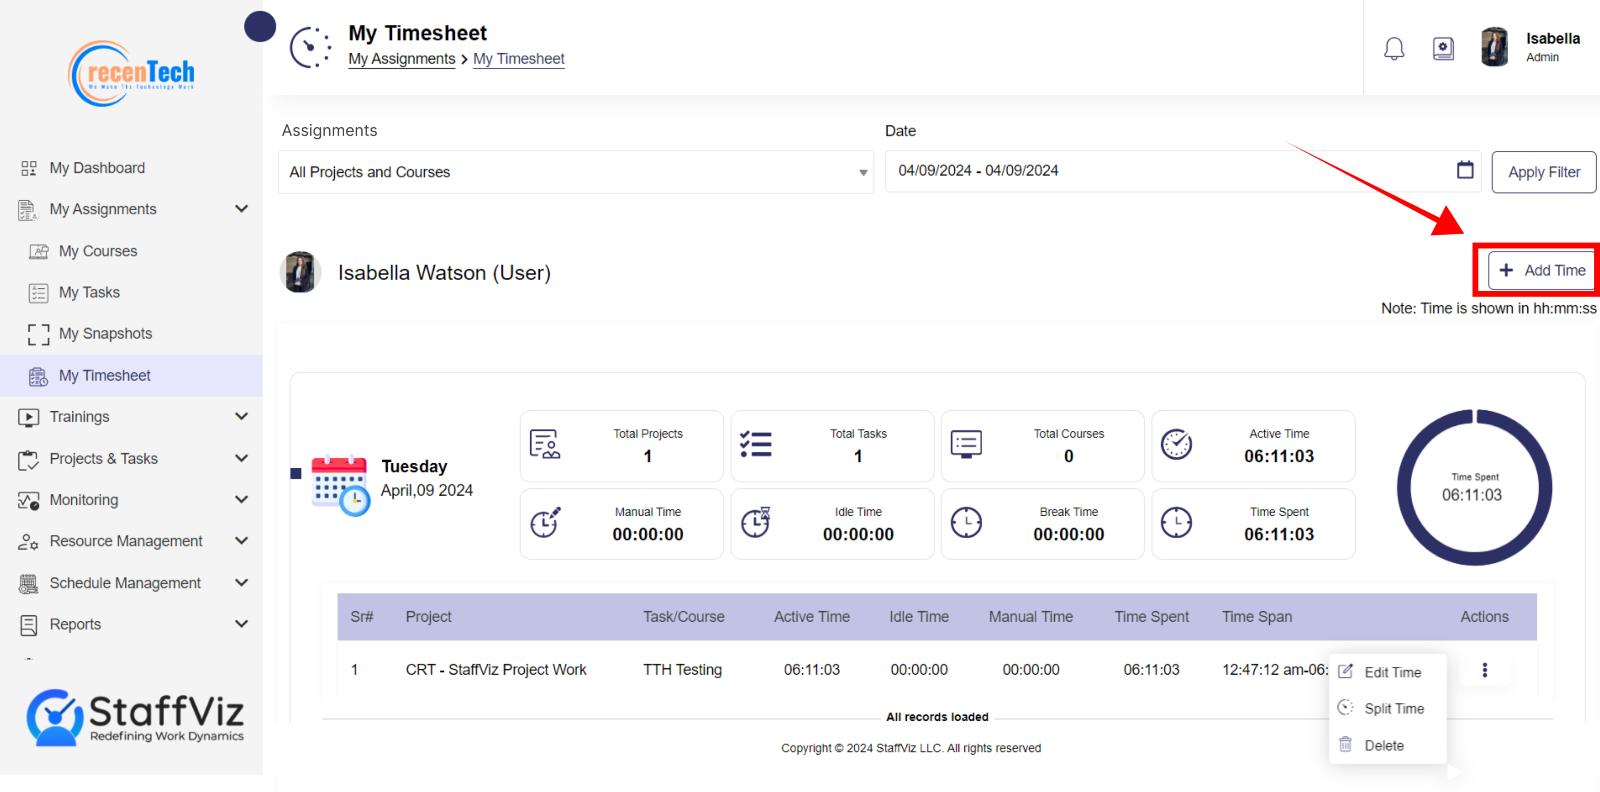
StaffViz will provide you with the following data.
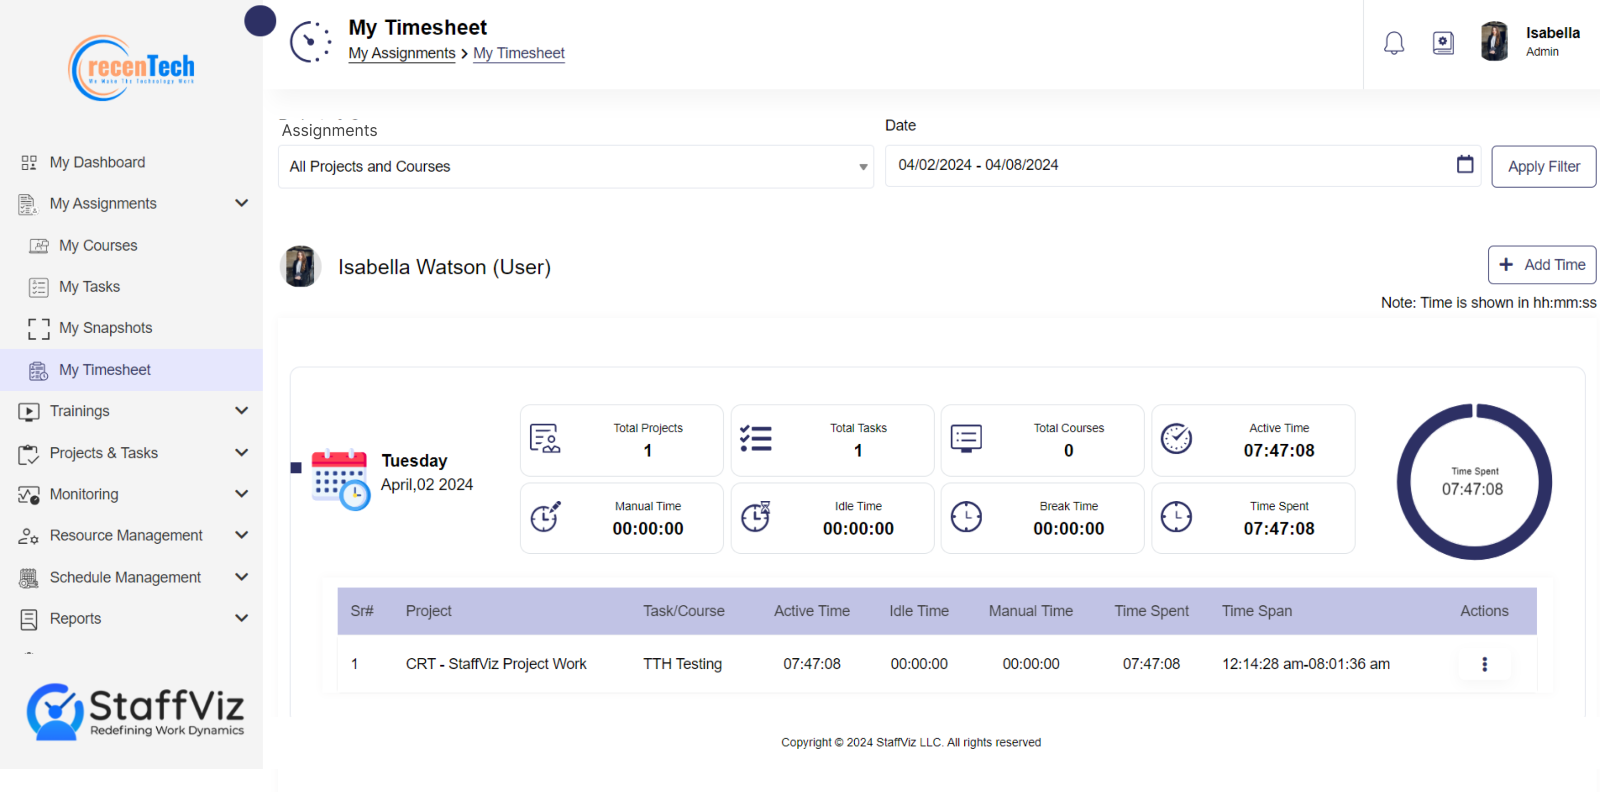
Day, Date and Month: On the left side of the of your screen you can see the day, date, month, and year to which the data belongs.
Total Projects: Total Number of projects assigned to the employee on this date.
Total Tasks: Total number of Tasks assigned to the employee on this date.
Total Courses: Total courses assigned to the employee.
Active Time: Total productive hours excluding the break.
Manual Time: Time added by the admin in case of any error or inconvenience.
Idle Time: Non-productive time spent other than the break time.
Break Time: Time spent during the allowed break time.
Time Spent: Total Time spent on a specific task.
Add Time Button: Use to add time manually. Learn more about this Add Time option in “how to add time manually” guide.
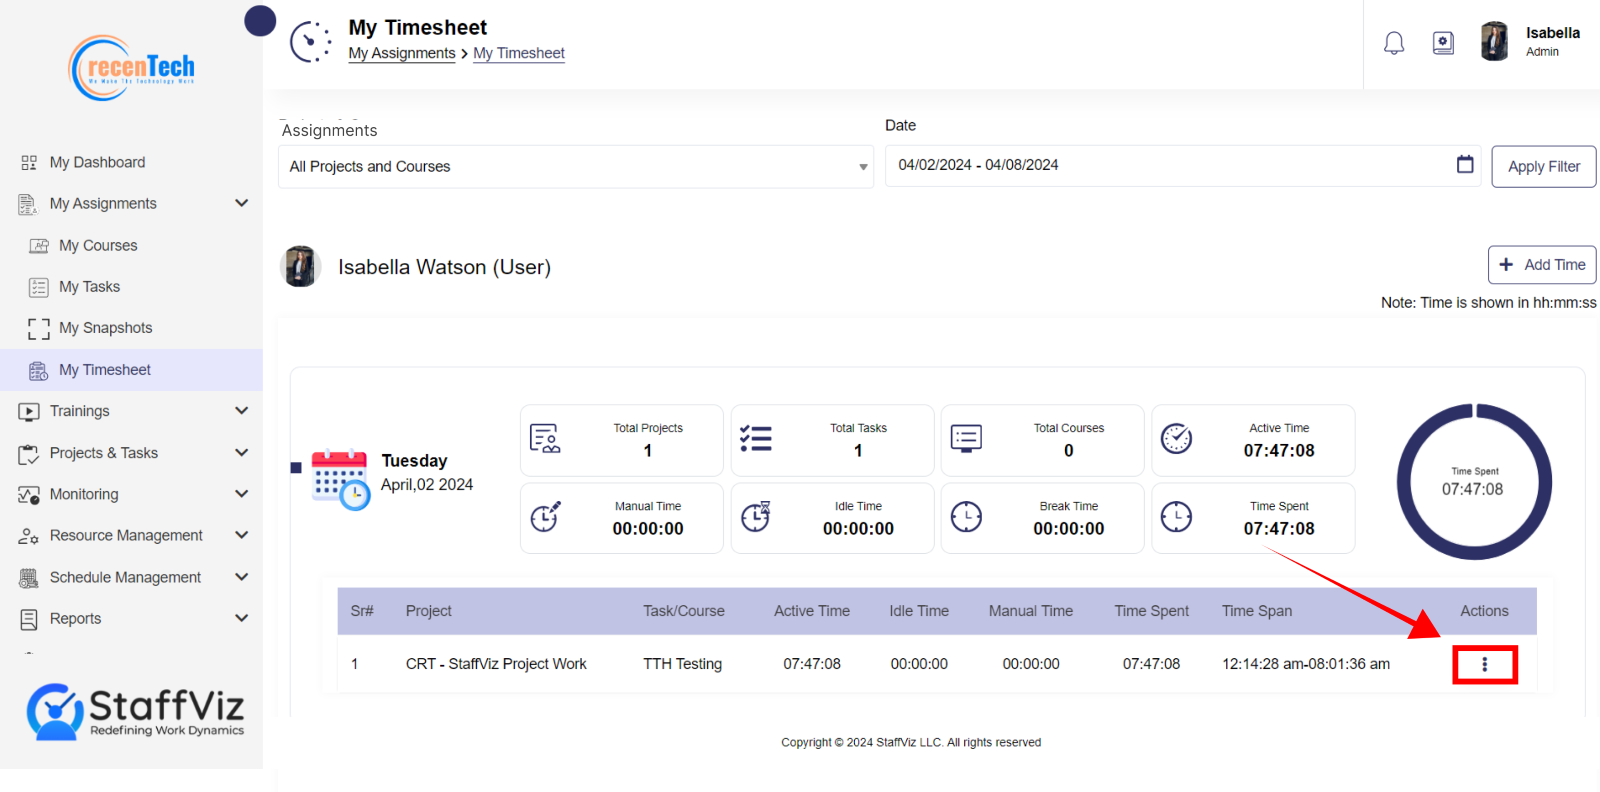
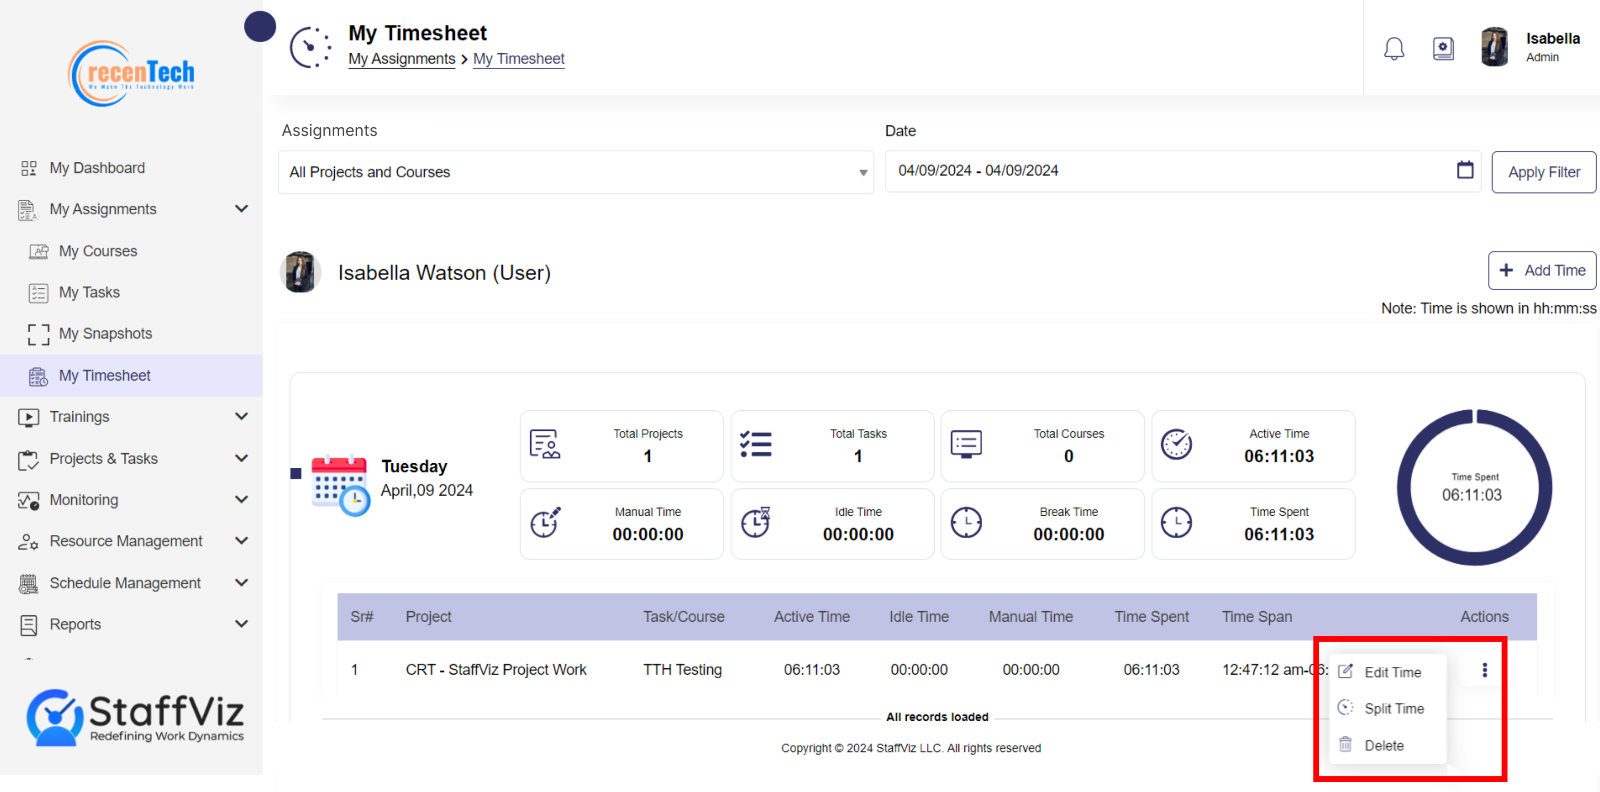
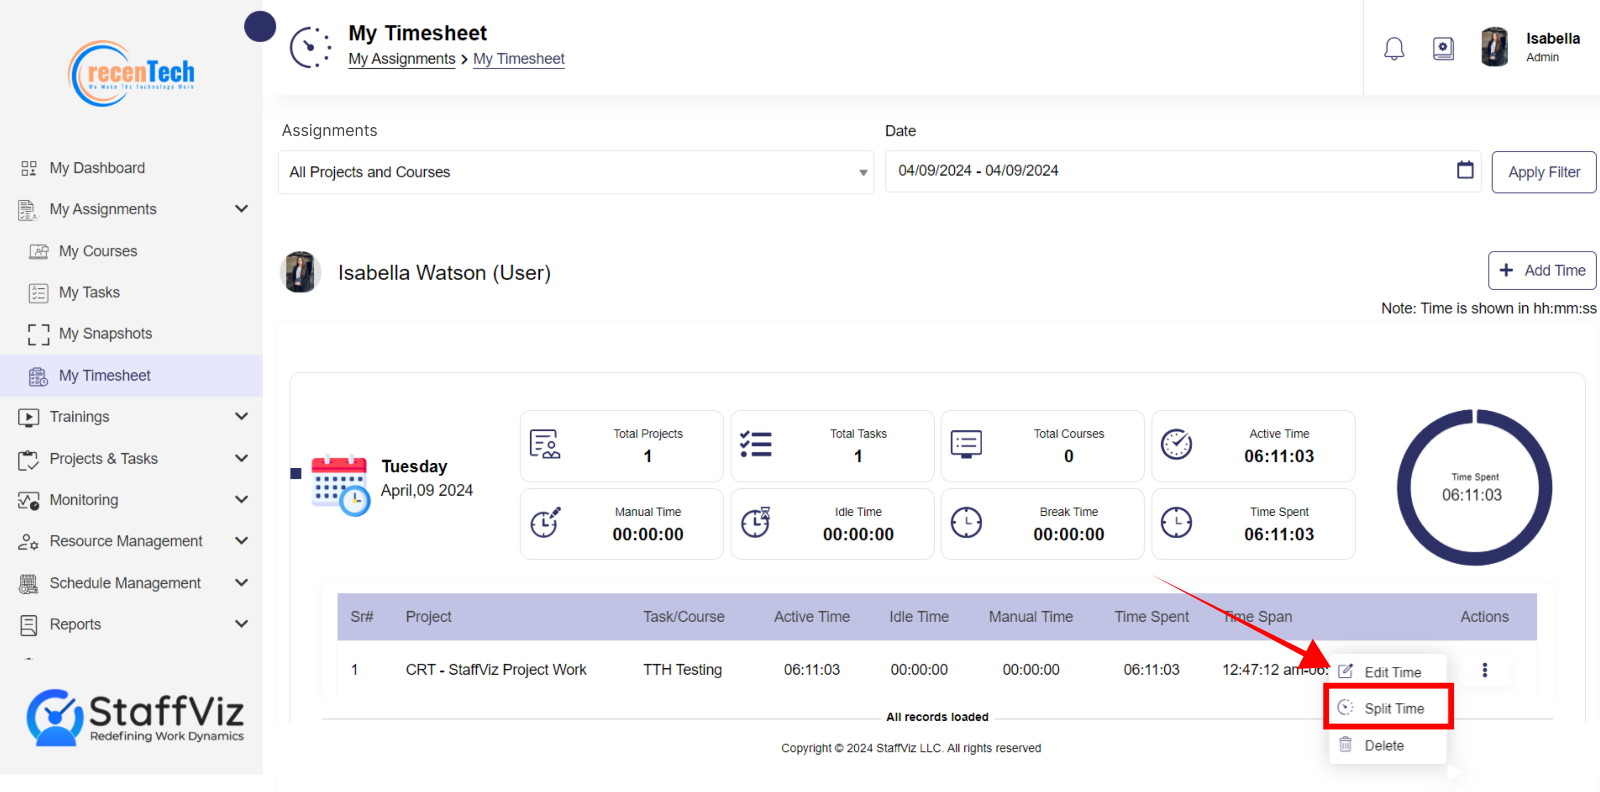
Actions: Action column allows users to edit, split or delete the time for the specific task, or assignment. All these options are explained in detail below.
Section 3.2: How to Edit, Split, or Delete Your Time
Step 1
Please click the three Action icon.
Step 2
Three options will appear.
Edit, Split Time, and Delete.
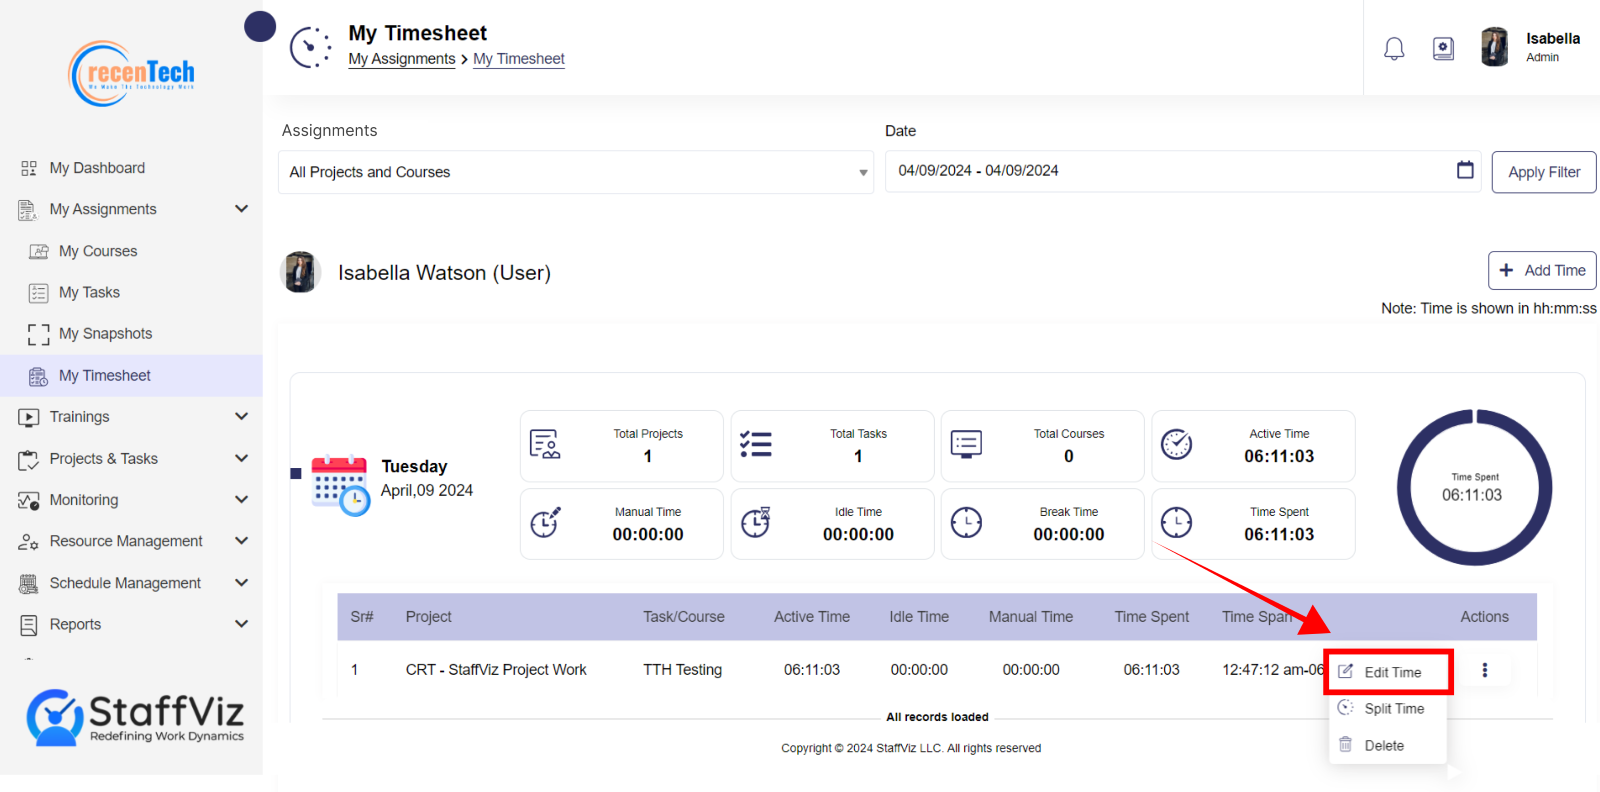
Section 3.2.1: Edit Time
Edit option allows user to make an edit time request to the admins in case of any human error or omission.
Note that users can edit time within the specific time span of the slot they are currently editing time.
Step 1
Please click the Edit Time option.
Step 2
Upon clicking the edit time button, a new Edit Time pop up window will appear on your screen.
Please fill out the Edit Time Entry form following the given instructions.
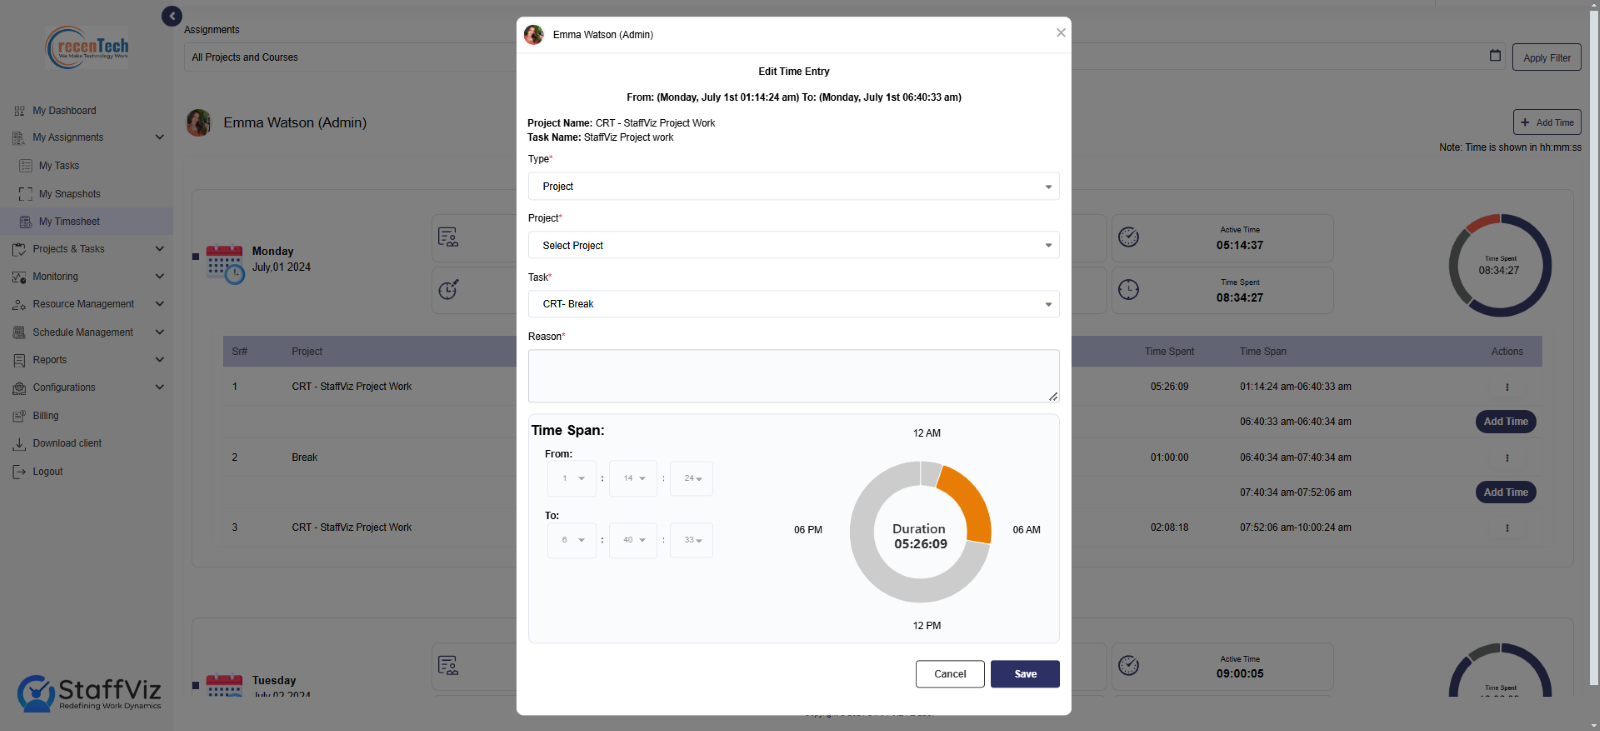
Type: Select the project, courses or break from the dropdown options.
Project/Courses/Break: Please select the relevant project, course, break for which you want to edit the time.
Task: In case you selected the project in the previous option, you’ll have to select the task or course for which you want to change the time. In case you select break option in the previous section, you won’t see any dropdown.
Reason: Give a valid reason to justify the time.
Date: Please select the date from the calendar for which the time needs to be edited.
From: Please select the starting time here.
To: Please select the completion time.
Time Span: The time span section showcases the time slot you are editing.
Please note that the edit time option allows you to shift your project, break, or course time. In the edit time section, you cannot split or make any change to the time span.
For example, if you accidentally press the break button rather than starting a project and want to rectify it, you can use edit time option to shift your specific time to project from the break.
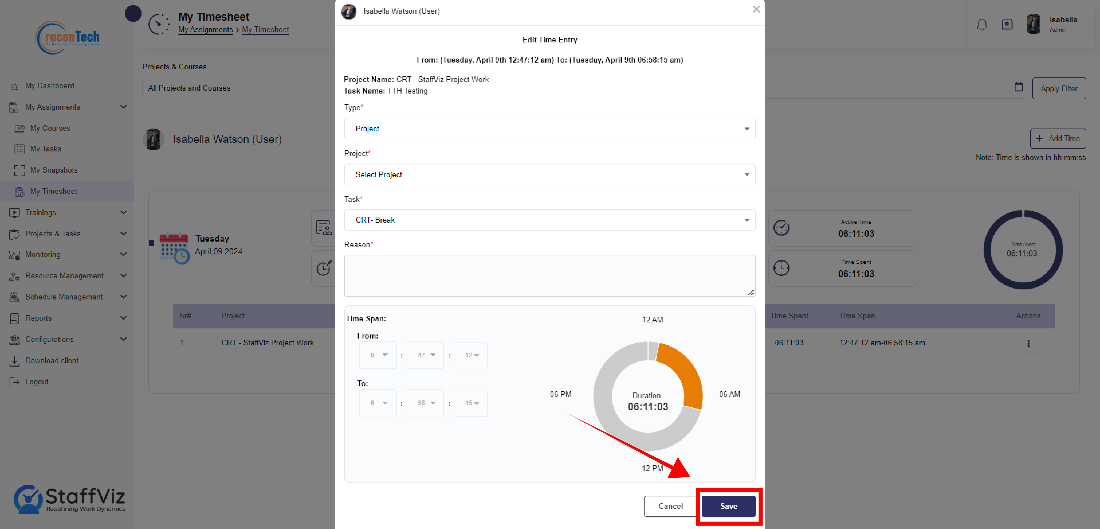
Step 3
Please click the Save button and the time will be edited on the panel.
Section 3.2.2: Split Time
The split time option allows users to request for the allocation of a part of pre-tracked timeslot between the assigned projects and tasks.
For an instance, you need to work on project A and project B. You started the clock at 9Am and work for 4 hours on both projects but forgot to shift your clock to project B. Now, with split time option, you can request the admin to split the time among project A and B. Admin will allocate your selected part of time slot to project B.
Please follow the steps below to make a split time request.
Step 1
Please click the Split Time option.
Step 2
Upon clicking the Split time button, a new Split Time Entry pop up window will appear on your screen.
Please fill out the Split Time Entry form following the given instructions.
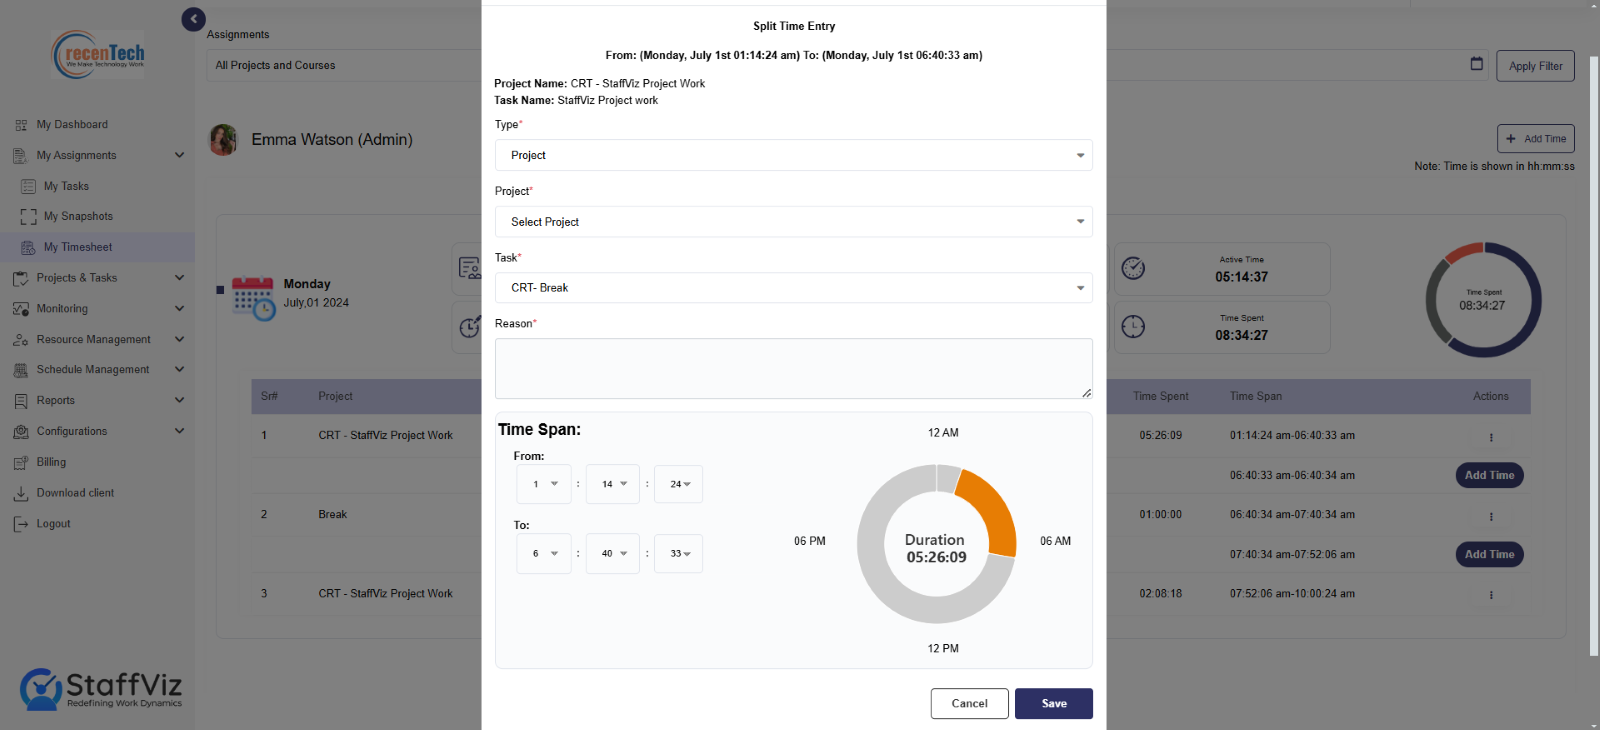
Type: Select the project, courses or break from the option to which you want to shift the split time.
Project/Courses/Break: Please select the relevant project, course, break for which you want to split the time.
Task: In case you selected the project or courses in the previous option, you’ll have to select the task or course for which you want to split the time. If you select break option in the previous section, you won’t see this dropdown.
Reason: Give a valid reason to justify the action.
Date: Please select the date from the calendar for which the time needs to be spliced.
From: Please select the starting time for split here.
To: Please select the completion time for the split.
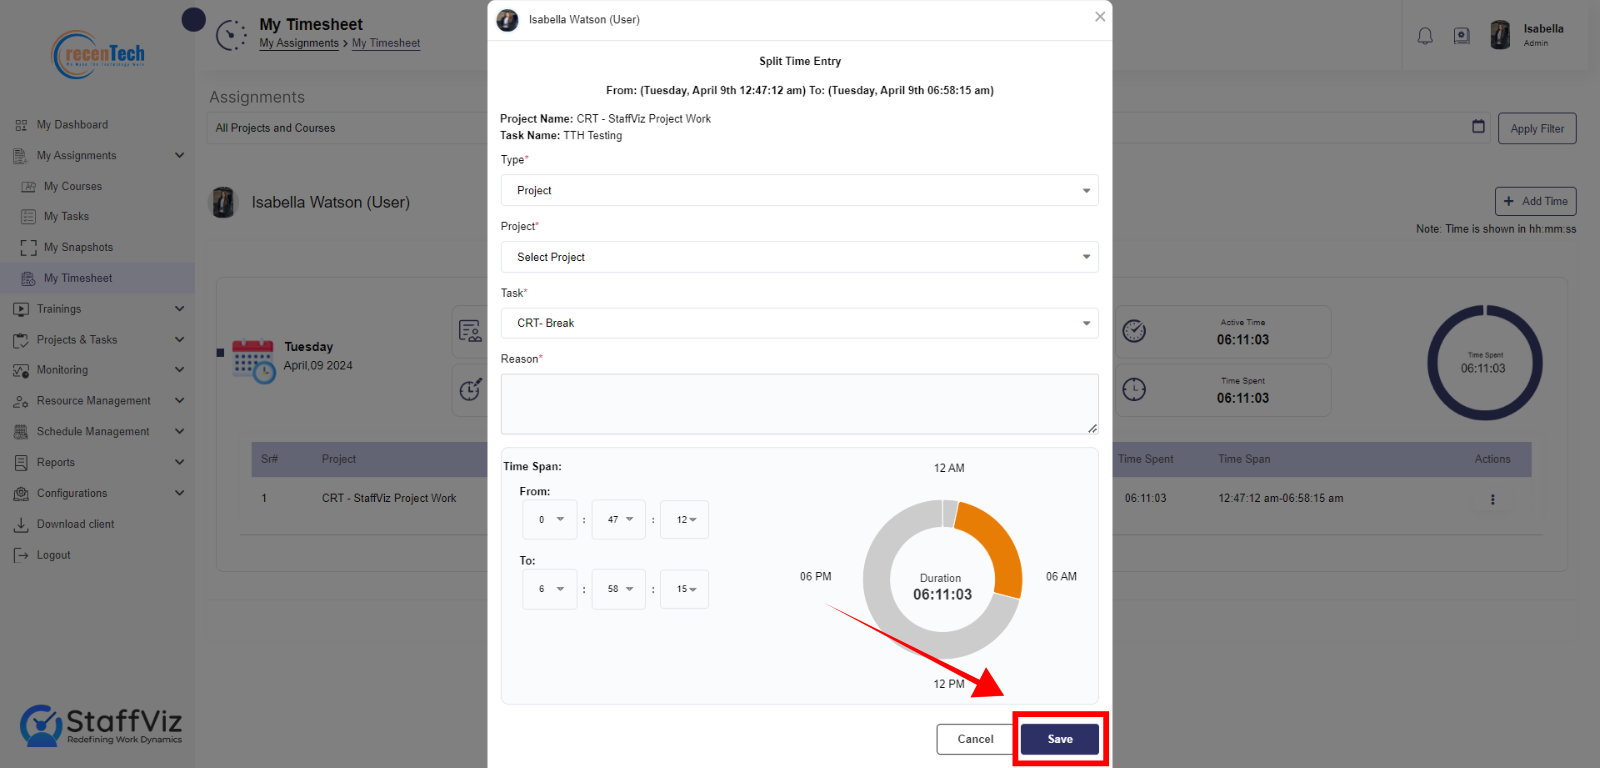
Step 4
Please click the Save button and the time will split among the projects.
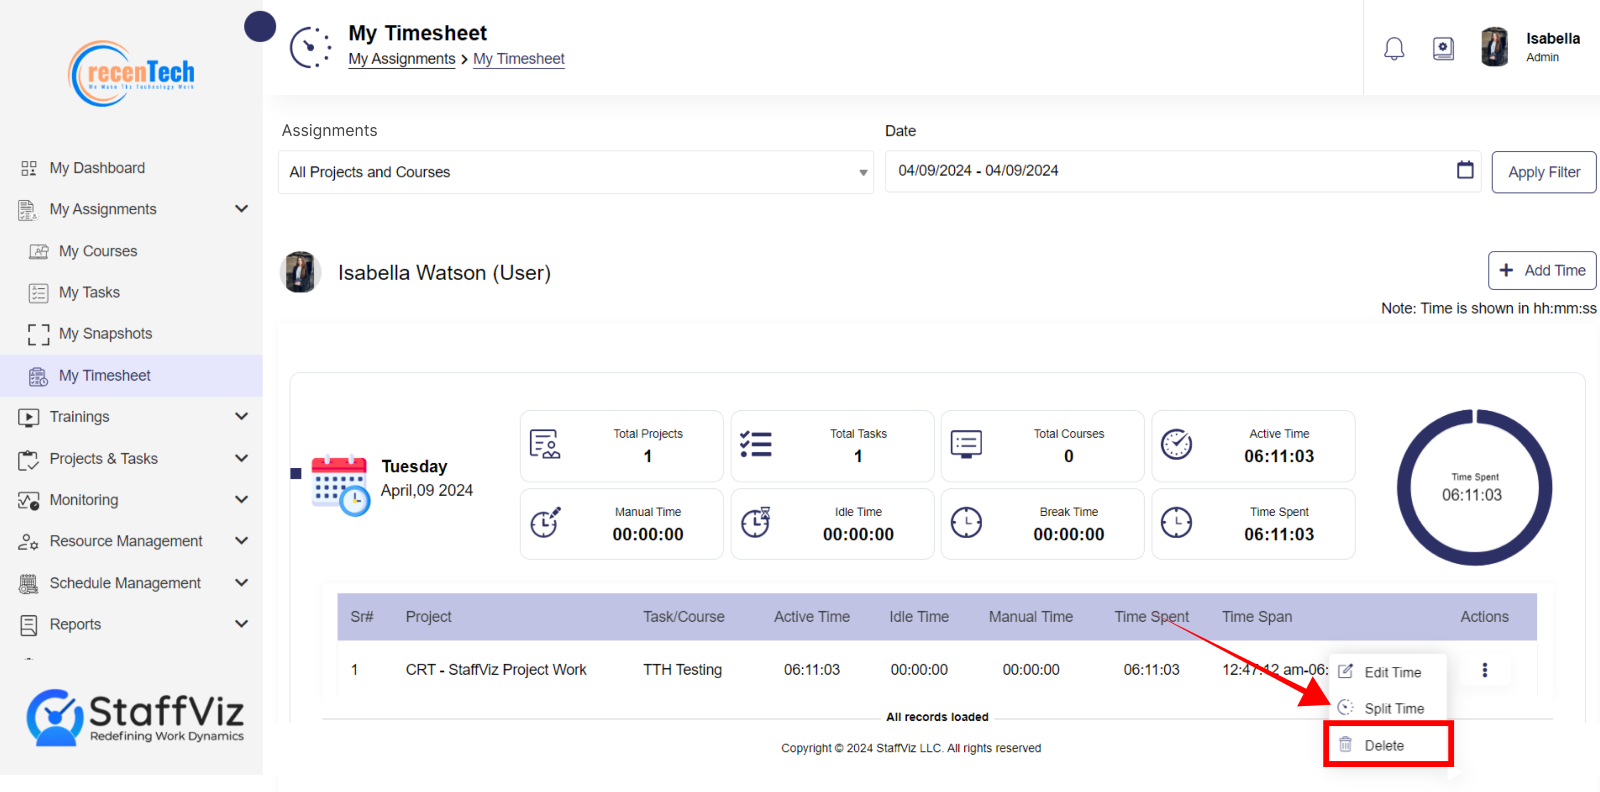
Section 3.2.3: Delete Time
Click the Action>Delete button and timeline row will be erased.
Keep in mind that when you delete an entry between the series three or more active slots, you’ll need to justify the time by adding details using the Add time button.
Section 3.3: How To Make a Manual Add Time Request
In case the StaffViz did not calculate a specific time for the task due to some human error, the mistake can be rectified by the user. In such cases, StaffViz admins can allow users to add time to the task manually.
Please follow further instructions to add time manually.
Step 1
After opening the Timesheet data for a specific tasks/project by following the above-mentioned steps, please navigate to the top right of your screen and look for the Add Time button.
Step 2
Upon clicking the Add Time button, a new pop-up window form will appear. Please fill in the following information by following the given instructions.
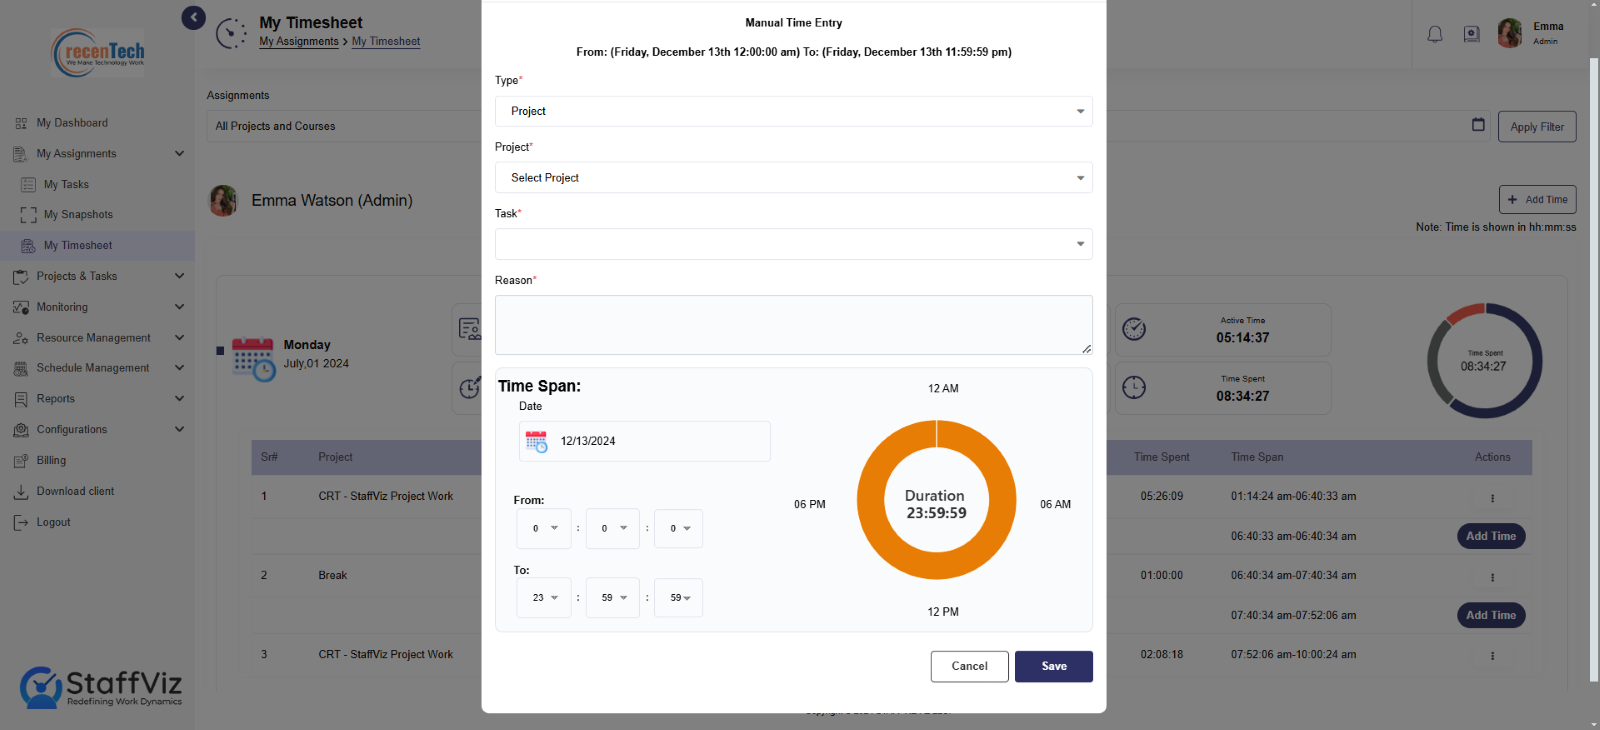
Type: Please select from Project, Course, or Break.
Project/Break/ Course: Please select the specific course/ project/ break in which you want to add time manually.
Task: Select a specific task from the dropdown where all the assigned tasks are shown as options.
Reason: Give a valid reason to add time for course/project/ break.
Time Span: Select the date from the calendar to which the manual time needs to be added.
Select Date: Here you need to select the date for which you want to rectify your time.
Select “From” Time: Timings are shown as Hours | Minutes | Seconds. Please fill up the start time.
Select The “To” Timing: Please select the end time to which you want to add the manual time.
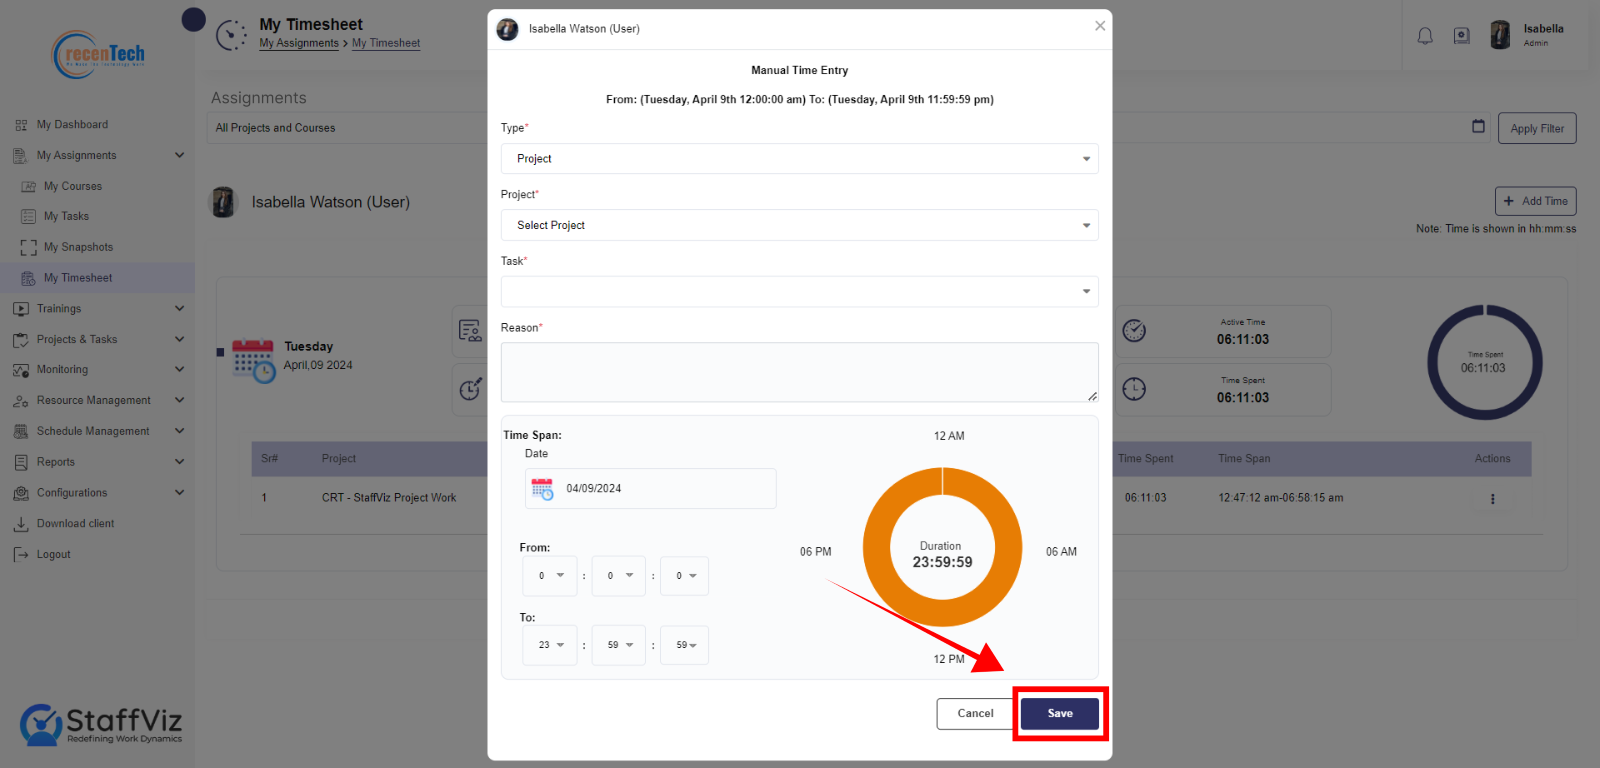
Step 3
Please click the save button and manual time will be added to your specific task/project/break.
And that’s all the information you need to keep your time management at the best.
Need further assistance? Contact us at support@staffviz.com and let StaffViz assist you!