Introduction
Welcome to StaffViz Dashboard. This guide will explain
about My Dashboard in StaffViz which is the default page in StaffViz web
application, which means whenever you login to StaffViz, you will land on this
page. StaffViz panel is a window performance panel for each user. It allows users/employees
to see their productive working hours, break status, tasks progress, assigned
projects, and much more on My dashboard.
We’ll go through the My dashboard and guide you
through all the sections step by step. For this purpose, you need to start
with:
The user panel has three options. Each serves a different
purpose.
Section 1.1: Notifications
Section 1.2: Guides
Section 1.3: My Account
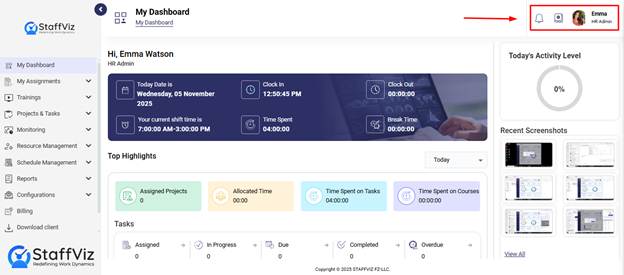
We’ll discuss each of them in this guide.
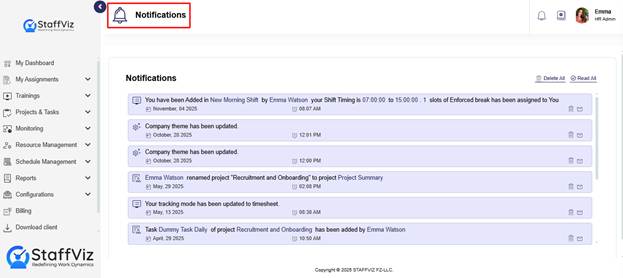
Section 1.1: Notifications
The notifications section is on the top right corner of
the main dashboard. As the name suggests, users and admins get all the updates
as well as activity notifications here.

User/Admins can delete these notifications using the Delete
All button.
Read All button allows users to mark all notifications as
read.
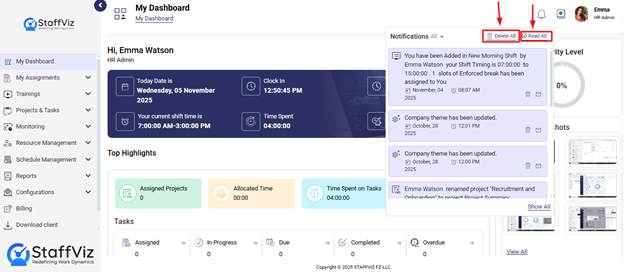
Show All button provides users access to all the previous
notifications.

On the All-Notifications panel, users and admins can also
delete the specific notification using the delete button.
Section 1.2: User Guides
StaffViz provides users and admins with complete
guidelines (like the one you are reading) to help them navigate and understand
the options and functions within StaffViz.
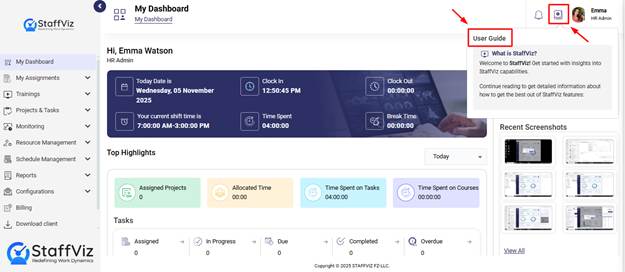
Clicking the guides button opens all the guides in the
pop-up window, where all guides are listed on the left and on the right is all
the content of the guide.
Section 1.3: My Account
My account section is used for personal account settings,
switching between multiple companies, and even creating new company accounts.
Your Log Out option for StaffViz account is also in the dropdown.
Let’s discuss each option and their function in detail.
1.3.1: How to Switch Company
Follow the given steps to switch companies.
Step 1: Click Switch Company
To switch between companies, please click the Switch
Company button.
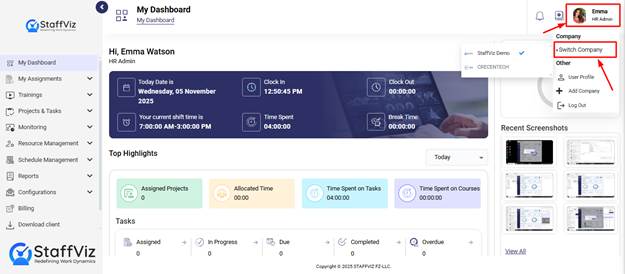
Step 2: Select the Company
From the list, please select the company you want to
switch to.

With just 2 easy steps, you can switch companies to
StaffViz.
1.3.2: User Profile
The User profile section is for all the StaffViz users
and is used to update your information.

Please follow the guidelines to update your user profile.
Step 1: Click User Profile
Click the user profile button, and a user profile
form will open.
Step 2: Fill the Form
The form has the following entries. Among which some can
be updated, some may not.
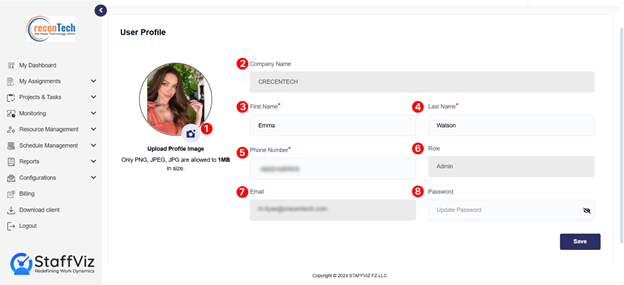
1.
Profile Image: Use the
camera icon to upload your image.
2.
Company Name: Company
you are currently working in. (Not Editable)
3.
First Name: User’s
first name.
4.
Last Name: Father
name or can be another legal last name.
5.
Phone Number: Fill in
your phone number here.
6.
Role: Your designation in the company. (Not
Editable)
7.
Email: Your professional email address
provided by the company. (Not Editable)
8.
Password: Enter your
new password to update the old one.
Step 3: Save Info
Once all the information is updated, please click the save
button to complete the process.

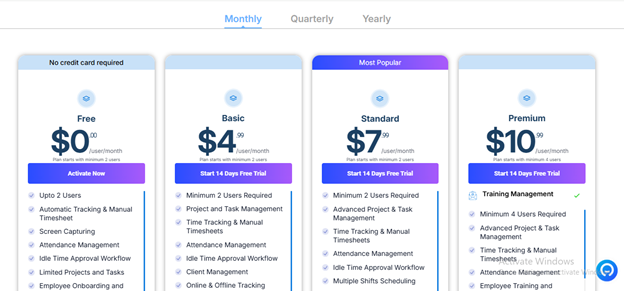
1.3.3: Add A Company
The option directs the user to the StaffViz website,
where you can select the pricing plan for the new company.
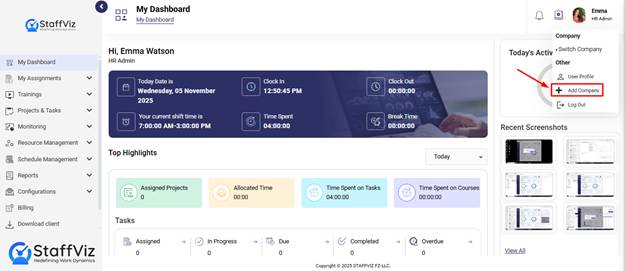
Clicking Add a Company will open this StaffViz webpage,
so you can register your new company here.
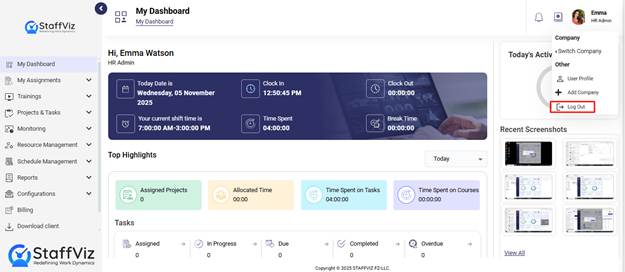
1.3.4: Logout
The Logout button in StaffViz allows users to
securely exit their accounts, ensuring the protection of personal and
organizational data.
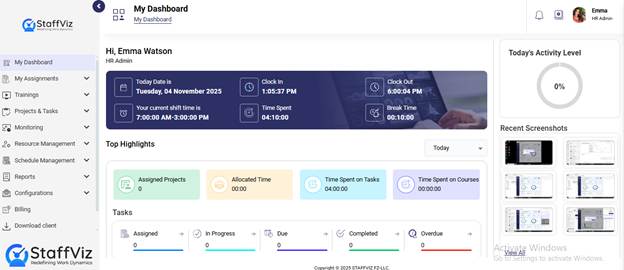
Section 2: The Welcome Bar
This section
provides a quick overview of your daily attendance and helps ensure your
working hours are accurately recorded.
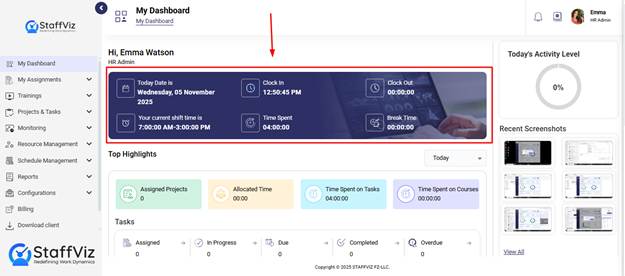
Here’s what each
field shows:
·
Today’s Date: Displays the current date.
·
Current Shift Time: Shows your assigned shift hours for the day.
·
Clock In: The exact time
when you start your workday.
·
Clock Out: The time when you end your shift (will show once you clock out).
·
Time Spent: The total time you’ve worked since clocking in.
·
Break Time: The total duration of breaks taken during your shift.
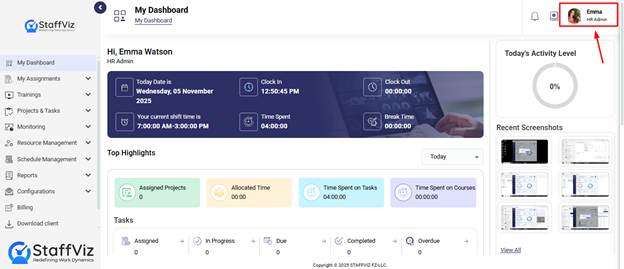
Section 3: Today’s Activity Level
On the top right corner of your screen is your Today’s
Activity Level. StaffViz calculates an employee’s activity level based on the
employee’s engagement during the task and activities. StaffViz uses Key Release
(from mouse and keyboard) to calculate user’s activity level.

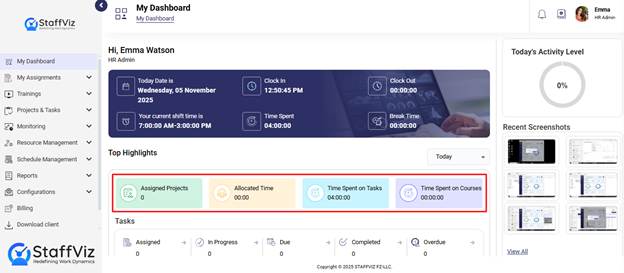
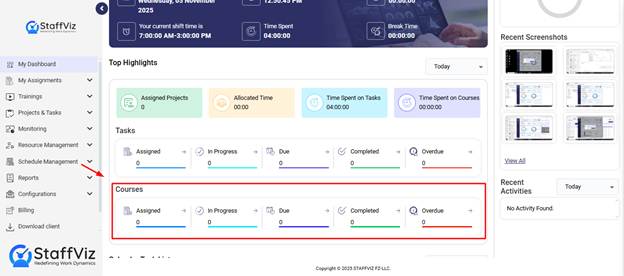
Section 4: Top Highlights
The top headlights section has a further three sections
to display the employee’s overall tasks, Courses, and time management.
4.1: Time and Project Cards
4.2: Tasks
4.3: Courses
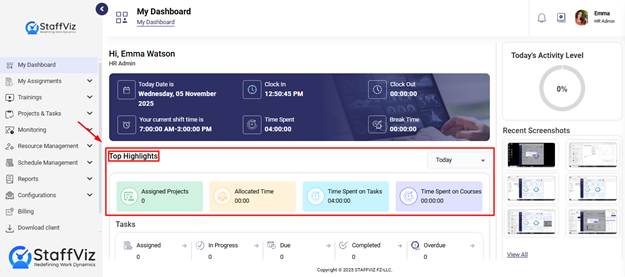
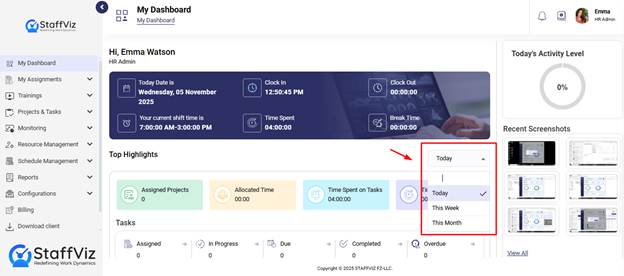
Top Highlights section has a time filter which is on
the left side of the screen. You can use this option to see today's
task/courses summary, course/task summary of last 7 days or courses or tasks
summary of last 30 days.
Section 4.1: Time and Project Cards
Time and Project Cards provide the following information.
1.
Assigned Project: Total
number of projects assigned to you within today/ in the last week/ in a month
(based on the time filter you’ve applied).
2.
Allocated Time: Allocated
time is the total time provided/assigned to complete all the assigned tasks
today/ in the last week/ in a month (based on the time filter you’ve applied).
3.
Time Spent on Tasks: Time spent
on all the tasks today/ in a week/ in a month.
4.
Time Spent on Courses: Total time
spent on the courses today/ in a week/in a month.
Section 4.2: Tasks
The task section provides information about the tasks.
Each tab in this section holds the following information.
The following information can be for a day, week, or month
based on the time filter you’ve applied for this section.
1.
Assigned: Total
number of tasks assigned to you.
2.
In-Progress: The number
of tasks currently in-progress.
3.
Due: Total assigned tasks that have not
started yet.
4.
Completed: Completed
sections display the number of completed tasks.
5.
Overdue: This tab
shows the tasks for which the assigned time has been over.
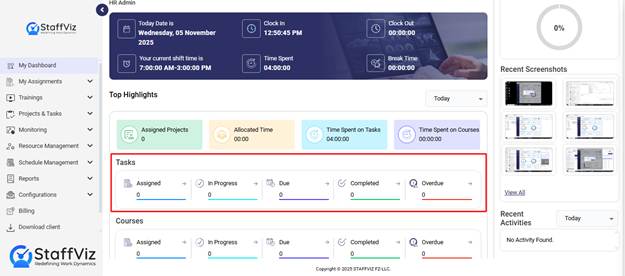
Section 4.3: Courses
The task section provides information about your course
progress. The displayed information adapts to the selected time filter: day,
week, or month. Each tab in this section holds the following information.
1.
Assigned: Total
number of courses assigned to you.
2.
In-Progress: The number
of courses currently in progress.
3.
Due: Total assigned courses that have not
started yet.
4.
Completed: Completed
sections display the completed courses.
5.
Overdue: This tab
shows the courses for which the assigned time has been over.
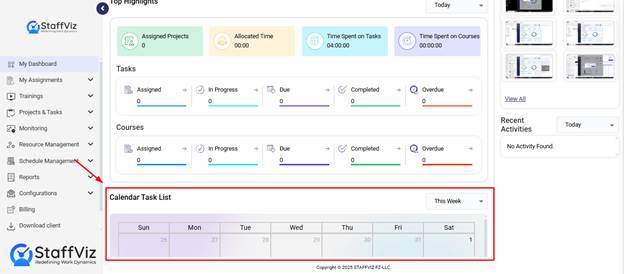
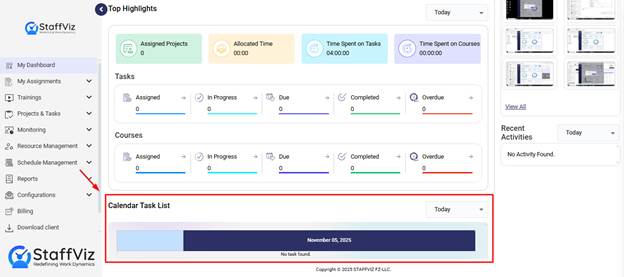
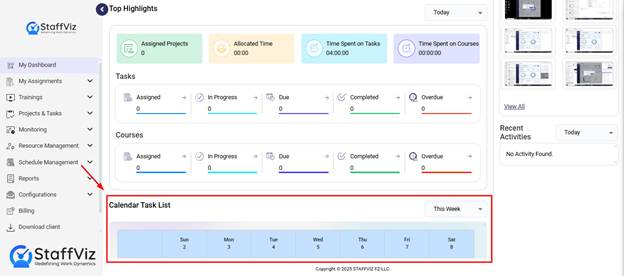
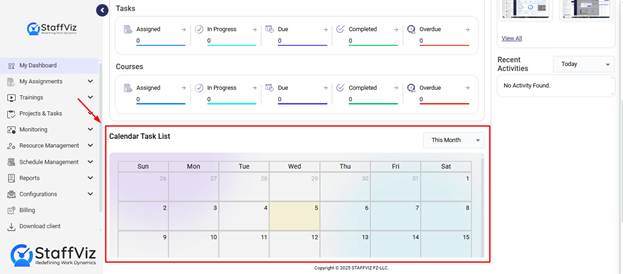
Section 5: Calendar Task Lists
Scroll down on the StaffViz Dashboard and you’ll see
Calendar Tasks. This section also provides information about your task activity
on a calendar.
Calendar views are different for different durations.
Today’s Calendar View (One Day)
On the Calendar all your tasks are listed.
Weekly Calendar View (Recent 7 Days)
On this Calander all your weekly tasks are listed on
their subsequent date.
Monthly Calendar View (Last 30 Days)
The monthly calendar showcases all the recurring and
one-time tasks.
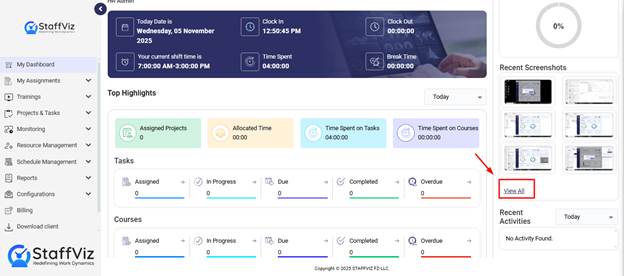
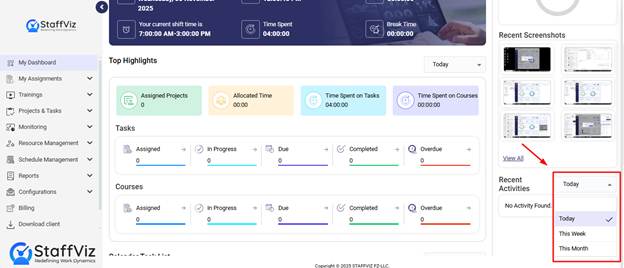
Section 6: Recent Screenshots
On the right side of your screen, all your recent
screenshots can be seen. StaffViz takes screenshots randomly for surveillance
purposes. Users can check their recent activity through these screenshots that
are captured.
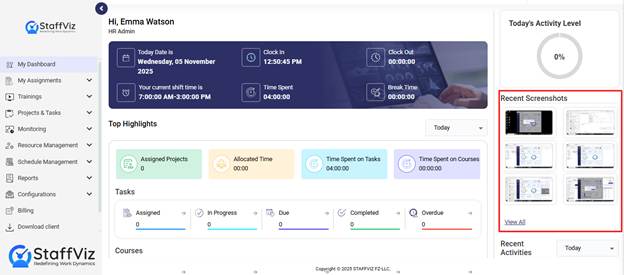
Under the Recent Screenshots section, there’s a View
All button. This button leads you to my snapshots section that is a
sub-section of my assignment module. We’ll discuss my snapshots section in
detail in further guides.
Section 7: Recent Activities
The Recent tabs section is on the right side of your
screen, right beneath the Recent Screenshots section. This section holds all
the information about all your activities on the StaffViz. Whether you start a
new course or complete a task, StaffViz will keep track of all.
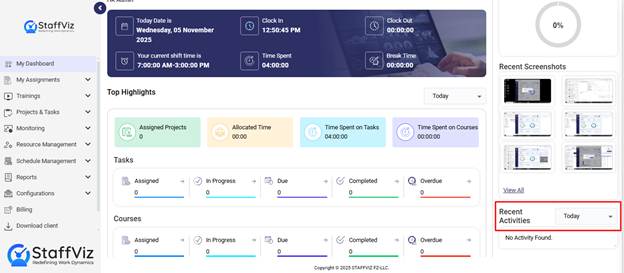
The Recent Activities section has a time filter
which is on the left side of the screen. This filter has dropdown options like
Today, This Week, and This Month. You can use this option to see today’s
activities, recent activity summary of last 7 days, or activity summary of last
30 days.
With the overview of the Recent Activates section, the
overall StaffViz Dashboard is completely explained.
Conclusion
This is how you can view My Dashboard in StaffViz. For
further information contact us at support@StaffViz.com